Konica Minolta bizhub C552 bizhub C452/C552/C552DS/C652/C652DS Network Adminis - Page 251
Settings under Store Address, Description
 |
View all Konica Minolta bizhub C552 manuals
Add to My Manuals
Save this manual to your list of manuals |
Page 251 highlights
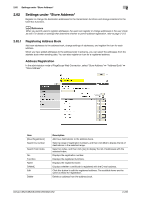
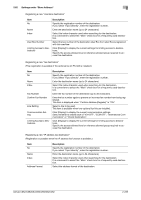
2.62 Settings under "Store Address" 2 Registering a new "E-mail" destination Item No Name Index E-mail Registration of Certification Information Limiting Access to Destinations Description Specify the registration number of the destination. If you select "Input directly", enter the registration number. Enter the destination name (up to 24 characters). Select the index character used when searching for the destination. It is convenient to select the "Main" check box for a frequently used destination. Enter the E-mail address of the destination (up to 320 characters). Select this check box to register certificate information. Click [Browse] to specify the certificate to be registered. Only the DER (Distinguished Encoding Rules) formatted file is supported for registration of certificate information. To delete the registered certificate information, select "Deletion of Certification Information". You cannot register a certificate if the E-mail address of the destination does not match that of the certificate. Before registering a certificate, check that those E-mail addresses are the same. Click [Display] to display the current settings for limiting access to destinations. Specify the access allowed level or reference allowed group required to access this destination. Registering a new "FTP destination" Item No Name Index Host Address File Path User ID Password is changed Password anonymous PASV Mode Proxy Port No. Limiting Access to Destinations Description Specify the registration number of the destination. If you select "Input directly", enter the registration number. Enter the destination name (up to 24 characters). Select the index character used when searching for the destination. It is convenient to select the "Main" check box for a frequently used destination. Enter the IP address of the destination FTP server. Format: *.*.*.* (Asterisk * can be 0 to 255) If the DNS server has already been configured, you can enter the host name instead. If "IPv6" is set to "ON", you can also specify the IPv6 address. Specify the destination directory (up to 127 bytes). Enter the user ID to log in to the destination FTP server (up to 63 bytes). Select this check box to change the password. This item is displayed when editing the registered information. Enter the password to log in to the destination FTP server (up to 63 bytes, excluding space and "). Select whether to allow anonymous users to access the FTP server. Select whether to communicate in PASV mode. Select whether to use a proxy server. Enter the port number. Click [Display] to display the current settings for limiting access to destinations. Specify the access allowed level or reference allowed group required to access this destination. bizhub C652/C652DS/C552/C552DS/C452 2-233
-
 1
1 -
2
-
3
-
4
-
5
-
6
-
7
-
8
-
9
-
10
-
11
-
12
-
13
-
14
-
15
-
16
-
17
-
18
-
19
-
20
-
21
-
22
-
23
-
24
-
25
-
26
-
27
-
28
-
29
-
30
-
31
-
32
-
33
-
34
-
35
-
36
-
37
-
38
-
39
-
40
-
41
-
42
-
43
-
44
-
45
-
46
-
47
-
48
-
49
-
50
-
51
-
52
-
53
-
54
-
55
-
56
-
57
-
58
-
59
-
60
-
61
-
62
-
63
-
64
-
65
-
66
-
67
-
68
-
69
-
70
-
71
-
72
-
73
-
74
-
75
-
76
-
77
-
78
-
79
-
80
-
81
-
82
-
83
-
84
-
85
-
86
-
87
-
88
-
89
-
90
-
91
-
92
-
93
-
94
-
95
-
96
-
97
-
98
-
99
-
100
-
101
-
102
-
103
-
104
-
105
-
106
-
107
-
108
-
109
-
110
-
111
-
112
-
113
-
114
-
115
-
116
-
117
-
118
-
119
-
120
-
121
-
122
-
123
-
124
-
125
-
126
-
127
-
128
-
129
-
130
-
131
-
132
-
133
-
134
-
135
-
136
-
137
-
138
-
139
-
140
-
141
-
142
-
143
-
144
-
145
-
146
-
147
-
148
-
149
-
150
-
151
-
152
-
153
-
154
-
155
-
156
-
157
-
158
-
159
-
160
-
161
-
162
-
163
-
164
-
165
-
166
-
167
-
168
-
169
-
170
-
171
-
172
-
173
-
174
-
175
-
176
-
177
-
178
-
179
-
180
-
181
-
182
-
183
-
184
-
185
-
186
-
187
-
188
-
189
-
190
-
191
-
192
-
193
-
194
-
195
-
196
-
197
-
198
-
199
-
200
-
201
-
202
-
203
-
204
-
205
-
206
-
207
-
208
-
209
-
210
-
211
-
212
-
213
-
214
-
215
-
216
-
217
-
218
-
219
-
220
-
221
-
222
-
223
-
224
-
225
-
226
-
227
-
228
-
229
-
230
-
231
-
232
-
233
-
234
-
235
-
236
-
237
-
238
-
239
-
240
-
241
-
242
-
243
-
244
-
245
-
 246
246 -
 247
247 -
 248
248 -
 249
249 -
 250
250 -
 251
251 -
 252
252 -
 253
253 -
 254
254 -
 255
255 -
 256
256 -
257
-
258
-
259
-
260
-
261
-
262
-
263
-
264
-
265
-
266
-
267
-
268
-
269
-
270
-
271
-
272
-
273
-
274
-
275
-
276
-
277
-
278
-
279
-
280
-
281
-
282
-
283
-
284
-
285
-
286
-
287
-
288
-
289
-
290
-
291
-
292
-
293
-
294
-
295
-
296
-
297
-
298
-
299
-
300
-
301
-
302
-
303
-
304
-
305
-
306
-
307
-
308
-
309
-
310
-
311
-
312
-
313
-
314
-
315
-
316
-
317
-
318
-
319
-
320
-
321
-
322
-
323
-
324
-
325
-
326
-
327
-
328
-
329
-
330
-
331
-
332
-
333
-
334
-
335
-
336
-
337
-
338
-
339
-
340
-
341
-
342
-
343
 |
 |
