Konica Minolta bizhub C552 bizhub C452/C552/C552DS/C652/C652DS Network Adminis - Page 255
Registering a group, Group
 |
View all Konica Minolta bizhub C552 manuals
Add to My Manuals
Save this manual to your list of manuals |
Page 255 highlights
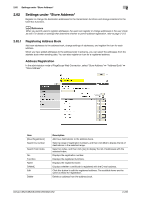
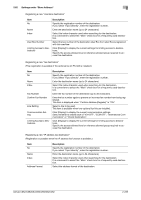
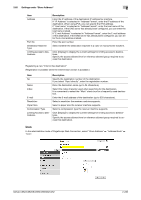
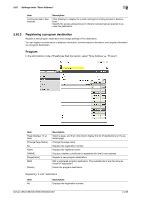
2.62 Settings under "Store Address" 2 Item No. Name Specify Icon [Search from List] Description Displays the registration number of the destination. Displays the name of the destination. Select "Specify Icon". Click this button to display the list of icons. Select the icon you want to register. 2.62.2 Registering a group Register a new group or change the settings of a registered group. You can register one or more destinations as a group. When you want to send (broadcast) the same data to multiple destinations, it is convenient to have those destinations registered as a group. To register a group, you must register the destinations to be added to the group in advance. Group In the administrator mode of PageScope Web Connection, select "Store Address" ö "Group". Item [New Registration] Search by number. No. Name Edit Delete Description Click this button to register a new group. Select a range of registration numbers, and then click [Go] to display the list of destinations in the selected range. Displays the registration number. Displays the registered name. Click this button to edit the registered group. The available items are the same as those for registration. Click this button to delete the group. Registering a "Group" destination Item Name Scan/Fax Address Check Destination Specify Icon Description Enter the destination name (up to 24 characters). From the list of destinations in the address book, select the destinations you want to add to the group. Check registered destinations. Click [Search from List], and then select an icon for a user you want to register from the displayed list. bizhub C652/C652DS/C552/C552DS/C452 2-237
-
 1
1 -
2
-
3
-
4
-
5
-
6
-
7
-
8
-
9
-
10
-
11
-
12
-
13
-
14
-
15
-
16
-
17
-
18
-
19
-
20
-
21
-
22
-
23
-
24
-
25
-
26
-
27
-
28
-
29
-
30
-
31
-
32
-
33
-
34
-
35
-
36
-
37
-
38
-
39
-
40
-
41
-
42
-
43
-
44
-
45
-
46
-
47
-
48
-
49
-
50
-
51
-
52
-
53
-
54
-
55
-
56
-
57
-
58
-
59
-
60
-
61
-
62
-
63
-
64
-
65
-
66
-
67
-
68
-
69
-
70
-
71
-
72
-
73
-
74
-
75
-
76
-
77
-
78
-
79
-
80
-
81
-
82
-
83
-
84
-
85
-
86
-
87
-
88
-
89
-
90
-
91
-
92
-
93
-
94
-
95
-
96
-
97
-
98
-
99
-
100
-
101
-
102
-
103
-
104
-
105
-
106
-
107
-
108
-
109
-
110
-
111
-
112
-
113
-
114
-
115
-
116
-
117
-
118
-
119
-
120
-
121
-
122
-
123
-
124
-
125
-
126
-
127
-
128
-
129
-
130
-
131
-
132
-
133
-
134
-
135
-
136
-
137
-
138
-
139
-
140
-
141
-
142
-
143
-
144
-
145
-
146
-
147
-
148
-
149
-
150
-
151
-
152
-
153
-
154
-
155
-
156
-
157
-
158
-
159
-
160
-
161
-
162
-
163
-
164
-
165
-
166
-
167
-
168
-
169
-
170
-
171
-
172
-
173
-
174
-
175
-
176
-
177
-
178
-
179
-
180
-
181
-
182
-
183
-
184
-
185
-
186
-
187
-
188
-
189
-
190
-
191
-
192
-
193
-
194
-
195
-
196
-
197
-
198
-
199
-
200
-
201
-
202
-
203
-
204
-
205
-
206
-
207
-
208
-
209
-
210
-
211
-
212
-
213
-
214
-
215
-
216
-
217
-
218
-
219
-
220
-
221
-
222
-
223
-
224
-
225
-
226
-
227
-
228
-
229
-
230
-
231
-
232
-
233
-
234
-
235
-
236
-
237
-
238
-
239
-
240
-
241
-
242
-
243
-
244
-
245
-
246
-
247
-
248
-
249
-
 250
250 -
 251
251 -
 252
252 -
 253
253 -
 254
254 -
 255
255 -
 256
256 -
 257
257 -
 258
258 -
 259
259 -
 260
260 -
261
-
262
-
263
-
264
-
265
-
266
-
267
-
268
-
269
-
270
-
271
-
272
-
273
-
274
-
275
-
276
-
277
-
278
-
279
-
280
-
281
-
282
-
283
-
284
-
285
-
286
-
287
-
288
-
289
-
290
-
291
-
292
-
293
-
294
-
295
-
296
-
297
-
298
-
299
-
300
-
301
-
302
-
303
-
304
-
305
-
306
-
307
-
308
-
309
-
310
-
311
-
312
-
313
-
314
-
315
-
316
-
317
-
318
-
319
-
320
-
321
-
322
-
323
-
324
-
325
-
326
-
327
-
328
-
329
-
330
-
331
-
332
-
333
-
334
-
335
-
336
-
337
-
338
-
339
-
340
-
341
-
342
-
343
 |
 |
