Konica Minolta bizhub PRO 1200/1200P bizhub PRO 1051/1200 Quick Guide - Page 20
Loading Paper (PF-703/PI-PFU), Guide Copier.
 |
View all Konica Minolta bizhub PRO 1200/1200P manuals
Add to My Manuals
Save this manual to your list of manuals |
Page 20 highlights
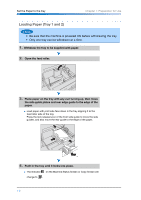
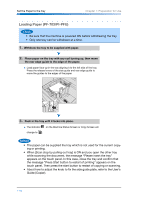
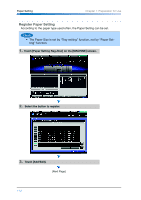
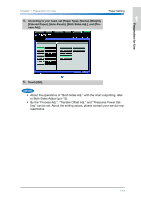
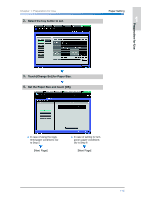
Set the Paper to the tray Chapter 1: Preparation for Use Loading Paper (PF-703/PI-PFU) • Be sure that the machine is powered ON before withdrawing the tray. • Only one tray can be withdrawn at a time. 1. Withdraw the tray to be supplied with paper. 2. Place paper on the tray with any curl turning up, then move the rear edge guide to the edge of the paper. ● Load paper face up in the tray aligning it to the left side of the tray. Press the release levers of the side guide and rear edge guide to move the guides to the edges of the paper. 3. Push in the tray until it locks into place. ● The indicator on the Machine Status Screen or Copy Screen will change to . • The paper can be supplied the tray which is not used for the current copying or printing. • When [Scan stop by pulling out tray] is ON and you open the other tray while scanning the document, the message "Please insert the tray" appears on the touch panel. In this case, close the tray and confirm that the message "Press Start button to restart of printing" appears on the touch panel. Then press the start button to restart of copying or scanning. • About how to adjust the knob to fix the side guide plate, refer to the User's Guide (Copier). 1-10
-
 1
1 -
2
-
3
-
4
-
5
-
6
-
7
-
8
-
9
-
10
-
11
-
12
-
13
-
14
-
 15
15 -
 16
16 -
 17
17 -
 18
18 -
 19
19 -
 20
20 -
 21
21 -
 22
22 -
 23
23 -
 24
24 -
 25
25 -
26
-
27
-
28
-
29
-
30
-
31
-
32
-
33
-
34
-
35
-
36
-
37
-
38
-
39
-
40
-
41
-
42
-
43
-
44
-
45
-
46
-
47
-
48
-
49
-
50
-
51
-
52
-
53
-
54
-
55
-
56
-
57
-
58
-
59
-
60
-
61
-
62
-
63
-
64
-
65
-
66
-
67
-
68
-
69
-
70
-
71
-
72
-
73
-
74
-
75
-
76
-
77
-
78
-
79
-
80
-
81
-
82
-
83
-
84
-
85
-
86
-
87
-
88
-
89
-
90
-
91
-
92
-
93
-
94
-
95
-
96
-
97
-
98
-
99
-
100
-
101
-
102
-
103
-
104
-
105
-
106
-
107
-
108
-
109
-
110
-
111
-
112
-
113
-
114
-
115
-
116
-
117
-
118
-
119
-
120
-
121
-
122
-
123
-
124
-
125
-
126
-
127
-
128
-
129
-
130
-
131
-
132
-
133
-
134
 |
 |
