Kyocera C220N User Guide - Page 45
Maintenance, OPERATION GUIDE, Cleaning the Printer
 |
UPC - 632983011973
View all Kyocera C220N manuals
Add to My Manuals
Save this manual to your list of manuals |
Page 45 highlights
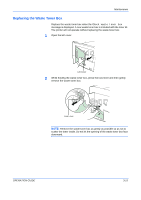
Maintenance 6 Insert the new waste toner box as shown in the figure below. When the box is set correctly, it will snap into place. New Waste Toner Box 7 Make sure that the waste toner box is correctly inserted and close the left cover. After replacing the toner containers and the waste toner box, clean the main charger units and the paper transfer unit. For instructions, see Cleaning the Printer on page 3-8. OPERATION GUIDE 3-17
-
 1
1 -
2
-
3
-
4
-
5
-
6
-
7
-
8
-
9
-
10
-
11
-
12
-
13
-
14
-
15
-
16
-
17
-
18
-
19
-
20
-
21
-
22
-
23
-
24
-
25
-
26
-
27
-
28
-
29
-
30
-
31
-
32
-
33
-
34
-
35
-
36
-
37
-
38
-
39
-
 40
40 -
 41
41 -
 42
42 -
 43
43 -
 44
44 -
 45
45 -
 46
46 -
 47
47 -
 48
48 -
 49
49 -
 50
50 -
51
-
52
-
53
-
54
-
55
-
56
-
57
-
58
-
59
-
60
-
61
-
62
-
63
-
64
-
65
-
66
-
67
-
68
-
69
-
70
-
71
-
72
 |
 |

Maintenance
OPERATION GUIDE
3-17
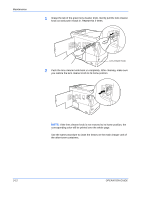
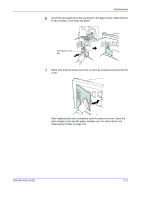
6
Insert the new waste toner box as shown in the figure below. When the box
is set correctly, it will snap into place.
7
Make sure that the waste toner box is correctly inserted and close the left
cover.
After replacing the toner containers and the waste toner box, clean the
main charger units and the paper transfer unit. For instructions, see
Cleaning the Printer on page 3-8
.
New Waste Toner
Box