Kyocera C220N User Guide - Page 51
Troubleshooting, OPERATION GUIDE, Cleaning the Main Charger Unit on Cleaning the Printer
 |
UPC - 632983011973
View all Kyocera C220N manuals
Add to My Manuals
Save this manual to your list of manuals |
Page 51 highlights
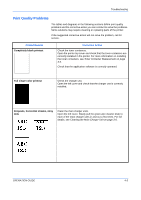
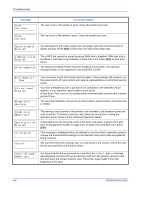
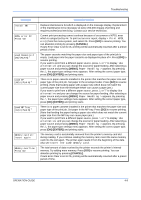
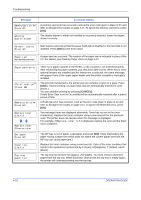
Troubleshooting Printed Results Grey background Dirt on the top edge or back of the paper Corrective Action Refresh drum. Perform the following procedures on the operation panel and try cleaning the drum surface using the printer's built-in cleaning system. 1 Press [MENU]. 2 Press U or V repeatedly until >Others appears. 3 Press Z. Press U or V repeatedly until >Service appears. 4 Press Z. Press U or V repeatedly until >>Drum appears. 5 Press [OK] ([ENTER]) twice. 6 The message display shows Please wait. After approx. 3 minutes, the display returns to Ready. Clean the main charger units. Open the left cover. Slowly pull the green wire cleaner knob to each of the main charger units in and out a few times. For full details, see Cleaning the Main Charger Unit on page 3-8. Check the charger units installation. Open the left cover and check that the charger units are correctly installed and seated as far as it will go. see Cleaning the Printer on page 3-8. Conduct color calibration either by switching the printer off then on or using the printer operation panel. Check the paper chute and the ramp. Pull out the paper transfer unit and check for toner on the paper ramp. Clean the paper ramp using a soft, dry, lint-free cloth. For details, see Cleaning the Paper Transfer Unit on page 3-13. Paper Ramp OPERATION GUIDE 4-5
-
 1
1 -
2
-
3
-
4
-
5
-
6
-
7
-
8
-
9
-
10
-
11
-
12
-
13
-
14
-
15
-
16
-
17
-
18
-
19
-
20
-
21
-
22
-
23
-
24
-
25
-
26
-
27
-
28
-
29
-
30
-
31
-
32
-
33
-
34
-
35
-
36
-
37
-
38
-
39
-
40
-
41
-
42
-
43
-
44
-
45
-
 46
46 -
 47
47 -
 48
48 -
 49
49 -
 50
50 -
 51
51 -
 52
52 -
 53
53 -
 54
54 -
 55
55 -
 56
56 -
57
-
58
-
59
-
60
-
61
-
62
-
63
-
64
-
65
-
66
-
67
-
68
-
69
-
70
-
71
-
72
 |
 |
