Kyocera K132 User Guide - Page 27
Erasing a contact, Customizing a phone number, Finding contact information
 |
View all Kyocera K132 manuals
Add to My Manuals
Save this manual to your list of manuals |
Page 27 highlights
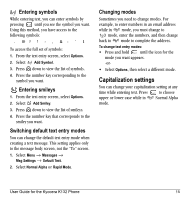
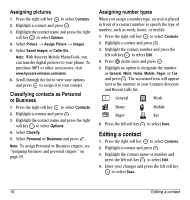
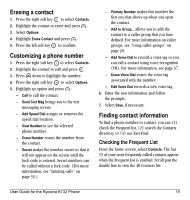
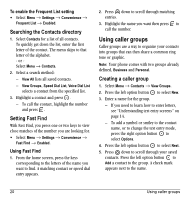
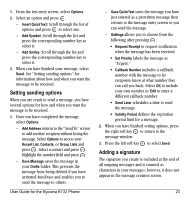
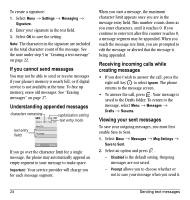
Erasing a contact 1. Press the right soft key to select Contacts. 2. Highlight the contact to erase and press . 3. Select Options. 4. Highlight Erase Contact and press . 5. Press the left soft key to confirm. Customizing a phone number 1. Press the right soft key to select Contacts. 2. Highlight the contact to edit and press . 3. Press down to highlight the number. 4. Press the right soft key to select Options. 5. Highlight an option and press : - Call to call the contact. - Send Text Msg brings you to the text messaging screen. - Add Speed Dial assigns or removes the speed dial location. - View Number to see the selected phone number. - Erase Number erases the number from the contact. - Secret makes the number secret so that it will not appear on the screen until the lock code is entered. Secret numbers can be called without a lock code. (For more information, see "Limiting calls" on page 35.) - Primary Number makes this number the first one that shows up when you open the contact. - Add to Group... allows you to add the contact to a caller group that you have defined. For more information on caller groups, see "Using caller groups" on page 20. - Add Voice Dial to record a voice tag so you can call a contact using voice recognition (VR). For more information, see page 37. - Erase Voice Dial erases the voice tag associated with the number. - Edit Voice Dial records a new voice tag. 6. Enter the new information and follow the prompts. 7. Select Save, if necessary. Finding contact information To find a phone number or contact, you can (1) check the Frequent list, (2) search the Contacts directory, or (3) use Fast Find. Checking the Frequent List From the home screen, select Contacts. The last 15 of your most frequently called contacts appear when the Frequent List is enabled. Scroll past the double line to view the All Contacts list. User Guide for the Kyocera K132 Phone 19
-
 1
1 -
2
-
3
-
4
-
5
-
6
-
7
-
8
-
9
-
10
-
11
-
12
-
13
-
14
-
15
-
16
-
17
-
18
-
19
-
20
-
21
-
 22
22 -
 23
23 -
 24
24 -
 25
25 -
 26
26 -
 27
27 -
 28
28 -
 29
29 -
 30
30 -
 31
31 -
 32
32 -
33
-
34
-
35
-
36
-
37
-
38
-
39
-
40
-
41
-
42
-
43
-
44
-
45
-
46
-
47
-
48
-
49
-
50
-
51
-
52
-
53
-
54
-
55
-
56
-
57
-
58
-
59
-
60
-
61
-
62
-
63
-
64
 |
 |
