Kyocera TASKalfa 500ci Kyocera Command Center Operation Guide Rev 6.3 - Page 20
Device Certificate - Self Issued, Export Certificate
 |
View all Kyocera TASKalfa 500ci manuals
Add to My Manuals
Save this manual to your list of manuals |
Page 20 highlights
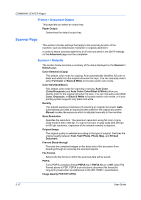
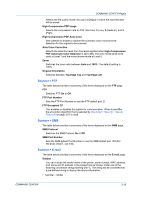
COMMAND CENTER Pages Device Certificate - Self Issued The self-issued certificate is automatically issued by default. The automatically issued certificate has the country code, common name (in a form of "KMxxxxxx" as for model names), and a validity period of about 10 years already configured. Self Certificate Displays whether the certificate is active. Expiration Displays the validity period of the certificate. View Certificate Click View to view details on the certificate. Create Certificate Click Create to create a certificate. Country code and common name are mandatorily required. On Windows Vista/7, the common name and the access name (host name or IP address) must be identical. Edit Certificate Click Edit to show Current Universal Time, and update the validity period of the certificate. Export Certificate Click Export to display the download dialog for the file. Click Save to download the exported certificate. If the printing system supports self-issued certificates only, it cannot carry out encrypted communication via IPP over SSL with Windows Vista/7 because the IPP over SSL function of Windows Vista/7 does not deem self-issued certificates as trusted. To enable printing via IPP over SSL, export the selfissued certificate from the printing system and import it into Windows Vista/7 as a trusted certificate. In this case, the access name must match the common name of the certificate. Device Certificate - CA Issued CA Certificate Displays whether the certificate issued by the Certification Authority (CA) is active or not. Expiration Displays the validity period of the certificate. View Certificate Click View to view the details of the certificate. Import Certificate Click Import to open the File Import window. Click Browse to open the file selection dialog box. Select a file and click Open. When the certificate is password-protected, enter the password and click Submit. The certificate is imported. Delete Certificate Click Delete. The certificate is displayed. Click Delete again to delete the certificate. When the CA issued certificate is deleted, the settings are made invalid if Authentication Type is set to Certificates for IPSec. The self Issued certificate is made valid for SSL. 3-13 User Guide
-
 1
1 -
2
-
3
-
4
-
5
-
6
-
7
-
8
-
9
-
10
-
11
-
12
-
13
-
14
-
 15
15 -
 16
16 -
 17
17 -
 18
18 -
 19
19 -
 20
20 -
 21
21 -
 22
22 -
 23
23 -
 24
24 -
 25
25 -
26
-
27
-
28
-
29
-
30
-
31
-
32
-
33
-
34
-
35
-
36
-
37
-
38
-
39
-
40
-
41
-
42
-
43
-
44
-
45
-
46
-
47
-
48
-
49
-
50
-
51
-
52
-
53
-
54
-
55
-
56
-
57
-
58
-
59
-
60
-
61
-
62
-
63
-
64
-
65
-
66
 |
 |