LG LFX28968SW Service Manual - Page 11
Cap Duct Motor Replacement, Sub Pwb For Working Dispenser
 |
View all LG LFX28968SW manuals
Add to My Manuals
Save this manual to your list of manuals |
Page 11 highlights
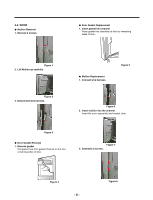
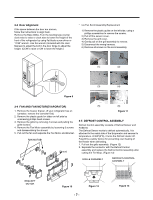
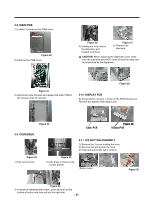
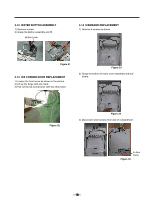
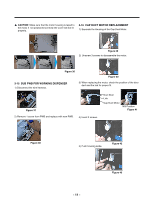
CAUTION: Make sure that the motor housing is taped to the mold, if not positioned correctly the cover will not fit properly. 3-16 CAP DUCT MOTOR REPLACEMENT 1) Separate the Housing of the Cap Duct Motor. Figure 39 2) Unscrew 3 screws to disassemble the motor. Figure 36 Figure 40 3-15 SUB PWB FOR WORKING DISPENSER 1) Disconnect the wire harness. 3) When replacing the motor, check the position of the door duct and the link for proper fit. Figure 37 2) Remove 1 screw from PWB and replace with new PWB. 4) Insert 2 screws. Duct Door Link Cap Duct Motor NG Position Figure 41 Figure 38 5) Push housing aside. Figure 42 - 11 - Figure 43
-
 1
1 -
2
-
3
-
4
-
5
-
 6
6 -
 7
7 -
 8
8 -
 9
9 -
 10
10 -
 11
11 -
 12
12 -
 13
13 -
 14
14 -
 15
15 -
 16
16 -
17
-
18
-
19
-
20
-
21
-
22
-
23
-
24
-
25
-
26
-
27
-
28
-
29
-
30
-
31
-
32
-
33
-
34
-
35
-
36
-
37
-
38
-
39
-
40
-
41
-
42
-
43
-
44
-
45
-
46
-
47
-
48
-
49
-
50
-
51
-
52
-
53
-
54
-
55
-
56
-
57
-
58
-
59
-
60
-
61
-
62
-
63
-
64
-
65
-
66
-
67
-
68
-
69
-
70
-
71
-
72
-
73
-
74
-
75
-
76
-
77
-
78
-
79
-
80
-
81
-
82
 |
 |

- 11 -
3-16
CAP DUCT MOTOR REPLACEMENT
1) Separate the Housing of the Cap Duct Motor.
3) When replacing the motor, check the position of the door
duct and the link for proper fit.
Link
Duct Door
Cap Duct Motor
NG Position
2) Unscrew 3 screws to disassemble the motor.
4) Insert 2 screws.
5) Push housing aside.
3-15
SUB PWB FOR WORKING DISPENSER
1) Disconnect the wire harness.
2) Remove 1 screw from PWB and replace with new PWB.
CAUTION:
Make sure that the motor housing is taped to
the mold, if
not positioned correctly the cover will not fit
properly.
Figure 36
Figure 37
Figure 38
Figure 43
Figure 42
Figure 41
Figure 40
Figure 39