LG LFX28968SW Service Manual - Page 9
Main Pwb, 9 Dispenser, Display Pcb, Ice Button Assembly
 |
View all LG LFX28968SW manuals
Add to My Manuals
Save this manual to your list of manuals |
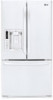
Page 9 highlights
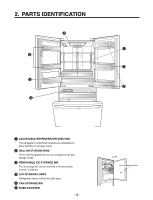
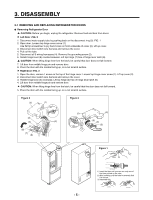
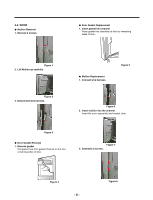
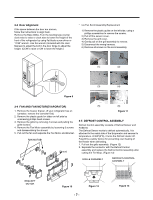
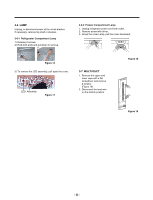
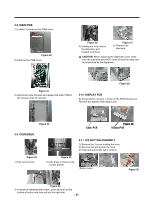
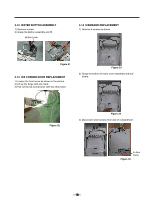
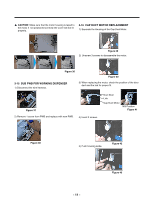
3-8 MAIN PWB 1) Loosen 3 screws on the PWB cover. Figure 20 2) Remove the PWB cover Figure 26 4) Holding the inner side of the dispenser pull forward to remove. Figure 27 5) Remove the lead wire. CAUTION: When replacing the dispenser cover make sure the lead wire does NOT come off and the water line is not pinched by the dispenser. Figure 21 3) Disconnect wire harness and replace the main PWB in the reverse order of removal. Figure 28 3-10 DISPLAY PCB As shown below, remove 1 screw on the PCB fixing screw. Remove the display PCB fixing screw. Figure 22 3-9 DISPENSER Case, PCB Figure 298 Display PCB 3-11 ICE BUTTON ASSEMBLY 1) Remove the 1 screw holding the lever. 2) Remove the spring from the hook. 3) Push and pull on the tab to remove. Figure 23 1) Pull out the drain Figure 24 2) Use these 2 holes to pull out the bottom Button Lever Figure 30 Figure 25 3) If nozzle is interfered with button, push and pull out the bottom of button and then pull out the right side. - 9-
-
 1
1 -
2
-
3
-
 4
4 -
 5
5 -
 6
6 -
 7
7 -
 8
8 -
 9
9 -
 10
10 -
 11
11 -
 12
12 -
 13
13 -
 14
14 -
15
-
16
-
17
-
18
-
19
-
20
-
21
-
22
-
23
-
24
-
25
-
26
-
27
-
28
-
29
-
30
-
31
-
32
-
33
-
34
-
35
-
36
-
37
-
38
-
39
-
40
-
41
-
42
-
43
-
44
-
45
-
46
-
47
-
48
-
49
-
50
-
51
-
52
-
53
-
54
-
55
-
56
-
57
-
58
-
59
-
60
-
61
-
62
-
63
-
64
-
65
-
66
-
67
-
68
-
69
-
70
-
71
-
72
-
73
-
74
-
75
-
76
-
77
-
78
-
79
-
80
-
81
-
82
 |
 |
