LG LG730 Owners Manual - English - Page 36
Using the advanced settings
 |
View all LG LG730 manuals
Add to My Manuals
Save this manual to your list of manuals |
Page 36 highlights
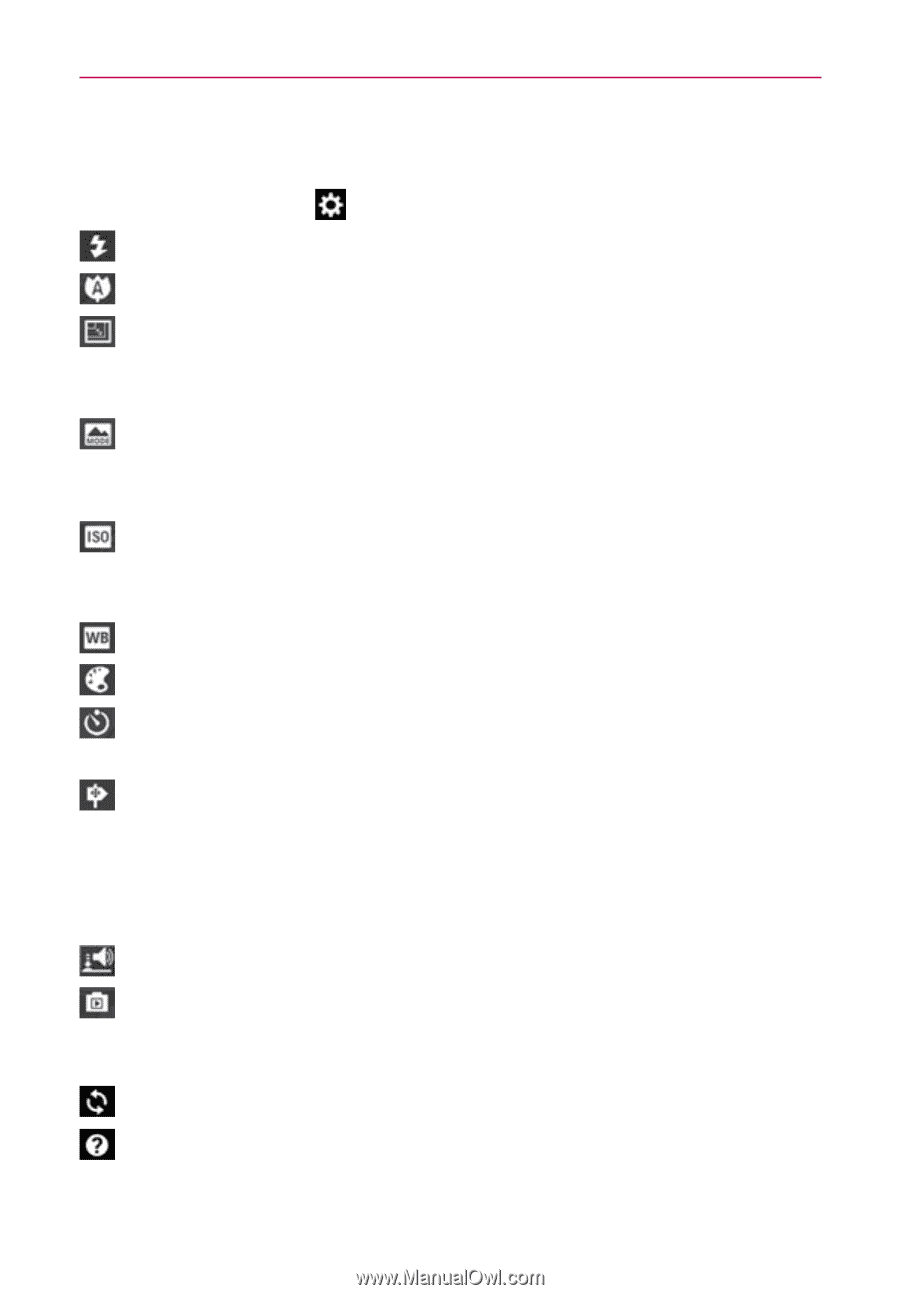
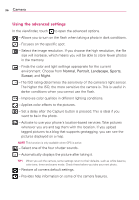
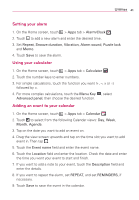
36 Camera Using the advanced settings In the viewfinder, touch to open the advanced options. - Allows you to turn on the flash when taking a photo in dark conditions. - Focuses on the specific spot. - Select the image resolution. If you choose the high resolution, the file size will increase, which means you will be able to store fewer photos in the memory. - Finds the color and light settings appropriate for the current environment. Choose from Normal, Portrait, Landscape, Sports, Sunset, and Night. - The ISO rating determines the sensitivity of the camera's light sensor. The higher the ISO, the more sensitive the camera is. This is useful in darker conditions when you cannot use the flash. - Improves color qualities in different lighting conditions. - Applies color effects to the pictures. - Set a delay after the Capture button is pressed. This is ideal if you want to be in the photo. - Activate to use your phone's location-based services. Take pictures wherever you are and tag them with the location. If you upload tagged pictures to a blog that supports geotagging, you can see the pictures displayed on a map. NOTE This function is only available when GPS is active. - Select one of the four shutter sounds. - Automatically displays the picture after taking it. TIP! When you exit the camera, some settings return to their defaults, such as white balance, color tone, timer and scene mode. Check these before you take your next photo. - Restore all camera default settings. - Provides help information on some of the camera features.
-
 1
1 -
2
-
3
-
4
-
5
-
6
-
7
-
8
-
9
-
10
-
11
-
12
-
13
-
14
-
15
-
16
-
17
-
18
-
19
-
20
-
21
-
22
-
23
-
24
-
25
-
26
-
27
-
28
-
29
-
30
-
 31
31 -
 32
32 -
 33
33 -
 34
34 -
 35
35 -
 36
36 -
 37
37 -
 38
38 -
 39
39 -
 40
40 -
 41
41 -
42
-
43
-
44
-
45
-
46
-
47
-
48
-
49
-
50
-
51
-
52
-
53
-
54
-
55
-
56
-
57
-
58
-
59
-
60
-
61
-
62
-
63
-
64
-
65
-
66
-
67
-
68
-
69
-
70
-
71
-
72
-
73
-
74
-
75
-
76
-
77
-
78
-
79
-
80
-
81
-
82
-
83
-
84
-
85
-
86
-
87
 |
 |