Lenovo ThinkPad X30 ThinkPad X30, X31, X32 - Hardware Maintenance Manual - Page 126
front, bezel
 |
View all Lenovo ThinkPad X30 manuals
Add to My Manuals
Save this manual to your list of manuals |
Page 126 highlights
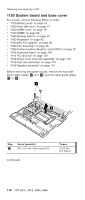
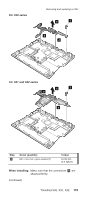
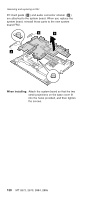
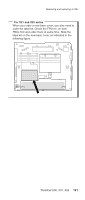
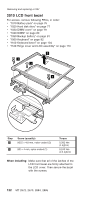
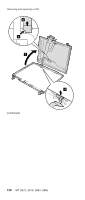
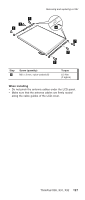
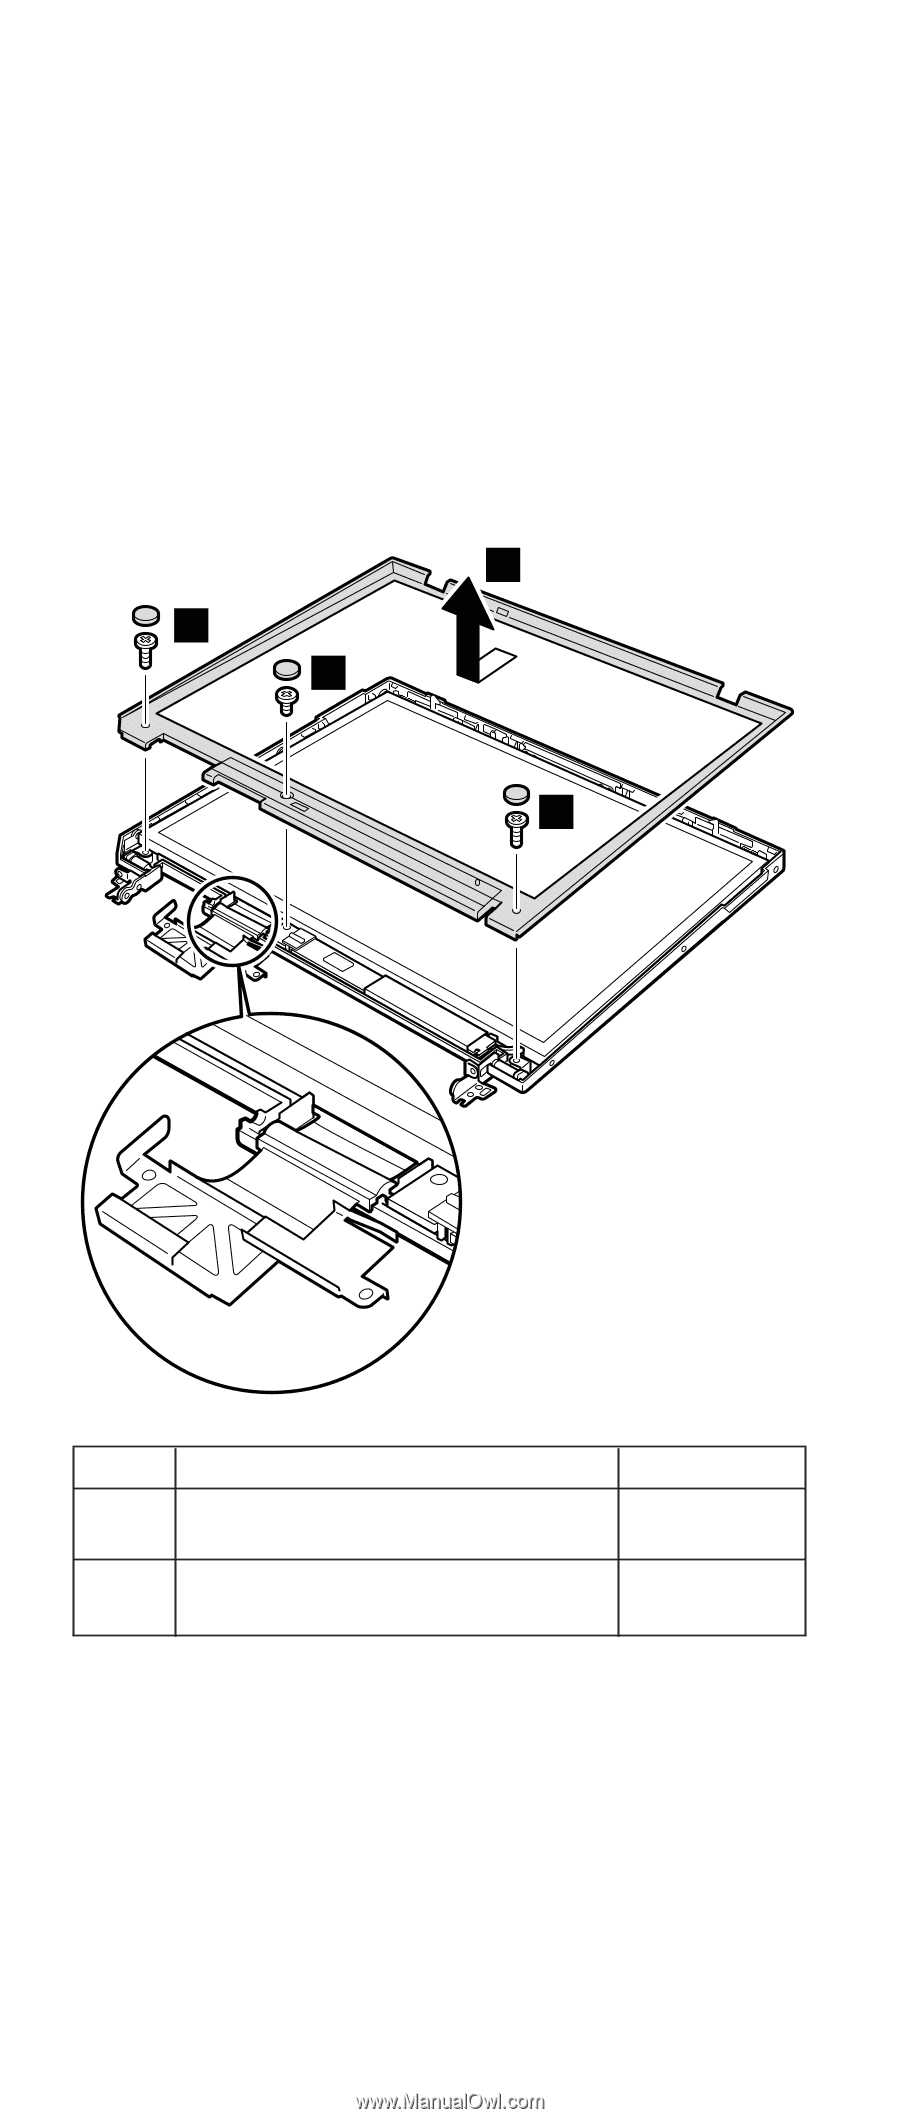
Removing and replacing a FRU 2010 LCD front bezel For access, remove following FRUs, in order: v "1010 Battery pack" on page 76 v "1020 Hard disk drive" on page 77 v "1030 DIMM cover" on page 79 v "1040 DIMM" on page 80 v "1050 Backup battery" on page 81 v "1060 Keyboard" on page 82 v "1100 Keyboard bezel" on page 104 v "1120 Hinge cover and LCD assembly" on page 110 3 1 2 1 Step 1 Screw (quantity) M2.5 × 4.8 mm, nylon-coated (2) 2 M2 × 4 mm, nylon-coated (1) Torque 0.392 Nm (4 kgfcm) 0.245 Nm (2.5 kgfcm) When installing: Make sure that all of the latches of the LCD front bezel are firmly attached to the LCD cover. Then secure the bezel with the screws. 122 MT 2672, 2673, 2884, 2885
-
 1
1 -
2
-
3
-
4
-
5
-
6
-
7
-
8
-
9
-
10
-
11
-
12
-
13
-
14
-
15
-
16
-
17
-
18
-
19
-
20
-
21
-
22
-
23
-
24
-
25
-
26
-
27
-
28
-
29
-
30
-
31
-
32
-
33
-
34
-
35
-
36
-
37
-
38
-
39
-
40
-
41
-
42
-
43
-
44
-
45
-
46
-
47
-
48
-
49
-
50
-
51
-
52
-
53
-
54
-
55
-
56
-
57
-
58
-
59
-
60
-
61
-
62
-
63
-
64
-
65
-
66
-
67
-
68
-
69
-
70
-
71
-
72
-
73
-
74
-
75
-
76
-
77
-
78
-
79
-
80
-
81
-
82
-
83
-
84
-
85
-
86
-
87
-
88
-
89
-
90
-
91
-
92
-
93
-
94
-
95
-
96
-
97
-
98
-
99
-
100
-
101
-
102
-
103
-
104
-
105
-
106
-
107
-
108
-
109
-
110
-
111
-
112
-
113
-
114
-
115
-
116
-
117
-
118
-
119
-
120
-
 121
121 -
 122
122 -
 123
123 -
 124
124 -
 125
125 -
 126
126 -
 127
127 -
 128
128 -
 129
129 -
 130
130 -
 131
131 -
132
-
133
-
134
-
135
-
136
-
137
-
138
-
139
-
140
-
141
-
142
-
143
-
144
-
145
-
146
-
147
-
148
-
149
-
150
-
151
-
152
-
153
-
154
-
155
-
156
-
157
-
158
-
159
-
160
-
161
-
162
-
163
-
164
-
165
-
166
-
167
-
168
-
169
-
170
-
171
-
172
-
173
-
174
-
175
-
176
-
177
-
178
-
179
-
180
-
181
-
182
-
183
-
184
-
185
-
186
-
187
-
188
-
189
-
190
-
191
-
192
-
193
-
194
-
195
-
196
 |
 |
2010
LCD
front
bezel
For
access,
remove
following
FRUs,
in
order:
v
“1010
Battery
pack”
on
page
76
v
“1020
Hard
disk
drive”
on
page
77
v
“1030
DIMM
cover”
on
page
79
v
“1040
DIMM”
on
page
80
v
“1050
Backup
battery”
on
page
81
v
“1060
Keyboard”
on
page
82
v
“1100
Keyboard
bezel”
on
page
104
v
“1120
Hinge
cover
and
LCD
assembly”
on
page
110
1
2
1
3
Step
Screw
(quantity)
Torque
±1²
M2.5
×
4.8
mm,
nylon-coated
(2)
0.392
Nm
(4
kgfcm)
±2²
M2
×
4
mm,
nylon-coated
(1)
0.245
Nm
(2.5
kgfcm)
When
installing:
Make
sure
that
all
of
the
latches
of
the
LCD
front
bezel
are
firmly
attached
to
the
LCD
cover.
Then
secure
the
bezel
with
the
screws.
Removing
and
replacing
a
FRU
122
MT
2672,
2673,
2884,
2885