Lenovo ThinkPad X60 Hardware Maintenance Manual - Page 36
Power, system, checkout - tablet windows 8
 |
View all Lenovo ThinkPad X60 manuals
Add to My Manuals
Save this manual to your list of manuals |
Page 36 highlights
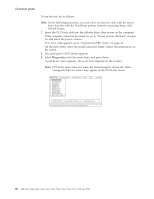
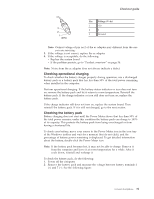
Checkout guide Utility v Run External Tests v Surface Scan Hard Disk v Benchmark System v DOS Shell v Tech Support Form v Battery Rundown v View Test Log v Print Log v Save Log v Full Erase Hard Drive v Quick Erase Hard Drive PC-Doctor for Windows This product is designed to help you troubleshoot and resolve problems related to your computer. Select one of the categories listed below to display symptoms and solutions: v CHECK SYSTEM HEALTH v SYSTEM AND DEVICE TESTS v LENOVO TROUBLESHOOTING v CENTER v SYSTEM REPORTS v UPDATES AND SUPPORT Power system checkout To verify a symptom, do the following: 1. Turn off the computer. 2. Remove the battery pack. 3. Connect the ac adapter. 4. Check that power is supplied when you turn on the computer. 5. Turn off the computer. 6. Disconnect the ac adapter and install the charged battery pack. 7. Check that the battery pack supplies power when you turn on the computer. If you suspect a power problem, see the appropriate one of the following power supply checkouts: v "Checking the ac adapter" v "Checking operational charging" on page 31 v "Checking the battery pack" on page 31 v "Checking the backup battery" on page 32 Checking the ac adapter You are here because the computer fails only when the ac adapter is used. v If the power problem occurs only when the ThinkPad X6 Tablet UltraBase™ is used, replace the UltraBase. v If the power-on indicator does not turn on, check the power cord of the ac adapter for correct continuity and installation. v If the computer does not charge during operation, go to ″Checking operational charging.″ To check the ac adapter, do the following: 1. Unplug the ac adapter cable from the computer. 2. Measure the output voltage at the plug of the ac adapter cable. See the following figure: 30 MT 6363, 6364, 6365, 6366, 6367, 6368, 7762, 7763, 7764, 7767, 7768, and 7769
-
 1
1 -
2
-
3
-
4
-
5
-
6
-
7
-
8
-
9
-
10
-
11
-
12
-
13
-
14
-
15
-
16
-
17
-
18
-
19
-
20
-
21
-
22
-
23
-
24
-
25
-
26
-
27
-
28
-
29
-
30
-
 31
31 -
 32
32 -
 33
33 -
 34
34 -
 35
35 -
 36
36 -
 37
37 -
 38
38 -
 39
39 -
 40
40 -
 41
41 -
42
-
43
-
44
-
45
-
46
-
47
-
48
-
49
-
50
-
51
-
52
-
53
-
54
-
55
-
56
-
57
-
58
-
59
-
60
-
61
-
62
-
63
-
64
-
65
-
66
-
67
-
68
-
69
-
70
-
71
-
72
-
73
-
74
-
75
-
76
-
77
-
78
-
79
-
80
-
81
-
82
-
83
-
84
-
85
-
86
-
87
-
88
-
89
-
90
-
91
-
92
-
93
-
94
-
95
-
96
-
97
-
98
-
99
-
100
-
101
-
102
-
103
-
104
-
105
-
106
-
107
-
108
-
109
-
110
-
111
-
112
-
113
-
114
-
115
-
116
-
117
-
118
-
119
-
120
-
121
-
122
-
123
-
124
-
125
-
126
-
127
-
128
-
129
-
130
-
131
-
132
-
133
-
134
-
135
-
136
-
137
-
138
-
139
-
140
-
141
-
142
-
143
-
144
-
145
-
146
-
147
-
148
-
149
-
150
-
151
-
152
-
153
-
154
-
155
-
156
-
157
-
158
-
159
-
160
-
161
-
162
-
163
-
164
-
165
-
166
 |
 |