Lenovo ThinkPad Yoga 14 (English) User Guide - ThinkPad Yoga 14 - Page 78
Installing the Windows 8.1 operating system
 |
View all Lenovo ThinkPad Yoga 14 manuals
Add to My Manuals
Save this manual to your list of manuals |
Page 78 highlights
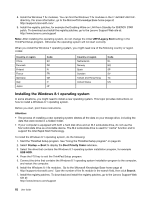
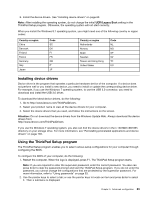
8. Install the Windows 7 fix modules. You can find the Windows 7 fix modules in the C:\SWTOOLS\OSFIXES\ directory. For more information, go to the Microsoft Knowledge Base home page at: http://support.microsoft.com/ 9. Install the registry patches, for example the Enabling Wake on LAN from Standby for ENERGY STAR patch. To download and install the registry patches, go to the Lenovo Support Web site at: http://www.lenovo.com/support Note: After installing the operating system, do not change the initial UEFI/Legacy Boot setting in the ThinkPad Setup program. Otherwise the operating system will not start correctly. When you install the Windows 7 operating system, you might need one of the following country or region codes: Country or region China Denmark Finland France Germany Italy Japan Code SC DK FI FR GR IT JP Country or region Netherlands Norway Spain Sweden Taiwan and Hong Kong United States Code NL NO SP SV TC US Installing the Windows 8.1 operating system In some situations, you might need to install a new operating system. This topic provides instructions on how to install a Windows 8.1 operating system. Before you start, print these instructions. Attention: • The process of installing a new operating system deletes all the data on your storage drive, including the data that were stored in a hidden folder. • If your computer is equipped with both a hard disk drive and an M.2 solid-state drive, do not use the M.2 solid-state drive as a bootable device. The M.2 solid-state drive is used for "cache" function and to support the Intel Rapid Start Technology. To install the Windows 8.1 operating system, do the following: 1. Start the ThinkPad Setup program. See "Using the ThinkPad Setup program" on page 63. 2. Select Startup ➙ Boot to display the Boot Priority Order submenu. 3. Select the drive that contains the Windows 8.1 operating system installation program, for example USB HDD. 4. Press the F10 key to exit the ThinkPad Setup program. 5. Connect the drive that contains the Windows 8.1 operating system installation program to the computer, and restart the computer. 6. Install the Windows 8.1 fix modules. Go to the Microsoft Knowledge Base home page at http://support.microsoft.com/. Type the number of the fix module in the search field, then click Search. 7. Install the registry patches. To download and install the registry patches, go to the Lenovo Support Web site at: http://www.lenovo.com/support 62 User Guide
-
 1
1 -
2
-
3
-
4
-
5
-
6
-
7
-
8
-
9
-
10
-
11
-
12
-
13
-
14
-
15
-
16
-
17
-
18
-
19
-
20
-
21
-
22
-
23
-
24
-
25
-
26
-
27
-
28
-
29
-
30
-
31
-
32
-
33
-
34
-
35
-
36
-
37
-
38
-
39
-
40
-
41
-
42
-
43
-
44
-
45
-
46
-
47
-
48
-
49
-
50
-
51
-
52
-
53
-
54
-
55
-
56
-
57
-
58
-
59
-
60
-
61
-
62
-
63
-
64
-
65
-
66
-
67
-
68
-
69
-
70
-
71
-
72
-
 73
73 -
 74
74 -
 75
75 -
 76
76 -
 77
77 -
 78
78 -
 79
79 -
 80
80 -
 81
81 -
 82
82 -
 83
83 -
84
-
85
-
86
-
87
-
88
-
89
-
90
-
91
-
92
-
93
-
94
-
95
-
96
-
97
-
98
-
99
-
100
-
101
-
102
-
103
-
104
-
105
-
106
-
107
-
108
-
109
-
110
-
111
-
112
-
113
-
114
-
115
-
116
-
117
-
118
-
119
-
120
-
121
-
122
-
123
-
124
-
125
-
126
-
127
-
128
-
129
-
130
-
131
-
132
-
133
-
134
-
135
-
136
-
137
-
138
-
139
-
140
-
141
-
142
-
143
-
144
-
145
-
146
-
147
-
148
-
149
-
150
-
151
-
152
-
153
-
154
-
155
-
156
-
157
-
158
-
159
-
160
-
161
-
162
-
163
-
164
-
165
-
166
-
167
-
168
-
169
-
170
-
171
-
172
-
173
-
174
-
175
-
176
-
177
-
178
 |
 |
