Lexmark 9350 User's Guide - Page 48
Using the Print Files menu, Using the Paper Handling submenu
 |
UPC - 734646031202
View all Lexmark 9350 manuals
Add to My Manuals
Save this manual to your list of manuals |
Page 48 highlights
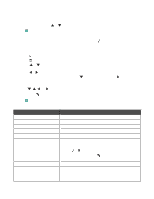
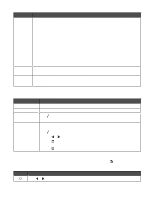
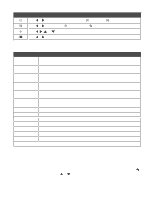
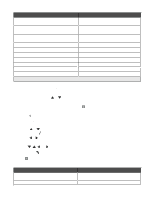
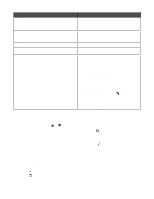
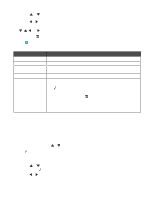
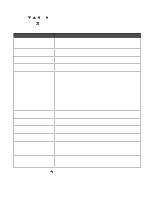
Use tool To Press or to rotate the photo counterclockwise ( 90° ) or clockwise ( 90° ). Press or to crop to shrink ( ) or crop to expand ( ). Press , , , or to move the Region of Interest box around the photo. Press or to answer Yes or No for removal of the red-eye effect from photos. Using the Paper Handling submenu The submenu appears with different menu items based on whether the optional Tray 2 is installed. Use this Size To Specify the size of the paper loaded. Appears when Tray 2 is not installed. Type Size - Tray 1 Type - Tray 1 Specify the type of paper loaded. Appears when Tray 2 is not installed. Specify the size of the paper loaded for Tray 1. Appears when Tray 2 is installed. Specify the type of paper loaded for Tray 1. Appears when Tray 2 is installed. Size - Tray 2 Type - Tray 2 Specify the size of the paper loaded for Tray 2. Appears when Tray 2 is installed. Specify the type of paper loaded for Tray 2. Appears when Tray 2 is installed. Tray Linking Set tray linking off or to automatic (on). Copy Source1 Specify the source, Tray 1 or Tray 2, for the job. Photo Source1 Specify the source, Tray 1 or Tray 2, for the job. Print Files Source1 Specify the source, Tray 1 or Tray 2, for the job. Fax Source1 Specify the source, Tray 1 or Tray 2, for the job. PictBridge Source1 Specify the source, Tray 1 or Tray 2, for the job. Bluetooth Source1 Specify the source, Tray 1 or Tray 2, for the job. 1 Menu item appears only when the optional Tray 2 is installed. Using the Print Files menu The Print Files menu is unavailable from the main display screen unless certain conditions are met: • A memory card or flash drive must be inserted into the memory card slot or PictBridge port. • The memory card or flash drive inserted contains files that have file name extensions of *.DOC, *.XLS, or *.PPT. Note: If there are any photo files on the memory card or flash drive, the Photo Card menu appears. Press to return to the main menu, and press or repeatedly until Print Files is highlighted. • The printer must be attached directly to the computer. Note: If your computer is attached to a network, this menu will not be active. 48
-
 1
1 -
2
-
3
-
4
-
5
-
6
-
7
-
8
-
9
-
10
-
11
-
12
-
13
-
14
-
15
-
16
-
17
-
18
-
19
-
20
-
21
-
22
-
23
-
24
-
25
-
26
-
27
-
28
-
29
-
30
-
31
-
32
-
33
-
34
-
35
-
36
-
37
-
38
-
39
-
40
-
41
-
42
-
 43
43 -
 44
44 -
 45
45 -
 46
46 -
 47
47 -
 48
48 -
 49
49 -
 50
50 -
 51
51 -
 52
52 -
 53
53 -
54
-
55
-
56
-
57
-
58
-
59
-
60
-
61
-
62
-
63
-
64
-
65
-
66
-
67
-
68
-
69
-
70
-
71
-
72
-
73
-
74
-
75
-
76
-
77
-
78
-
79
-
80
-
81
-
82
-
83
-
84
-
85
-
86
-
87
-
88
-
89
-
90
-
91
-
92
-
93
-
94
-
95
-
96
-
97
-
98
-
99
-
100
-
101
-
102
-
103
-
104
-
105
-
106
-
107
-
108
-
109
-
110
-
111
-
112
-
113
-
114
-
115
-
116
-
117
-
118
-
119
-
120
-
121
-
122
-
123
-
124
-
125
-
126
-
127
-
128
-
129
-
130
-
131
-
132
-
133
-
134
-
135
-
136
-
137
-
138
-
139
-
140
-
141
-
142
-
143
-
144
-
145
-
146
-
147
-
148
-
149
-
150
-
151
-
152
-
153
-
154
-
155
-
156
-
157
-
158
-
159
-
160
-
161
-
162
-
163
-
164
-
165
-
166
-
167
-
168
-
169
-
170
-
171
-
172
-
173
-
174
-
175
-
176
-
177
-
178
-
179
-
180
-
181
-
182
-
183
-
184
-
185
-
186
-
187
-
188
-
189
-
190
-
191
-
192
-
193
-
194
-
195
-
196
-
197
-
198
 |
 |
