Lexmark 9350 User's Guide - Page 55
Using the Change Copy Default Settings submenu, Setup, Change Copy Default Setting
 |
UPC - 734646031202
View all Lexmark 9350 manuals
Add to My Manuals
Save this manual to your list of manuals |
Page 55 highlights
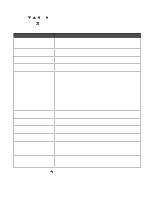
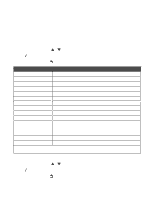
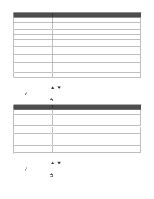
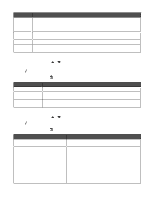
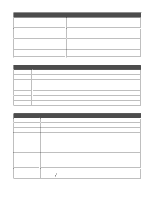
Use this Set Date and Time Paper Handling Language Country Key Press Tone Power Save Block Host Settings Caller ID Pattern Speaker Volume To Set the current date and time and using the keypad numbers. Change settings related to the loading of paper in the paper tray or trays. For more information, see "Using the Paper Handling submenu" on page 54. Change the language shown on the control panel. Change the country or region shown on the control panel to your country or region. Set the volume of the tone when a control panel button is pressed to either On or Off. On is the default. Set the printer to enter a power saving mode at or after a certain time limit. Values are Now, After 10 Min, After 30 Min, After 60 Min, and Never. Allow your system support person to block to prevent individual users on a network from making printer setting changes using the Printer Setup Utility. Indicate different identification methods for alternate caller ID patterns in different countries or regions. Values are Pattern 1 and Pattern 2. For more information, see "Using Caller ID" on page 131. Set the volume of the speaker during a call. Values are Off, Low, and High. Using the Change Copy Default Settings submenu 1 From the Setup menu, press or repeatedly until Change Copy Default Setting is highlighted. 2 Press . 3 After changing values, press to save these values and exit this submenu. Use this Color Quality Content Type 2-sided copies Paper Handling To Specify to print in color or black and white. Specify to print in Auto, Draft, Normal, or Photo mode. Note: Auto and Photo are good for pictures and paper-based print jobs. Auto is good for printing on transparencies. Specify the type of document you want to print. Values are Text & Graphics, Photo, Text Only, and Line Drawing. Specify whether the original is one- or two-sided and whether you want the copy to be one- or two-sided. Note: This applies only to copy jobs when the duplex unit is installed. Change settings related to the loading of paper in the paper tray or trays. For more information, see "Using the Paper Handling submenu" on page 54. Using the Change Photo Default Settings submenu 1 From the Setup menu, press or repeatedly until Change Photo Default Settings is highlighted. 2 Press . 3 After changing values, press to save these values and exit this submenu. 55
-
 1
1 -
2
-
3
-
4
-
5
-
6
-
7
-
8
-
9
-
10
-
11
-
12
-
13
-
14
-
15
-
16
-
17
-
18
-
19
-
20
-
21
-
22
-
23
-
24
-
25
-
26
-
27
-
28
-
29
-
30
-
31
-
32
-
33
-
34
-
35
-
36
-
37
-
38
-
39
-
40
-
41
-
42
-
43
-
44
-
45
-
46
-
47
-
48
-
49
-
 50
50 -
 51
51 -
 52
52 -
 53
53 -
 54
54 -
 55
55 -
 56
56 -
 57
57 -
 58
58 -
 59
59 -
 60
60 -
61
-
62
-
63
-
64
-
65
-
66
-
67
-
68
-
69
-
70
-
71
-
72
-
73
-
74
-
75
-
76
-
77
-
78
-
79
-
80
-
81
-
82
-
83
-
84
-
85
-
86
-
87
-
88
-
89
-
90
-
91
-
92
-
93
-
94
-
95
-
96
-
97
-
98
-
99
-
100
-
101
-
102
-
103
-
104
-
105
-
106
-
107
-
108
-
109
-
110
-
111
-
112
-
113
-
114
-
115
-
116
-
117
-
118
-
119
-
120
-
121
-
122
-
123
-
124
-
125
-
126
-
127
-
128
-
129
-
130
-
131
-
132
-
133
-
134
-
135
-
136
-
137
-
138
-
139
-
140
-
141
-
142
-
143
-
144
-
145
-
146
-
147
-
148
-
149
-
150
-
151
-
152
-
153
-
154
-
155
-
156
-
157
-
158
-
159
-
160
-
161
-
162
-
163
-
164
-
165
-
166
-
167
-
168
-
169
-
170
-
171
-
172
-
173
-
174
-
175
-
176
-
177
-
178
-
179
-
180
-
181
-
182
-
183
-
184
-
185
-
186
-
187
-
188
-
189
-
190
-
191
-
192
-
193
-
194
-
195
-
196
-
197
-
198
 |
 |
