Lexmark 9350 User's Guide - Page 50
Using Fax and the Fax Mode menu, Fax Mode
 |
UPC - 734646031202
View all Lexmark 9350 manuals
Add to My Manuals
Save this manual to your list of manuals |
Page 50 highlights
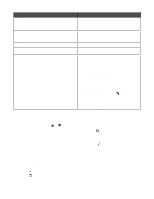
Use this To Type - Tray 1 Specify the type of paper loaded in Tray 1. Appears when Tray 2 is installed. Size - Tray 2 Specify the size of the paper loaded in Tray 2. Appears when Tray 2 is installed. Type - Tray 2 Specify the type of paper loaded in Tray 2. Appears when Tray 2 is installed. Tray Linking Set tray linking off or to automatic (on). Copy Source1 Specify the source, Tray 1 or Tray 2, for the job. Photo Source1 Specify the source, Tray 1 or Tray 2, for the job. Print Files Source1 Specify the source, Tray 1 or Tray 2, for the job. Fax Source1 Specify the source, Tray 1 or Tray 2, for the job. PictBridge Source1 Specify the source, Tray 1 or Tray 2, for the job. Bluetooth Source1 Specify the source, Tray 1 or Tray 2, for the job. 1 Menu item appears only when the optional Tray 2 is installed. Using Fax and the Fax Mode menu To access and navigate: 1 From the control panel, press or repeatedly until Fax is highlighted. 2 You can: • Enter the fax number in the open field, and then press or to send the fax. • Press to access the Fax Mode menu to use more fax options or functions. The Fax Mode menu appears. 3 From the Fax Mode menu, you can: • Press or repeatedly to scroll through the submenus or menu items until you reach the one you want to change. Press to enter the submenu or menu item. • Press or repeatedly to reach the value you want. 4 To go into other submenus, menu items, and values to make additional changes, continue to use the navigation buttons ( , , , and ). 5 If needed, press repeatedly to return to the previous menu. 6 Press to start the fax job. The following table explains the function of each submenu or menu item in the Fax Mode menu. Use this Phone Book Redial History To Add, edit, and print names and fax numbers of individuals or groups. View the redial list. 50
-
 1
1 -
2
-
3
-
4
-
5
-
6
-
7
-
8
-
9
-
10
-
11
-
12
-
13
-
14
-
15
-
16
-
17
-
18
-
19
-
20
-
21
-
22
-
23
-
24
-
25
-
26
-
27
-
28
-
29
-
30
-
31
-
32
-
33
-
34
-
35
-
36
-
37
-
38
-
39
-
40
-
41
-
42
-
43
-
44
-
 45
45 -
 46
46 -
 47
47 -
 48
48 -
 49
49 -
 50
50 -
 51
51 -
 52
52 -
 53
53 -
 54
54 -
 55
55 -
56
-
57
-
58
-
59
-
60
-
61
-
62
-
63
-
64
-
65
-
66
-
67
-
68
-
69
-
70
-
71
-
72
-
73
-
74
-
75
-
76
-
77
-
78
-
79
-
80
-
81
-
82
-
83
-
84
-
85
-
86
-
87
-
88
-
89
-
90
-
91
-
92
-
93
-
94
-
95
-
96
-
97
-
98
-
99
-
100
-
101
-
102
-
103
-
104
-
105
-
106
-
107
-
108
-
109
-
110
-
111
-
112
-
113
-
114
-
115
-
116
-
117
-
118
-
119
-
120
-
121
-
122
-
123
-
124
-
125
-
126
-
127
-
128
-
129
-
130
-
131
-
132
-
133
-
134
-
135
-
136
-
137
-
138
-
139
-
140
-
141
-
142
-
143
-
144
-
145
-
146
-
147
-
148
-
149
-
150
-
151
-
152
-
153
-
154
-
155
-
156
-
157
-
158
-
159
-
160
-
161
-
162
-
163
-
164
-
165
-
166
-
167
-
168
-
169
-
170
-
171
-
172
-
173
-
174
-
175
-
176
-
177
-
178
-
179
-
180
-
181
-
182
-
183
-
184
-
185
-
186
-
187
-
188
-
189
-
190
-
191
-
192
-
193
-
194
-
195
-
196
-
197
-
198
 |
 |
