Lexmark M410 Service Manual - Page 106
Adjustment Procedures, Printhead Assembly
 |
UPC - 734646261005
View all Lexmark M410 manuals
Add to My Manuals
Save this manual to your list of manuals |
Page 106 highlights
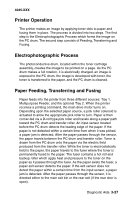
4045-XXX Adjustment Procedures Printhead Assembly This adjustment must be performed whenever the printhead is removed, replaced or the printhead mounting screws are loosened. An incorrectly adjusted printhead produces horizontally skewed images down the page. To perform the printhead adjustment: 1. Turn the printer off. 2. Press and hold Return and Go. 3. Turn the printer On and release the buttons when "Performing Self Test" displays. 4. Select Print Test, Tray 1 and Single from the menu. The test page should only be printed on letter or A4 paper from Tray 1. The Print Test page consists of horizontal lines that can be used for skew adjustment, page count setting, printer serial number code levels and print registration settings. 5. Check the Print Test page for any sign of skew by folding the paper in half (left edge to right edge). Check the horizontal lines at the top left and top right of the test page for equal distance from the top of the page. If any adjustment is necessary, perform the following: a. Remove the top cover. b. Loosen the three printhead mounting screws. c. Adjust the position of the printhead. d. Replace the top cover. e. Print a Print Test page and check for skew again. This procedure may take two or three attempts before you get satisfactory results. 6. When you have the correct printhead adjustment, gently tighten the three printhead mounting screws being careful not to move the printhead assembly. 4-2 Service Manual
-
 1
1 -
2
-
3
-
4
-
5
-
6
-
7
-
8
-
9
-
10
-
11
-
12
-
13
-
14
-
15
-
16
-
17
-
18
-
19
-
20
-
21
-
22
-
23
-
24
-
25
-
26
-
27
-
28
-
29
-
30
-
31
-
32
-
33
-
34
-
35
-
36
-
37
-
38
-
39
-
40
-
41
-
42
-
43
-
44
-
45
-
46
-
47
-
48
-
49
-
50
-
51
-
52
-
53
-
54
-
55
-
56
-
57
-
58
-
59
-
60
-
61
-
62
-
63
-
64
-
65
-
66
-
67
-
68
-
69
-
70
-
71
-
72
-
73
-
74
-
75
-
76
-
77
-
78
-
79
-
80
-
81
-
82
-
83
-
84
-
85
-
86
-
87
-
88
-
89
-
90
-
91
-
92
-
93
-
94
-
95
-
96
-
97
-
98
-
99
-
100
-
 101
101 -
 102
102 -
 103
103 -
 104
104 -
 105
105 -
 106
106 -
 107
107 -
 108
108 -
 109
109 -
 110
110 -
 111
111 -
112
-
113
-
114
-
115
-
116
-
117
-
118
-
119
-
120
-
121
-
122
-
123
-
124
-
125
-
126
-
127
-
128
-
129
-
130
-
131
-
132
-
133
-
134
-
135
-
136
-
137
-
138
-
139
-
140
-
141
-
142
-
143
-
144
-
145
-
146
-
147
-
148
-
149
-
150
-
151
-
152
-
153
-
154
-
155
-
156
-
157
-
158
-
159
-
160
-
161
-
162
-
163
-
164
-
165
-
166
-
167
-
168
-
169
-
170
-
171
-
172
-
173
-
174
-
175
-
176
-
177
-
178
-
179
-
180
-
181
-
182
-
183
-
184
-
185
-
186
-
187
-
188
-
189
-
190
-
191
-
192
-
193
-
194
-
195
 |
 |
