Lexmark M410 Service Manual - Page 43
Service Checks, Charge Roll Service Check
 |
UPC - 734646261005
View all Lexmark M410 manuals
Add to My Manuals
Save this manual to your list of manuals |
Page 43 highlights
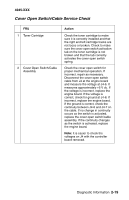
4045-XXX Service Checks Note: Anytime the engine board is replaced, the Configuration ID must be reset in NVRAM on the new engine board. Review the following information before performing any service checks. • Paper feed Problems (especially paper jams): Go to "Viewing the Error Log" on page 3-17 and check the printer error log for indications of repetitive entries that help to isolate a problem to a particular area of the printer or option. • Paper feed Problems with error message: Use the "User Error Messages" on page 2-9 to help diagnose the problem. • Print Quality Problems: Go to "Print Quality Test Pages" on page 3-2 and print a test page to help diagnose problems before changing any settings or working on the printer. • Use the resident diagnostics test provided to help isolate a problem before taking the machine apart or removing any options. Charge Roll Service Check Service Tip: Close and evenly spaced repetitive marks 47.5 mm apart or spots on the page can be caused by a damaged or contaminated charge roll. FRU 1 Charge Roll Assembly 2 Left Side Charge Roll Arm and Bushing Action Check the charge roll for correct installation, toner buildup, marks, cuts or other signs of contamination or damage. Replace as necessary. Check the left side charge roll arm and bushing for correct assembly operation. Check for damage to the arm or bearing assembly. Diagnostic Information 2-17
-
 1
1 -
2
-
3
-
4
-
5
-
6
-
7
-
8
-
9
-
10
-
11
-
12
-
13
-
14
-
15
-
16
-
17
-
18
-
19
-
20
-
21
-
22
-
23
-
24
-
25
-
26
-
27
-
28
-
29
-
30
-
31
-
32
-
33
-
34
-
35
-
36
-
37
-
 38
38 -
 39
39 -
 40
40 -
 41
41 -
 42
42 -
 43
43 -
 44
44 -
 45
45 -
 46
46 -
 47
47 -
 48
48 -
49
-
50
-
51
-
52
-
53
-
54
-
55
-
56
-
57
-
58
-
59
-
60
-
61
-
62
-
63
-
64
-
65
-
66
-
67
-
68
-
69
-
70
-
71
-
72
-
73
-
74
-
75
-
76
-
77
-
78
-
79
-
80
-
81
-
82
-
83
-
84
-
85
-
86
-
87
-
88
-
89
-
90
-
91
-
92
-
93
-
94
-
95
-
96
-
97
-
98
-
99
-
100
-
101
-
102
-
103
-
104
-
105
-
106
-
107
-
108
-
109
-
110
-
111
-
112
-
113
-
114
-
115
-
116
-
117
-
118
-
119
-
120
-
121
-
122
-
123
-
124
-
125
-
126
-
127
-
128
-
129
-
130
-
131
-
132
-
133
-
134
-
135
-
136
-
137
-
138
-
139
-
140
-
141
-
142
-
143
-
144
-
145
-
146
-
147
-
148
-
149
-
150
-
151
-
152
-
153
-
154
-
155
-
156
-
157
-
158
-
159
-
160
-
161
-
162
-
163
-
164
-
165
-
166
-
167
-
168
-
169
-
170
-
171
-
172
-
173
-
174
-
175
-
176
-
177
-
178
-
179
-
180
-
181
-
182
-
183
-
184
-
185
-
186
-
187
-
188
-
189
-
190
-
191
-
192
-
193
-
194
-
195
 |
 |
