Lexmark T522 Setup Guide
Lexmark T522 - Optra Laser Printer Manual
 |
UPC - 734646620642
View all Lexmark T522 manuals
Add to My Manuals
Save this manual to your list of manuals |
Lexmark T522 manual content summary:
- Lexmark T522 | Setup Guide - Page 1
Lexmark T522 Setup Guide May 2001 www.lexmark.com - Lexmark T522 | Setup Guide - Page 2
law: LEXMARK INTERNATIONAL addressed to Lexmark International, Inc , or services do not provisions: Lexmark International, instructions, to a professional service person. • This product is designed, tested and approved to meet strict global safety standards with the use of specific Lexmark instructions - Lexmark T522 | Setup Guide - Page 3
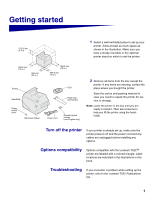
. Options compatibility Options compatible with the Lexmark T522TM printer are labeled with a colored triangle. Label locations are indicated in the illustrations in this book. Troubleshooting If you encounter a problem while setting up the printer, refer to the Lexmark T522 Publications CD. 1 - Lexmark T522 | Setup Guide - Page 4
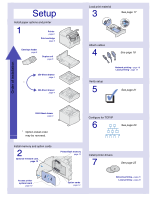
Setup Install paper options and printer 1 Printer page 6 Print cartridge page 6 Envelope feeder page 9 Duplex unit page option cards 2 Optional firmware card page 13 Printer/flash memory page 12 Install printer drivers 7 See page 25 Access printer system board page 10 Option cards page 14 - Lexmark T522 | Setup Guide - Page 5
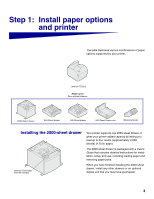
drawer Lexmark T522 label (colored triangle) Your printer supports one 2000-sheet drawer. It gives your printer added capacity by letting you load up to four reams (approximately 2,000 sheets) of 20 lb. paper. The 2000-sheet drawer is packaged with a User's Guide that contains detailed instructions - Lexmark T522 | Setup Guide - Page 6
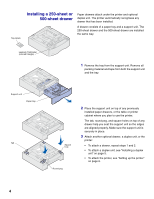
drawers attach under the printer and optional duplex unit. The printer automatically recognizes any drawer that has been installed. A drawer consists of a paper tray and a support unit. The 250-sheet drawer and the 500-sheet drawer are installed the same way. Lexmark T522 label (colored triangle - Lexmark T522 | Setup Guide - Page 7
Back cover The duplex unit attaches under the printer, below the standard input tray and above any paper drawers. Refer to the Lexmark T522 online information, on the Lexmark T522 Publications CD, for details about using the duplex unit. Lexmark T522 label (colored triangle) 500 Sheet Duplex Tab - Lexmark T522 | Setup Guide - Page 8
duplex unit help you seat the printer so the edges are aligned properly. Make sure the printer is securely in place. Square hole Print cartridge 2 Remove the print cartridge packaging. a Push the release latch and open the printer upper front door. b Grasp the print cartridge by the hand grip and - Lexmark T522 | Setup Guide - Page 9
material straight out. Discard all packaging material. d Align the slides on the print cartridge with the slots on the print cartridge cradle. Use the colored arrows inside the printer for placement. e Guide the print cartridge down as it drops and snaps into place. f Close the upper front door - Lexmark T522 | Setup Guide - Page 10
to make sure it adheres securely to the operator panel. d Peel the protective covering away from the over- lay. 5 Attach the paper bail. a Remove the printer top cover and slide the plas- tic bracket onto the static brush holder. Adjust the bracket so it is centered over the area where paper - Lexmark T522 | Setup Guide - Page 11
T522 label (colored triangle) The envelope feeder attaches to the front of your printer behind the lower front door. It can be removed when you are not using it, making the printer more compact. Refer to the Lexmark T522 online information for details about using the envelope feeder. Release latch - Lexmark T522 | Setup Guide - Page 12
Step 2: Install memory and option cards You can customize your printer memory capacity and connectivity by adding optional cards. The instructions in this section help you install any of the following options: • Printer memory • Flash memory • Tri-Port Adapter • USB/Parallel 1284-C Interface Card • - Lexmark T522 | Setup Guide - Page 13
3 Press down on the side door latches and open the side door. Screws Keyhole Tab 4 Loosen, but do not remove, the six screws on the shield. You need a small Phillips screwdriver to loosen these screws. Note: Screws are used to give added protection against memory theft. 5 Use the tabs to slide the - Lexmark T522 | Setup Guide - Page 14
1 Memory connector 2 Note: Some memory and firmware options for other Lexmark printers cannot be used with your printer. Refer to the Lexmark T522 Publications CD for specifications. 1 Follow the steps in "Accessing the printer system board" on page 10. Warning! Electronic components can be - Lexmark T522 | Setup Guide - Page 15
firmware card Follow the instructions in this section to install an optional firmware card. The system board has one location where a firmware card can be installed. Warning! Optional firmware cards are easily damaged by static electricity. Touch something metal on the printer before you touch - Lexmark T522 | Setup Guide - Page 16
to the documentation that shipped with the card. Your printer has two connectors that support the following option cards: • Hard disk with adapter small Phillips screwdriver to install these options. Note: The Lexmark T522 printer ships with an Ethernet print server already installed. Install a - Lexmark T522 | Setup Guide - Page 17
3 Remove and save the two screws on the back of the printer that attach the metal plate to the slot. Remove and discard the plate. 4 Unpack the card. Save the packaging materials. 5 Align the connection points on - Lexmark T522 | Setup Guide - Page 18
Reattaching the shield and closing the doors After you have installed option cards on the printer system board, follow these steps to reattach the shield and close the doors. lower front doors. Note: If you have not completed the section "Setting up the printer" beginning on page 6, do so now. 16 - Lexmark T522 | Setup Guide - Page 19
Step 3: Load print material Length guide lever Length guide Paper size indicators . Paper capacity mark Width guide tab Width guide Complete these instructions to load print material into any of the standard or optional trays. All paper trays are loaded in the same way. 1 Remove the paper tray - Lexmark T522 | Setup Guide - Page 20
to a network or locally (directly to a computer). Network printing You can attach your printer to a network using standard network cables. A 10BaseT/100BaseTX Fast Ethernet port is standard on the Lexmark T522 printer. You can add a Token-Ring or 10Base2 Ethernet port by installing an optional - Lexmark T522 | Setup Guide - Page 21
printer models. The parallel port is standard on the base (nonnetwork) model. The parallel port requires an IEEE-1284 compliant parallel cable. We recommend Lexmark , such as Lexmark part number 43H5171 (9.8 ft). Note: Some UNIX, Linux, and Macintosh computers also support USB connections. Consult - Lexmark T522 | Setup Guide - Page 22
Adapter, you can locally attach the printer with a serial cable. We recommend Lexmark part number 1038693 (50 ft). support USB cable connections. To attach the printer to a computer: 1 Make sure the printer, computer, and any other attached devices are turned off and unplugged. 2 Connect the printer - Lexmark T522 | Setup Guide - Page 23
setup page". Note: You can change the language that appears on the operator panel display. Refer to the Lexmark T522 Publications CD for instructions. Printing a network setup page If the printer is attached to a network, print a network setup page to verify the network connection. This page also - Lexmark T522 | Setup Guide - Page 24
network support instructions. Printing a menu settings page Print the menu settings page to review the default printer settings and to verify that printer options are installed correctly. For more information about using the printer operator panel and changing menu settings, refer to the Lexmark - Lexmark T522 | Setup Guide - Page 25
page 24 and begin with step 2. Note: You can find instructions for other methods of setting the IP address in the online documentation on the drivers CD that shipped with your printer. If your network is not using DHCP, then you must manually assign an IP address. One of the easiest ways is to - Lexmark T522 | Setup Guide - Page 26
for Pull Printing once an IP address has been assigned to your printer. For detailed configuration instructions, refer to the online documentation on the ImageQuick CD. The ImageQuick CD is shipped with printers that have the optional ImageQuick firmware card preinstalled, and also with the - Lexmark T522 | Setup Guide - Page 27
28 28 29 Network printing The following instructions explain how to install printer drivers on printers attached to a network. Windows Ports The following network printer ports are supported: • Microsoft IP port (Windows NT 4.0 and Windows 2000) • Lexmark network port (Windows 95/98/Me, Windows - Lexmark T522 | Setup Guide - Page 28
to install without using the instructions on the drivers CD, you need a basic understanding of network printing on TCP/IP networks, printer driver installation, and the process involved in adding new network ports. Macintosh Your Lexmark T522 printer connects automatically to AppleTalk networks - Lexmark T522 | Setup Guide - Page 29
Web site at www.lexmark.com/drivers. Lexmark provides a printer driver package for each supported UNIX platform containing all the necessary drivers and PPDs. The user's guide contained in each package gives detailed instructions for installing and using Lexmark printers in UNIX environments. You - Lexmark T522 | Setup Guide - Page 30
drivers are supported: • Windows system printer driver • Lexmark T522 custom printer driver System drivers are built into Windows operating systems. Custom drivers are available on the drivers CD. Updated system and custom drivers are available at www.lexmark.com/drivers. Installation instructions - Lexmark T522 | Setup Guide - Page 31
Web site at www.lexmark.com/drivers. Lexmark provides a printer driver package for each supported UNIX platform containing all the necessary drivers and PPDs. The user's guide contained in each package gives detailed instructions for installing and using Lexmark printers in UNIX environments. All - Lexmark T522 | Setup Guide - Page 32
P/N 09H0401 E.C. 2H0000 Lexmark and Lexmark with diamond design are trademarks of Lexmark International, Inc., registered in the United States and/or other countries. © 2001 Lexmark International, Inc. 740 West New Circle Road Lexington, Kentucky 40550 www.lexmark.com
-
 1
1 -
 2
2 -
 3
3 -
 4
4 -
 5
5 -
 6
6 -
 7
7 -
8
-
9
-
10
-
11
-
12
-
13
-
14
-
15
-
16
-
17
-
18
-
19
-
20
-
21
-
22
-
23
-
24
-
25
-
26
-
27
-
28
-
29
-
30
-
31
-
32
 |
 |

www.lexmark.com
Setup Guide
May 2001
Lexmark T522