Lexmark T522 Setup Guide - Page 18
Reattaching the shield and, closing the doors
 |
UPC - 734646620642
View all Lexmark T522 manuals
Add to My Manuals
Save this manual to your list of manuals |
Page 18 highlights
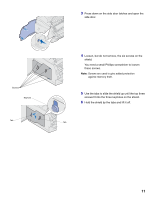
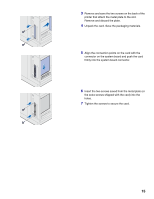
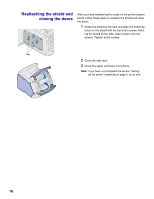
Reattaching the shield and closing the doors After you have installed option cards on the printer system board, follow these steps to reattach the shield and close the doors. 1 Grasp the shield by the tabs and align the three key- holes on the shield with the top three screws. Holding the shield by the tabs, slide it down onto the screws. Tighten all six screws. Tabs 2 Close the side door. 3 Close the upper and lower front doors. Note: If you have not completed the section "Setting up the printer" beginning on page 6, do so now. 16
-
 1
1 -
2
-
3
-
4
-
5
-
6
-
7
-
8
-
9
-
10
-
11
-
12
-
 13
13 -
 14
14 -
 15
15 -
 16
16 -
 17
17 -
 18
18 -
 19
19 -
 20
20 -
 21
21 -
 22
22 -
 23
23 -
24
-
25
-
26
-
27
-
28
-
29
-
30
-
31
-
32
 |
 |

16
Reattaching the shield and
closing the doors
After you have installed option cards on the printer system
board, follow these steps to reattach the shield and close
the doors.
1
Grasp the shield by the tabs and align the three key-
holes on the shield with the top three screws. Hold-
ing the shield by the tabs, slide it down onto the
screws. Tighten all six screws.
2
Close the side door.
3
Close the upper and lower front doors.
Note:
If you have not completed the section
“
Setting
up the printer
”
beginning on page 6, do so now.
Tabs