Lexmark T522 Setup Guide - Page 10
tic bracket onto the static brush holder. Adjust
 |
UPC - 734646620642
View all Lexmark T522 manuals
Add to My Manuals
Save this manual to your list of manuals |
Page 10 highlights
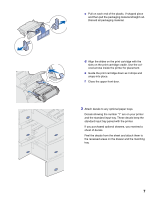
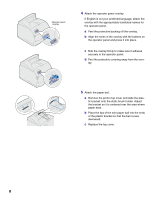
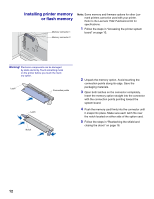
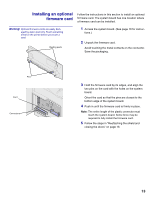
Operator panel overlay 4 Attach the operator panel overlay. If English is not your preferred language, attach the overlay with the appropriately translated names for the operator panel. a Peel the protective backing off the overlay. b Align the holes in the overlay with the buttons on the operator panel and press it into place. c Rub the overlay firmly to make sure it adheres securely to the operator panel. d Peel the protective covering away from the over- lay. 5 Attach the paper bail. a Remove the printer top cover and slide the plas- tic bracket onto the static brush holder. Adjust the bracket so it is centered over the area where paper exits. b Place the tips of the wire paper bail into the ends of the plastic bracket so that the bail curves downward. c Replace the top cover. 8
-
 1
1 -
2
-
3
-
4
-
 5
5 -
 6
6 -
 7
7 -
 8
8 -
 9
9 -
 10
10 -
 11
11 -
 12
12 -
 13
13 -
 14
14 -
 15
15 -
16
-
17
-
18
-
19
-
20
-
21
-
22
-
23
-
24
-
25
-
26
-
27
-
28
-
29
-
30
-
31
-
32
 |
 |
