Lexmark T522 Setup Guide - Page 20
Step 4, Attach cables
 |
UPC - 734646620642
View all Lexmark T522 manuals
Add to My Manuals
Save this manual to your list of manuals |
Page 20 highlights
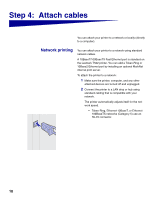
Step 4: Attach cables You can attach your printer to a network or locally (directly to a computer). Network printing You can attach your printer to a network using standard network cables. A 10BaseT/100BaseTX Fast Ethernet port is standard on the Lexmark T522 printer. You can add a Token-Ring or 10Base2 Ethernet port by installing an optional MarkNet internal print server. To attach the printer to a network: 1 Make sure the printer, computer, and any other attached devices are turned off and unplugged. 2 Connect the printer to a LAN drop or hub using standard cabling that is compatible with your network. The printer automatically adjusts itself for the network speed. - Token-Ring, Ethernet 10BaseT, or Ethernet 100BaseTX networks (Category 5) use an RJ-45 connector. 18
-
 1
1 -
2
-
3
-
4
-
5
-
6
-
7
-
8
-
9
-
10
-
11
-
12
-
13
-
14
-
 15
15 -
 16
16 -
 17
17 -
 18
18 -
 19
19 -
 20
20 -
 21
21 -
 22
22 -
 23
23 -
 24
24 -
 25
25 -
26
-
27
-
28
-
29
-
30
-
31
-
32
 |
 |
