Lexmark X466dtwe Wireless Setup Guide - Page 16
For Macintosh users with an AirPort base station, For Macintosh users with a wireless access point
 |
View all Lexmark X466dtwe manuals
Add to My Manuals
Save this manual to your list of manuals |
Page 16 highlights
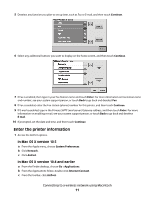
If you do not know the IP address of the wireless access point: 1 Click , or click Start and then click Run. 2 In the Start Search or Run box, type cmd. 3 Press Enter or click OK. The Command Prompt window opens. 4 Type ipconfig, and then press Enter. Check the Wireless Network Connection section: • The "Default Gateway" entry is typically the wireless access point . • The IP address appears as four sets of numbers separated by periods, such as 192.168.2.134. b Type the user name and password of the router when prompted. c Click OK. d On the main page, click Wireless or any other selection where settings are stored. The SSID will be displayed. e Write down the SSID. Note: Make sure you copy it exactly, including any capital letters. 2 Print the printer network setup page. In the Wireless section, look for SSID. 3 Compare the SSID of the computer and SSID of the printer. If the SSIDs are the same, then the computer and the printer are connected to the same wireless network. If the SSIDs are not the same, then run the utility again to set up the printer on the wireless network used by the computer. For Macintosh users with an AirPort base station In Mac OS X version 10.5 1 From the Apple menu, choose System Preferences. 2 Click Network. 3 Click AirPort. The SSID of the network the computer is connected to is displayed in the Network Name pop-up menu. 4 Write down the SSID. In Mac OS X version 10.4 and earlier 1 From the Finder desktop, choose Go > Applications. 2 From the Applications folder, double-click Internet Connect. 3 From the toolbar, click AirPort. The SSID of the network the computer is connected to is displayed in the Network pop-up menu. 4 Write down the SSID. For Macintosh users with a wireless access point 1 Type the IP address of the wireless access point in the address field of your Web browser and continue to Step 2. Troubleshooting wireless setup 16
-
 1
1 -
2
-
3
-
4
-
5
-
6
-
7
-
8
-
9
-
10
-
 11
11 -
 12
12 -
 13
13 -
 14
14 -
 15
15 -
 16
16 -
 17
17 -
 18
18 -
 19
19 -
 20
20 -
 21
21 -
22
-
23
-
24
-
25
-
26
-
27
 |
 |