Lexmark X4850 User's Guide (Mac) - Page 81
Understanding the Photo Edit Mode menu, Understanding the PictBridge Default Print Settings menu
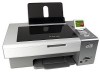 |
UPC - 734646046664
View all Lexmark X4850 manuals
Add to My Manuals
Save this manual to your list of manuals |
Page 81 highlights
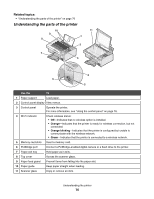
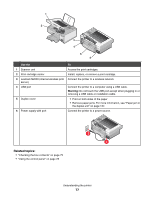
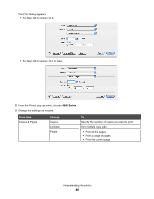
From here Save Photos Change Default Settings Print Camera Selections You can Choose to save photos to a computer or flash drive. Choose default settings for photo size, layout, quality, and paper handling. Print Digital Print Order Format (DPOF) selections. This option appears only when there is a valid DPOF file on your memory device. Related topics: • "Inserting a memory card" on page 56 • "Inserting a flash drive" on page 57 • "Using the control panel" on page 78 Understanding the Photo Edit Mode menu To access the Photo Edit Mode menu: 1 Insert a memory card or flash drive. 2 From the control panel, press . 3 Press to select Browse and Print Photos. 4 Press or to navigate through the photos. 5 Press to select a photo. 6 Press . 7 Press to select Edit Photo. From here Brightness Rotate Crop Auto Enhance Remove Red Eye Colorized Effect Frames You can Adjust the brightness of a photo. Rotate a photo in 90-degree increments clockwise or counterclockwise. Crop a photo. Enhance a photo automatically. Reduce the red-eye effect caused by light reflection. Select whether to print a photo in black and white, sepia, antique brown, or antique gray. Select a frame for the photo. Related topics: • "Inserting a memory card" on page 56 • "Inserting a flash drive" on page 57 • "Using the control panel" on page 78 Understanding the PictBridge Default Print Settings menu The PictBridge Default Print Settings menu lets you select default printer settings that are used if no settings are selected from your digital camera. For more information on making camera selections, see the documentation that came with your camera. Understanding the printer 81
-
 1
1 -
2
-
3
-
4
-
5
-
6
-
7
-
8
-
9
-
10
-
11
-
12
-
13
-
14
-
15
-
16
-
17
-
18
-
19
-
20
-
21
-
22
-
23
-
24
-
25
-
26
-
27
-
28
-
29
-
30
-
31
-
32
-
33
-
34
-
35
-
36
-
37
-
38
-
39
-
40
-
41
-
42
-
43
-
44
-
45
-
46
-
47
-
48
-
49
-
50
-
51
-
52
-
53
-
54
-
55
-
56
-
57
-
58
-
59
-
60
-
61
-
62
-
63
-
64
-
65
-
66
-
67
-
68
-
69
-
70
-
71
-
72
-
73
-
74
-
75
-
 76
76 -
 77
77 -
 78
78 -
 79
79 -
 80
80 -
 81
81 -
 82
82 -
 83
83 -
 84
84 -
 85
85 -
 86
86 -
87
-
88
-
89
-
90
-
91
-
92
-
93
-
94
-
95
-
96
-
97
-
98
-
99
-
100
-
101
-
102
-
103
-
104
-
105
-
106
-
107
-
108
-
109
-
110
-
111
-
112
-
113
-
114
-
115
-
116
-
117
-
118
-
119
-
120
-
121
-
122
-
123
-
124
-
125
-
126
-
127
-
128
-
129
-
130
-
131
-
132
-
133
-
134
-
135
-
136
-
137
-
138
-
139
-
140
-
141
-
142
-
143
-
144
-
145
-
146
-
147
-
148
-
149
-
150
-
151
-
152
-
153
-
154
-
155
-
156
-
157
-
158
-
159
-
160
-
161
-
162
-
163
-
164
-
165
-
166
 |
 |
