Lexmark X4850 User's Guide (Mac) - Page 82
Understanding the Print Files Options menu, To access the PictBridge Default Print Settings menu
 |
UPC - 734646046664
View all Lexmark X4850 manuals
Add to My Manuals
Save this manual to your list of manuals |
Page 82 highlights
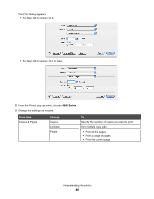
To access the PictBridge Default Print Settings menu: 1 Connect a PictBridge-enabled digital camera to the printer. 2 When the control panel display indicates, press . From here Photo Size Layout Quality Paper Handling You can Specify the size of the photo or photos to be printed. Choose the layout of the photo or photos to be printed. Choose the quality of the photo or photos to be printed. Set the default paper size and paper type. Related topics: • "Printing photos from a PictBridge-enabled digital camera" on page 61 • "Using the control panel" on page 78 Understanding the Print Files Options menu To use the Print Files function, your printer must be connected to a computer, and both the printer and computer must be on. 1 Insert a memory card or flash drive containing document files into the printer. The following file types are supported: • .doc (Microsoft Word) • .xls (Microsoft Excel) • .ppt (Microsoft Powerpoint) • .pdf (Adobe Portable Document Format) • .rtf (Rich Text Format) • .docx (Microsoft Word Open Document Format) • .xlsx (Microsoft Excel Open Document Format) • .pptx (Microsoft Powerpoint Open Document Format) • .wps (Microsoft Works) • .wpd (WordPerfect) 2 After the memory device is detected, press . From here Paper Handling You can Choose the paper size and paper type. 3 Use the control panel buttons to make your selections. 4 Press to save your settings temporarily. Related topics: • "Inserting a memory card" on page 56 • "Inserting a flash drive" on page 57 • "Using the control panel" on page 78 Understanding the printer 82
-
 1
1 -
2
-
3
-
4
-
5
-
6
-
7
-
8
-
9
-
10
-
11
-
12
-
13
-
14
-
15
-
16
-
17
-
18
-
19
-
20
-
21
-
22
-
23
-
24
-
25
-
26
-
27
-
28
-
29
-
30
-
31
-
32
-
33
-
34
-
35
-
36
-
37
-
38
-
39
-
40
-
41
-
42
-
43
-
44
-
45
-
46
-
47
-
48
-
49
-
50
-
51
-
52
-
53
-
54
-
55
-
56
-
57
-
58
-
59
-
60
-
61
-
62
-
63
-
64
-
65
-
66
-
67
-
68
-
69
-
70
-
71
-
72
-
73
-
74
-
75
-
76
-
 77
77 -
 78
78 -
 79
79 -
 80
80 -
 81
81 -
 82
82 -
 83
83 -
 84
84 -
 85
85 -
 86
86 -
 87
87 -
88
-
89
-
90
-
91
-
92
-
93
-
94
-
95
-
96
-
97
-
98
-
99
-
100
-
101
-
102
-
103
-
104
-
105
-
106
-
107
-
108
-
109
-
110
-
111
-
112
-
113
-
114
-
115
-
116
-
117
-
118
-
119
-
120
-
121
-
122
-
123
-
124
-
125
-
126
-
127
-
128
-
129
-
130
-
131
-
132
-
133
-
134
-
135
-
136
-
137
-
138
-
139
-
140
-
141
-
142
-
143
-
144
-
145
-
146
-
147
-
148
-
149
-
150
-
151
-
152
-
153
-
154
-
155
-
156
-
157
-
158
-
159
-
160
-
161
-
162
-
163
-
164
-
165
-
166
 |
 |
