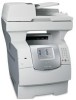
Lexmark X642E Advanced Manual
Lexmark X642E - X642E Manual
 |
UPC - 734646258746
View all Lexmark X642E manuals
Add to My Manuals
Save this manual to your list of manuals |
Lexmark X642E manual content summary:
- Lexmark X642E | Advanced Manual - Page 1
SafeCom Go Lexmark Administrator's Manual D60711-14 June 2012 - Lexmark X642E | Advanced Manual - Page 2
cannot be held responsible for any technical or typographical errors and reserves the right to make changes to products and EUR EP1 120 701. Feedback: If you have any feedback or ideas concerning this manual or the SafeCom product, then please send an e-mail to [email protected] © Copyright 1999 - Lexmark X642E | Advanced Manual - Page 3
page 21 2.4.5 Log web page 22 2.4.6 Password web page 23 2.5 SafeCom Go Lexmark - How to 24 2.5.1 Get the SafeCom Go Lexmark software 24 2.5.2 Specify SafeCom Server 24 2.5.3 Register device 25 2.5.4 Select user identification - User code or card 25 2.5.5 Login with Windows - Lexmark X642E | Advanced Manual - Page 4
issues 40 4.4 SafeCom Go Lexmark device trace facility 40 4.5 At the printer: Login service not available 40 4.6 At the printer: User unknown 41 4.7 At the printer: Login denied 41 4.8 At the printer: Restricted access 41 4.9 At the printer: Error printing document 41 4.10 At - Lexmark X642E | Advanced Manual - Page 5
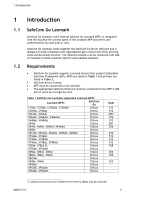
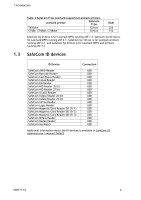
). MFPs are listed in Table 1 and printers are listed in Table 2. SafeCom device license. MFP must be connected to the network. The appropriate SafeCom ID Device must be connected to the MFP's USB port if users are to login by card. Table 1 SafeCom Go Lexmark supported Lexmark MFPs1 Lexmark - Lexmark X642E | Advanced Manual - Page 6
P:Go Lexmark supported Lexmark printers Lexmark printer SafeCom P:Go RAM T656dne 121xxx 256 C748e, C748de, C748dte 031xxx 512 SafeCom Go 012xxx is for Lexmark MFPs running eSF 1.2, SafeCom Go 021xxx is for Lexmark MFPs running eSF 2.1, SafeCom Go 121xxx is for Lexmark printers running eSF - Lexmark X642E | Advanced Manual - Page 7
Print Driver To use SafeCom Pull Print, you need to install the Lexmark Universal Print Driver for PCL5 and PostScript. Lexmark's Universal Print Driver is available on www.lexmark.com. 1. Download a copy of the Lexmark Universal Print Driver and unpack it. Al Lexmark devices that should be part - Lexmark X642E | Advanced Manual - Page 8
for eSF 3.1 based MFPs X746de, X748de and X748dte. Support for eSF 3.1 based printers C748e, C748de and C748dte. Support for delegated print. Support for user access rights (2.5.10). Import Security setup Normal/Role based (2.3.1). Revision D60711-13 SafeCom Go Lexmark version S93 nnn.030 - Lexmark X642E | Advanced Manual - Page 9
S93 nnn.030*01. Updated to reflect the introduction of SafeCom G3 Server. Added section on tracking information (4.13). Revision D60711-09 SafeCom Go Lexmark version S93 nnn.030*01. Introduced Auto-sense as default Identification method (2.4.2). Supports SafeCom G3 Server features: Unicode - Lexmark X642E | Advanced Manual - Page 10
install the SafeCom Go Lexmark software via a web browser: 1. Open a web browser and enter the IP address of the printer in the address field. Use of JavaScript (Active Scripting) must be enabled. 2. Click Settings on the menu. 3. In the Other Settings list click Embedded Solutions. D60711 - Lexmark X642E | Advanced Manual - Page 11
and enter the IP address of the printer in the address field. Use of JavaScript (Active Scripting) must be enabled. 2. Click Settings in the menu. 3. In the Other Settings list click Import/Export. 4. In the Import/Export Security Setups menu select Import Security Setups File. D60711-14 11 - Lexmark X642E | Advanced Manual - Page 12
File Received exit the device web page. When the setup file is imported it will create security templates that define security groups. These templates are matched with the groups in the SafeCom Server User Settings. The templates are used to control users' access to specific printer features, see - Lexmark X642E | Advanced Manual - Page 13
Setups click Access Controls. 6. Browse to Solution 1 and select SafeCom. The solution number must match the solution number under Pull Print access control on the Configuration web page (2.4.2). 7. Set Use Profiles to No Security. 8. If the device is: a printer, proceed to step 10. an MFP - Lexmark X642E | Advanced Manual - Page 14
/hide icons for functions other than SafeCom Pull Print: 1. Open a web browser and enter the IP address of the printer in the address field. Use of JavaScript (Active Scripting) must be enabled. 2. Click Settings on the menu. 3. In the Default Settings list, click General Settings. 4. In the General - Lexmark X642E | Advanced Manual - Page 15
2.4.1 Login to the SafeCom Go Lexmark Web Interface 1. Open a web browser and enter the IP address of the printer in the address field. Use of JavaScript (Active Scripting) must be enabled. 2. Click Applications on the menu. 3. Click SafeCom Go. 4. Enter Password (default is nimda) and click Login - Lexmark X642E | Advanced Manual - Page 16
server (2.4.4). Log - to enable troubleshooting login (2.4.5). Password - change the password (2.4.6). 2.4.2 Configuration web page The Configuration web page is where you configure SafeCom Go Lexmark, including which server it should connect to and how users should be identified. D60711 - Lexmark X642E | Advanced Manual - Page 17
the device, Card or Windows is selected. On a printer, Card is selected. If there is no USB ID device then User code is selected. User code Card Card or User code Card or Windows: Allows the user to login by either card or by entering their Windows username, password, and domain. The SafeCom - Lexmark X642E | Advanced Manual - Page 18
and white. Pull Print access control4: Default is Solution 1, this must match the solution number selected on the Edit Access Controls web page (2.3.2). Drivers: When pull printing, the SafeCom solution compares the driver name embedded in the print job with its list of driver names. If no match - Lexmark X642E | Advanced Manual - Page 19
: Relevant only if SafeCom handles access control for E-mail (2.5.10). Encryption: Configure the max length of encryption keys (2.5.12). Restart the device for changes to take effect. Restore factory default: Returns all settings, except the password, to their default values (2.5.13). D60711-14 19 - Lexmark X642E | Advanced Manual - Page 20
Go Lexmark 2.4.3 Information web page The Information web page shows version, configuration summary and up time. Mail to SafeCom Support: To report a bug, use Mail to SafeCom Support [email protected]. Tell us what the problem is, including a step-by-step description, so SafeCom Support can - Lexmark X642E | Advanced Manual - Page 21
Go Lexmark 2.4.4 Register web page Use the Register web page to register the device with the SafeCom server. The device can be used with SafeCom once it has been registered with the SafeCom server. 1. Enter the User logon and PIN code of a user with Technician or Administrator rights. The user must - Lexmark X642E | Advanced Manual - Page 22
2 SafeCom Go Lexmark 2.4.5 Log web page Use the Log web page to enable, disable and view log information. Only generate log information only if SafeCom Support instructs you to do so for troubleshooting purposes. 1. Click Enable to start logging. 2. Click Disable to stop logging (text changes on - Lexmark X642E | Advanced Manual - Page 23
Go Lexmark 2.4.6 Password web page Change the SafeCom Go Lexmark password on the Password web page. The default password is nimda. If you forget the password you must uninstall (2.8) SafeCom Go Lexmark and install it again. 1. Enter Old password. 2. Enter New password and Verify password. 3. Click - Lexmark X642E | Advanced Manual - Page 24
the Configuration web page (2.4.2) 2. Enter Group Name, SafeCom server TCP port (default is 7500) and SafeCom server IP address in Add. 3. Click Add. 4. In a multiserver solution, click Move up and Move down to prioritize the order in which the servers are contacted in case the first one on the list - Lexmark X642E | Advanced Manual - Page 25
at the device by a user with Technician or Administrator rights. 2.5.4 Select user identification - User code or card 1. Open the Configuration web page (2.4.2). 2. In the Device pane, go to User identification and select User code, Card, Card or User code or Card or Windows. 3. Click Apply. D60711 - Lexmark X642E | Advanced Manual - Page 26
On MFPs with touchscreen it is possible to login by entering your Windows username, password (and domain). If all users belong to the same domain you can configure the device so they don't need to enter their domain at the device. 1. Open the Configuration web page (2.4.2). 2. Specify a Default - Lexmark X642E | Advanced Manual - Page 27
and SafeCom Go Lexmark version S93 nnn.030*08, you can control users' access rights to specific features via SafeCom Administrator, refer to SafeCom G3 Administrator's Manual D60603. You can control access rights to the following features: Copy E-mail Scan Fax Print all button D60711 - Lexmark X642E | Advanced Manual - Page 28
specified as part of the SMTP Setup on the device. The To: field can be pre-filled with User e-mail, Blank or Default To: address. Check Force BCC to user to have the BCC: field pre-filled with the user's email address. 2.5.12 Control max length of encryption keys 1. Open the Configuration web page - Lexmark X642E | Advanced Manual - Page 29
sent encrypted to the device when Encryption is selected in the Device properties dialog and Encrypt documents is selected on the Settings tab in the User properties dialog. When SafeCom is configured to control print data between a server and a device data is always encrypted. Otherwise - Lexmark X642E | Advanced Manual - Page 30
IP Device name Device model Device location User identification Default domain Pre-fill domain Mask user code Login without PIN code Print all at login Document list, Show newest first Track, Copy Track, Folder Track, Fax Track, E-mail Pull Print access control Drivers Timeout Post track High speed - Lexmark X642E | Advanced Manual - Page 31
if the SafeCom Go Lexmark software is loaded and running. 1. Open a web browser and enter the IP address of the printer in the address field. Use of JavaScript (Active Scripting) must be enabled. 2. Click Settings on the menu. 3. In the Other Settings list click Embedded Solutions. 4. Verify - Lexmark X642E | Advanced Manual - Page 32
of the printer in the address field. Use of JavaScript (Active Scripting) must be enabled. Note: If you are uninstalling SafeCom Go 012xxx software (see Table 1 in section 1.2) proceed to step 13. 2. Click Settings on the menu. 3. In the Other Settings list click Security. 4. Click Security Setup - Lexmark X642E | Advanced Manual - Page 33
on the menu. 9. In the Other Settings list click Security. 10. Click Security Setup. 11. Under Advanced Security Setup click Security Templates. 12. Click SafeCom. 13. Click Delete Entry. Then click Delete Entry to confirm. Finally, uninstall SafeCom Go Lexmark: 14. Click Settings on the menu. 15 - Lexmark X642E | Advanced Manual - Page 34
3 Using SafeCom Go Lexmark 3 Using SafeCom Go Lexmark 3.1 Control panel 3.2 Login The login sequence is initiated if you are not already logged in and tap an icon (Pull Print, Copy, E-mail, Fax, or Network Folder) where SafeCom handles access control (2.3.2). If the copy function requires SafeCom - Lexmark X642E | Advanced Manual - Page 35
before you have used the card, you will be prompted with the Enter user code OR use card dialog. If the device also requires a PIN code you will be prompted with the Enter user code OR use card then enter PIN code dialog. 6On Lexmark X464, the touchscreen does not display a 10-second countdown. 7On - Lexmark X642E | Advanced Manual - Page 36
3 Using SafeCom Go Lexmark Login with Windows: If User identification (2.5.4) is Card or Windows, login by using either your card or by entering your Windows login credentials: 1. Enter Username on the touchscreen. Tap Next. 2. Enter Password on the touchscreen. Tap Next. 3. Enter Domain on the - Lexmark X642E | Advanced Manual - Page 37
/Unretain button. Tap Delete to delete the selected documents. Tap Info for information about the selected documents, including cost, driver name, use of color and duplex. Tap Refresh to update the document list with pending documents that have finished spooling after the user logged in. Tap - Lexmark X642E | Advanced Manual - Page 38
The From: field can be pre-filled with User email or Default From: address (see 2.5.10.) Tap each field and enter the address using the keypad or touchscreen. Tap Start to scan and e-mail the document. Logout There is a configurable Timeout that defaults to 60 seconds (2.4.2). The logout process is - Lexmark X642E | Advanced Manual - Page 39
3 Using SafeCom Go Lexmark 3.8 Register card with Windows credentials 1. Use card reader. If there is an available PUK code in the system, tap Cancel in the Please enter PUK dialog. The Login to register card dialog appears. If there are no available PUK codes the user gets the Login to - Lexmark X642E | Advanced Manual - Page 40
as the printer firmware version and latest printer status. The SafeCom trace facility is also used for troubleshooting. However, use only if SafeCom Support instructs you to do so. The log facility is enabled on the SafeCom Go Lexmark Log web page (2.4.5). At the printer: Login service not available - Lexmark X642E | Advanced Manual - Page 41
: Question mark before the document name The list of supported printer drivers does not include an entry matching the driver you used. Use the web browser to add the driver name to the list. 4.11 At the printer: Login error Is the SafeCom Service running on the SafeCom server? Is the - Lexmark X642E | Advanced Manual - Page 42
the documented was processed in the print queue. 4.14 Tracking of blank pages Lexmark devices can be configured to either print or not print blank pages. In order to get correct tracking data we highly recommend the Lexmark device print blank pages. The blank page is tracked as one mono impression - Lexmark X642E | Advanced Manual - Page 43
approved by SafeCom a/s could void the user's authority to operate this equipment according to part 15 of the FCC rules. This equipment generates, uses, and can radiate radio frequency energy and if not installed and used in accordance with the instruction manual, may cause interference to radio - Lexmark X642E | Advanced Manual - Page 44
Login denied, 41 Login service not available, 40 Login without PIN code, 17 Manuals, 7 MFP authentication, 18 Patent, 2 Post track, 18 Register device SafeCom Go Lexmark, 25 Regulatory information, 43 Restricted access, 41 SafeCom Go Lexmark, 5, 14 Printer firmware, 5, 6 SafeCom Help Desk Assistant - Lexmark X642E | Advanced Manual - Page 45
- Lexmark X642E | Advanced Manual - Page 46
6 Index D60711-14 46
-
 1
1 -
 2
2 -
 3
3 -
 4
4 -
 5
5 -
 6
6 -
 7
7 -
8
-
9
-
10
-
11
-
12
-
13
-
14
-
15
-
16
-
17
-
18
-
19
-
20
-
21
-
22
-
23
-
24
-
25
-
26
-
27
-
28
-
29
-
30
-
31
-
32
-
33
-
34
-
35
-
36
-
37
-
38
-
39
-
40
-
41
-
42
-
43
-
44
-
45
-
46
 |
 |

SafeCom Go Lexmark
Administrator’s Manual
D60711-14
June 2012