Lexmark X864 Card Stock & Label Guide - Page 20
aligned with the ribs in the duplex or redrive areas of the printer. This eliminates
 |
View all Lexmark X864 manuals
Add to My Manuals
Save this manual to your list of manuals |
Page 20 highlights
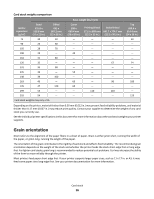
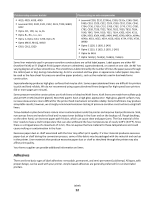
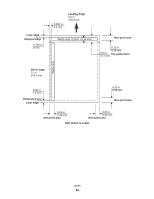
20 mm 21 mm 27 mm 22 mm 15.5 mm 21.5 mm 28 mm 26 mm 17 mm 15 mm Reference Plate When developing a paper label for duplexing, the converter should ensure the label design protects against contamination or buildup. Contamination adversely affects paper feeding and causes paper jams in the printer. We recommend labels used for duplexing have a non-adhesive border around the label area. In addition, make sure the release strength is sufficient to withstand temperatures of 225°C (437°F) and pressures to 25 psi. This is particularly important with a duplex application since the label is subjected to these extremes twice. Use label ties whenever possible. These small uncut areas (approximately 1.6 mm or 0.06 in.) help stabilize the label sheet and prevent tearing at perforations and die-cuts during printing. In addition, using ties helps prevent the labels from predispensing in the printer. The slits and cuts in the labels expose the adhesives to the printer. For best results when duplexing labels, position the label sheet so the slits and cuts are not aligned with the ribs in the duplex or redrive areas of the printer. This eliminates any contact points between the label adhesive and the printer, thereby preventing any adhesive contamination in the printer. The following graphics show the rib locations for the Optra S, Optra T, and Lexmark T, respectively. Optra S rib locations (rib width = 2 mm): Optra T and Lexmark T rib locations (rib width = 2 mm): Labels 20 16 mm 11 mm 15 mm 13 mm 16 mm 17 mm 26 mm 18 mm 12 mm 20 mm 15 mm 12 mm 4.02 mm Reference Plate
-
 1
1 -
2
-
3
-
4
-
5
-
6
-
7
-
8
-
9
-
10
-
11
-
12
-
13
-
14
-
 15
15 -
 16
16 -
 17
17 -
 18
18 -
 19
19 -
 20
20 -
 21
21 -
 22
22 -
 23
23 -
 24
24 -
 25
25 -
26
-
27
-
28
-
29
-
30
-
31
-
32
-
33
-
34
-
35
-
36
-
37
-
38
-
39
-
40
-
41
-
42
-
43
-
44
-
45
-
46
-
47
-
48
-
49
-
50
-
51
-
52
-
53
-
54
-
55
-
56
-
57
-
58
-
59
-
60
-
61
-
62
-
63
-
64
-
65
-
66
-
67
-
68
-
69
-
70
-
71
-
72
-
73
-
74
-
75
-
76
-
77
-
78
-
79
-
80
-
81
-
82
-
83
-
84
-
85
-
86
-
87
-
88
-
89
-
90
-
91
-
92
-
93
-
94
-
95
-
96
-
97
-
98
-
99
-
100
-
101
-
102
-
103
-
104
-
105
-
106
-
107
-
108
-
109
-
110
-
111
-
112
-
113
-
114
-
115
-
116
-
117
-
118
-
119
-
120
-
121
-
122
-
123
-
124
-
125
-
126
-
127
-
128
-
129
-
130
-
131
-
132
-
133
-
134
-
135
-
136
-
137
-
138
-
139
-
140
-
141
-
142
-
143
-
144
-
145
-
146
-
147
-
148
-
149
-
150
-
151
-
152
-
153
-
154
 |
 |
