Lexmark X945e Setup Guide - Page 40
Sending a fax, Sending a fax using the control panel, Improving fax quality
 |
View all Lexmark X945e manuals
Add to My Manuals
Save this manual to your list of manuals |
Page 40 highlights
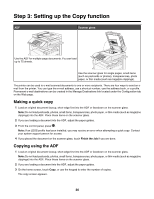
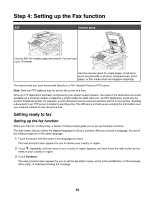
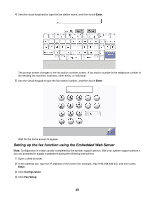
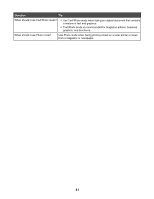
5 Click Configuration. If you are changing fax modes, you must click Submit before you can access the configuration page. Note: During the printer power-on sequence, if the print server is configured to use Network Time Protocol (NTP) time, the current date and time are provided. However, you must set the time zone to get the correct time. 6 Enter the required FCC information: • Date and time (current) • Station name (personal name or company name) • Station number (fax phone line number) 7 Select the Time Zone, such as Eastern (USA and Canada, Eastern Standard Time). This sets the required information. 8 Select the settings for Rings to Answer, and so on. 9 Click Submit when you finish entering all information. Changing optional settings, such as setting up a fax transmission log, creating permanent fax destinations, and enabling the fax server function can be changed through the Embedded Web Server or the control panel. Sending a fax During initial printer setup, you may be required to configure the printer for faxing. For more information, see "Setting up the fax function" on page 38. Sending a fax using the control panel 1 Load an original document faceup, short-edge first into the ADF or facedown on the scanner glass. Note: Do not load postcards, photos, small items, transparencies, photo paper, or thin media (such as magazine clippings) into the ADF. Place these items on the scanner glass. 2 If you are loading a document into the ADF, adjust the paper guides. 3 On the home screen, touch Fax. 4 Enter the fax number or a shortcut using the touch screen or keypad. To add recipients, touch Next Number, and then type the recipient's telephone number or shortcut number, or search the address book. Note: To place a dial pause within a fax number, press . The dial pause appears as a comma in the Fax to: box. Use this feature if you need to dial an outside line first. 5 Touch Fax It. For more information, see the User's Guide on the Software and Documentation CD. Improving fax quality Question When should I use Text mode? Tip • Use Text mode when text preservation is the main goal of the fax, and preserving images copied from the original document is not a concern. • Text mode is recommended for faxing receipts, carbon copy forms, and documents that contain only text or fine line art. 40
-
 1
1 -
2
-
3
-
4
-
5
-
6
-
7
-
8
-
9
-
10
-
11
-
12
-
13
-
14
-
15
-
16
-
17
-
18
-
19
-
20
-
21
-
22
-
23
-
24
-
25
-
26
-
27
-
28
-
29
-
30
-
31
-
32
-
33
-
34
-
 35
35 -
 36
36 -
 37
37 -
 38
38 -
 39
39 -
 40
40 -
 41
41 -
 42
42 -
 43
43 -
 44
44 -
 45
45 -
46
-
47
-
48
-
49
-
50
-
51
-
52
-
53
-
54
-
55
-
56
-
57
-
58
-
59
-
60
-
61
-
62
-
63
 |
 |