LiftMaster LA400 LA400 Manual - Page 31
» Limits - troubleshooting
 |
UPC - 753182403953
View all LiftMaster LA400 manuals
Add to My Manuals
Save this manual to your list of manuals |
Page 31 highlights
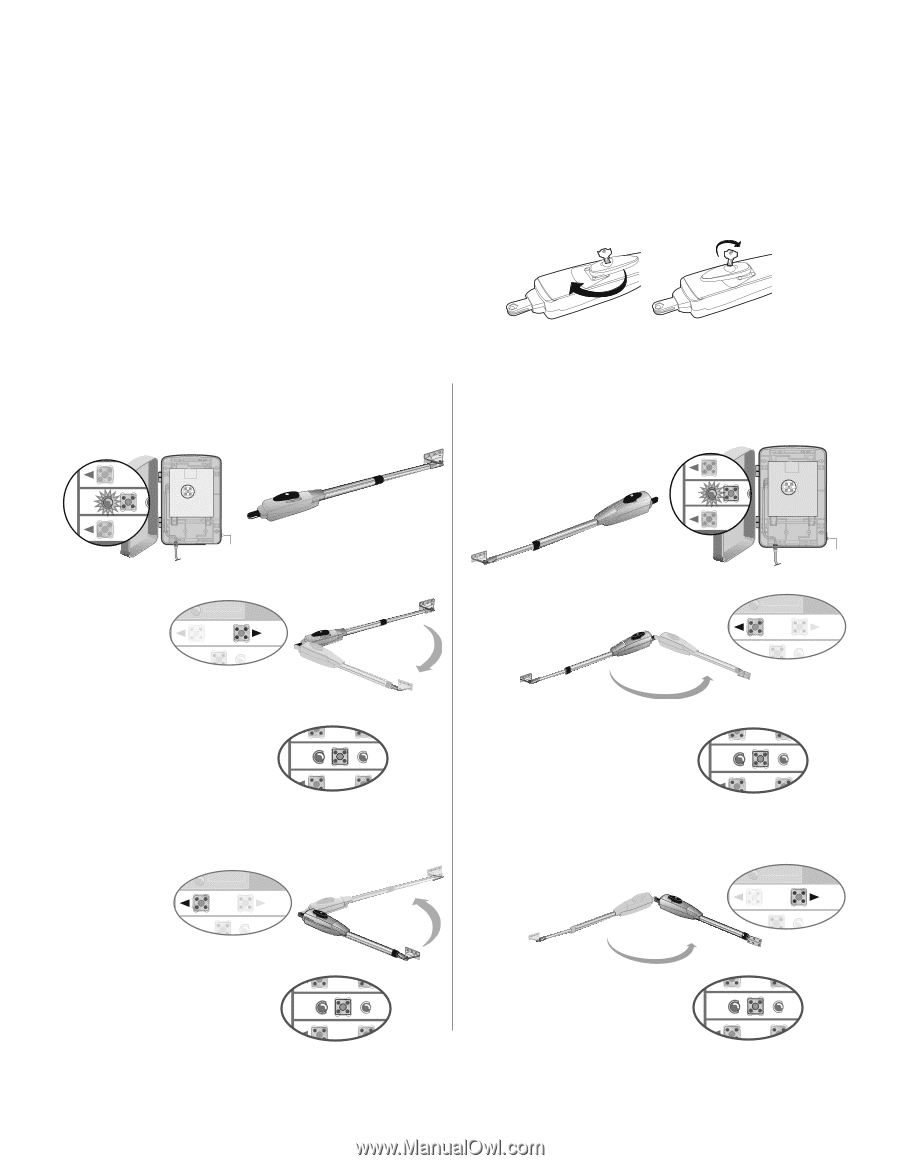
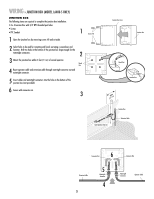
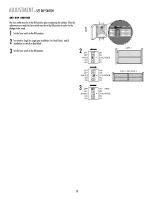
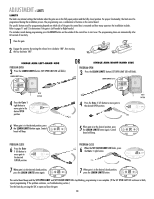
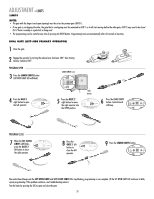
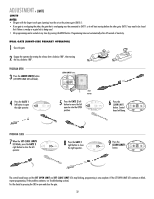
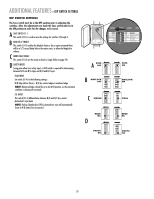
ADJUSTMENT » LIMITS LIMITS The limits are internal settings that indicate when the gates are in the fully open position and the fully closed position. For proper functionality, the limits must be programmed during the installation process. The programming uses a combination of buttons on the control board. The specific buttons used for programming depends on which side of the gate the control box is mounted and how many operators the installation includes. Refer to pages 11 and 12 to determine if the gate is Left-handed or Right-handed. If a mistake is made during programming press the RESET button on the outside of the control box to start over. The programming times-out automatically after 60 seconds of inactivity. 1 Close the gate. 2 Engage the operator by turning the release lever clockwise 180°, then turning the key clockwise 180°. SINGLE ARM LEFT-HAND SIDE PROGRAM OPEN 3 Press the LEARN LIMITS button (SET OPEN LIMIT LED will blink). LEARN LIMITS button SET OPEN LIMIT R2 K2 U4 D4 D2 RESET BUTTON 4 Press the Gate 1 right button to move gate to the desired OPEN position. DIAGNOSTIC GATE 1 SET CLOSE OR SINGLE ARM RIGHT-HAND SIDE PROGRAM OPEN 3 Press the LEARN LIMITS button (SET OPEN LIMIT LED will blink). LEARN LIMITS button SET OPEN LIMIT OFF D9 Z3 Z4 U3 D4 D1 D2 R2 R1 F3 K2 D6 4 Press the Gate 1 left button to move gate to the desired OPEN position. RESET BUTTON DIAGNOSTIC GATE 1 SET CLOSE 5 When gate is in the desired position, press the LEARN LIMITS button again. Control SET OPEN SET CLOSE board will beep. LIMIT LIMIT 5 When gate is in the desired position, press the LEARN LIMITS button again. Control SET OPEN LIMIT SET CLOSE LIMIT board will beep. PROGRAM CLOSE 6 Press the Gate 1 left button to move gate to the desired CLOSED position. DIAGNOSTIC GATE 1 SET CLOSE PROGRAM CLOSE 6 When the SET CLOSE LIMIT LED blinks, press the Gate 1 right button. DIAGNOSTIC GATE 1 SET CLOSE 7 When gate is in the desired closed position, SET press the LEARN LIMITS button again. OPEN LIMIT SET CLOSE LIMIT 7 When gate is in the desired closed position, press the LEARN LIMITS button. SET OPEN LIMIT SET CLOSE LIMIT The control board beeps and the SET OPEN LIMIT and SET CLOSE LIMIT LEDs stop blinking, programming is now complete. (If the SET OPEN LIMIT LED continues to blink, repeat programming. If the problem continues, see Troubleshooting section.) Test the limits by pressing the SBC to open and close the gate. 30
-
 1
1 -
2
-
3
-
4
-
5
-
6
-
7
-
8
-
9
-
10
-
11
-
12
-
13
-
14
-
15
-
16
-
17
-
18
-
19
-
20
-
21
-
22
-
23
-
24
-
25
-
 26
26 -
 27
27 -
 28
28 -
 29
29 -
 30
30 -
 31
31 -
 32
32 -
 33
33 -
 34
34 -
 35
35 -
 36
36 -
37
-
38
-
39
-
40
-
41
-
42
-
43
-
44
-
45
-
46
-
47
-
48
 |
 |