Linksys WPS54GU2 User Guide - Page 24
information, refer to Configuring the PrintServer Using the Web-based Utility., Connect - port setup
 |
UPC - 745883557806
View all Linksys WPS54GU2 manuals
Add to My Manuals
Save this manual to your list of manuals |
Page 24 highlights
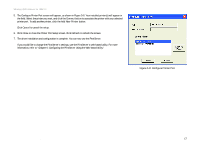
Wireless-G PrintServer for USB 2.0 5. The Configure Printer Port screen will appear, as shown in Figure 5-8. Your installed printer(s) will appear in the field. Select the printer you want, and click the Connect button to associate the printer with your selected printer port. To add another printer, click the Add New Printer button. Click Cancel to cancel the setup. 6. Click Close to close the Printer Port Setup screen. Click Refresh to refresh the screen. 7. The driver installation and configuration is complete. You can now use the PrintServer. If you would like to change the PrintServer's settings, use the PrintServer's web-based utility. For more information, refer to "Chapter 6: Configuring the PrintServer Using the Web-based Utility." Figure 5-8: Configure Printer Port Chapter 5: Windows Driver Installation 17 Starting the Print Driver Utility
-
 1
1 -
2
-
3
-
4
-
5
-
6
-
7
-
8
-
9
-
10
-
11
-
12
-
13
-
14
-
15
-
16
-
17
-
18
-
 19
19 -
 20
20 -
 21
21 -
 22
22 -
 23
23 -
 24
24 -
 25
25 -
 26
26 -
 27
27 -
 28
28 -
 29
29 -
30
-
31
-
32
-
33
-
34
-
35
-
36
-
37
-
38
-
39
-
40
-
41
-
42
-
43
-
44
-
45
-
46
-
47
-
48
-
49
-
50
-
51
-
52
-
53
-
54
-
55
-
56
-
57
-
58
-
59
-
60
-
61
-
62
-
63
-
64
-
65
-
66
-
67
-
68
-
69
-
70
-
71
-
72
-
73
-
74
-
75
-
76
 |
 |
