Linksys WPS54GU2 User Guide - Page 36
Browse, Cancel, Finish, Select Program Folder, Choose Destination Location
 |
UPC - 745883557806
View all Linksys WPS54GU2 manuals
Add to My Manuals
Save this manual to your list of manuals |
Page 36 highlights
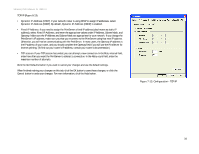
Wireless-G PrintServer for USB 2.0 5. The Choose Destination Location screen will appear, as shown in Figure 8-3. Choose the location where the B-Admin folder will be installed. To install the driver in the default location, click Next. If you want the folder to be installed in a different location, click the Browse button and select the location. Then click Next. Click Back to return to the previous screen. Click Cancel to end the Bi-Admin installation. 6. The Select Program Folder screen, shown in Figure 8-4, will appear. An icon will be added to the program folder listed. You may change the name for the program folder, if you wish. Click Next. Click Back to return to the previous screen. Click Cancel to end the Bi-Admin installation. 7. When the Bi-Admin is installed, the Setup Complete screen will appear. Click Finish. Figure 7-3: Choose Destination Location Chapter 8: Bi-Admin Management Bi-Admin Installation Figure 7-4: Select Program Folder 29
-
 1
1 -
2
-
3
-
4
-
5
-
6
-
7
-
8
-
9
-
10
-
11
-
12
-
13
-
14
-
15
-
16
-
17
-
18
-
19
-
20
-
21
-
22
-
23
-
24
-
25
-
26
-
27
-
28
-
29
-
30
-
 31
31 -
 32
32 -
 33
33 -
 34
34 -
 35
35 -
 36
36 -
 37
37 -
 38
38 -
 39
39 -
 40
40 -
 41
41 -
42
-
43
-
44
-
45
-
46
-
47
-
48
-
49
-
50
-
51
-
52
-
53
-
54
-
55
-
56
-
57
-
58
-
59
-
60
-
61
-
62
-
63
-
64
-
65
-
66
-
67
-
68
-
69
-
70
-
71
-
72
-
73
-
74
-
75
-
76
 |
 |
