Linksys WPS54GU2 User Guide - Page 35
Bi-Admin Management - installation cd
 |
UPC - 745883557806
View all Linksys WPS54GU2 manuals
Add to My Manuals
Save this manual to your list of manuals |
Page 35 highlights
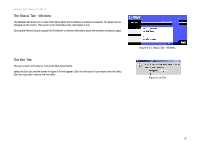
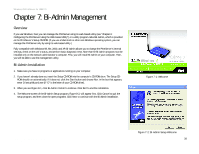
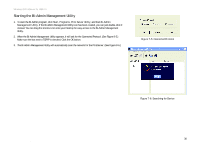
Wireless-G PrintServer for USB 2.0 Chapter 7: Bi-Admin Management Overview If you use Windows, then you can manage the PrintServer using its web-based utility (see "Chapter 6: Configuring the PrintServer Using the Web-based Utility") or a utility program called Bi-Admin, which is provided on the PrintServer's Setup CD-ROM. (If you use a Macintosh or other non-Windows operating system, you can manage the PrintServer only by using its web-based utility.) Fully compatible with Windows 98, Me, 2000, and XP, Bi-Admin allows you to change the PrintServer's internal settings, check on the unit's status, and perform basic diagnostic tests. Note that the Bi-Admin program must be installed only on the network administrator's computer. First, you will install Bi-Admin on your computer. Then, you will be able to use the management utility. Bi-Admin Installation 1. Make sure you have no programs or applications running on your computer. 2. If you haven't already done so, insert the Setup CD-ROM into the computer's CD-ROM drive. The Setup CDROM should run automatically. If it does not, click the Start button and choose Run. In the box that appears, enter D:\setupWizard.exe (if "D" is the letter of your CD-ROM drive). 3. When you see Figure 8-1, click Bi-Admin Install to continue. Click Exit to end the installation. 4. The Welcome screen of the Bi-Admin Setup program, Figure 8-2, will appear first. Click Cancel to quit the setup program, and then close the open programs. Click Next to continue with the Bi-Admin installation. Figure 7-1: Welcome Chapter 8: Bi-Admin Management Overview Figure 7-2: Bi-Admin Setup Welcome 28
-
 1
1 -
2
-
3
-
4
-
5
-
6
-
7
-
8
-
9
-
10
-
11
-
12
-
13
-
14
-
15
-
16
-
17
-
18
-
19
-
20
-
21
-
22
-
23
-
24
-
25
-
26
-
27
-
28
-
29
-
 30
30 -
 31
31 -
 32
32 -
 33
33 -
 34
34 -
 35
35 -
 36
36 -
 37
37 -
 38
38 -
 39
39 -
 40
40 -
41
-
42
-
43
-
44
-
45
-
46
-
47
-
48
-
49
-
50
-
51
-
52
-
53
-
54
-
55
-
56
-
57
-
58
-
59
-
60
-
61
-
62
-
63
-
64
-
65
-
66
-
67
-
68
-
69
-
70
-
71
-
72
-
73
-
74
-
75
-
76
 |
 |
