MSI 975X PLATINUM User Guide - Page 24
Installing DDRII Modules
 |
UPC - 816909035759
View all MSI 975X PLATINUM manuals
Add to My Manuals
Save this manual to your list of manuals |
Page 24 highlights
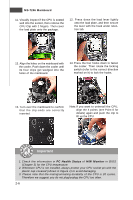
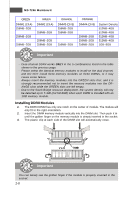
MS-7246 Mainboard GREEN DIMM1 (Ch A) 256MB~2GB 256MB~2GB 256MB~2GB GREEN DIMM2 (Ch A) 256MB~2GB 256MB~2GB 256MB~2GB ORANGE DIMM3 (Ch B) 256MB~2GB 256MB~2GB 256MB~2GB ORANGE DIMM4 (Ch B) 256MB~2GB 256MB~2GB 256MB~2GB System Density 512MB~4GB 512MB~4GB 512MB~4GB 512MB~4GB 1GB~8GB Important - Dual-channel DDRII works ONLY in the 5 combinations listed in the table shown in the previous page. - Please select the identical memory modules to install on the dual channel, and DO NOT install three memory modules on three DIMMs, or it may cause some failure. - Always insert the memory modules into the GREEN slots first, and it is strongly recommended not to insert the memory modules into the ORANGE slots while the GREEN slots are left empty. - Due to the South Bridge resource deployment, the system density will only be detected up to 7+GB (not full 8GB) when each DIMM is installed with an 1GB memory module. Installing DDRII Modules 1. The DDRII DIMM has only one notch on the center of module. The module will only fit in the right orientation. 2. Insert the DIMM memory module vertically into the DIMM slot. Then push it in until the golden finger on the memory module is deeply inserted in the socket. 3. The plastic clip at each side of the DIMM slot will automatically close. Volt Notch Important You can barely see the golden finger if the module is properly inserted in the socket. 2-8
-
 1
1 -
2
-
3
-
4
-
5
-
6
-
7
-
8
-
9
-
10
-
11
-
12
-
13
-
14
-
15
-
16
-
17
-
18
-
 19
19 -
 20
20 -
 21
21 -
 22
22 -
 23
23 -
 24
24 -
 25
25 -
 26
26 -
 27
27 -
 28
28 -
 29
29 -
30
-
31
-
32
-
33
-
34
-
35
-
36
-
37
-
38
-
39
-
40
-
41
-
42
-
43
-
44
-
45
-
46
-
47
-
48
-
49
-
50
-
51
-
52
-
53
-
54
-
55
-
56
-
57
-
58
-
59
-
60
-
61
-
62
-
63
-
64
-
65
-
66
-
67
-
68
-
69
-
70
-
71
-
72
-
73
-
74
-
75
-
76
-
77
-
78
-
79
-
80
-
81
-
82
-
83
-
84
-
85
-
86
-
87
-
88
-
89
-
90
-
91
-
92
-
93
-
94
-
95
-
96
-
97
-
98
-
99
-
100
-
101
-
102
-
103
-
104
-
105
-
106
-
107
-
108
-
109
-
110
-
111
-
112
-
113
-
114
-
115
-
116
-
117
-
118
-
119
-
120
-
121
-
122
-
123
-
124
-
125
-
126
-
127
-
128
-
129
-
130
-
131
-
132
-
133
-
134
-
135
-
136
-
137
-
138
-
139
-
140
-
141
-
142
-
143
-
144
-
145
-
146
-
147
-
148
-
149
-
150
-
151
-
152
-
153
-
154
-
155
-
156
-
157
 |
 |