Magnavox MRD723B Owner's Manual - English - Page 57
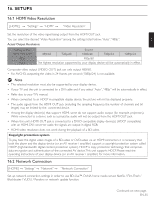
Select Subnet Mask, Default Gateway, Primary DNS and Secondary DNS in turn, and enter each
 |
View all Magnavox MRD723B manuals
Add to My Manuals
Save this manual to your list of manuals |
Page 57 highlights
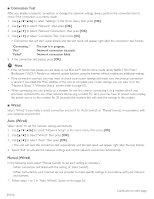
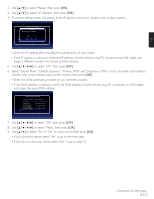
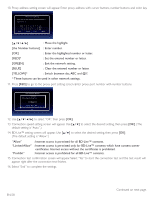
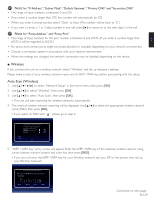
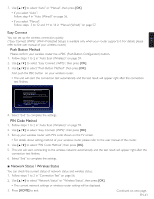
EN 2. Use [Î / ï] to select "Manual", then press [OK]. 3. Use [Î / ï] to select "IP Address", then press [OK]. 4. IP address setting screen will appear. Enter IP address with cursor buttons and number buttons. Network Settings (Manual) IP Address Please input the IP Address. Next Cancel 0 . 0 . 0 . 0 Back Clear OK 5/7 • Enter the IP address after checking the specifications of your router. • If the IP address is unknown, check the IP address of other devices. (e.g. PC connected via LAN cable) and assign a different number from those of other devices. 5. Use to select "OK", then press [OK]. 6. Select "Subnet Mask", "Default Gateway", "Primary DNS" and "Secondary DNS" in turn, and enter each address number with cursor buttons and number buttons, then press [OK]. • Enter the DNS addresses provided by your Internet provider. • If the DNS address is unknown, check the DNS address of other devices (e.g. PC connected via LAN cable) and assign the same DNS address. Network Settings (Manual) Please enter your network settings. IP Address : xxx. xxx. xxx. xxx Subnet Mask : xxx. xxx. xxx. xxx Default Gateway : xxx. xxx. xxx. xxx Primary DNS : xxx. xxx. xxx. xxx Next Secondary DNS : xxx. xxx. xxx. xxx Cancel 5/7 7. Use to select "OK", then press [OK]. 8. Use to select "Next", then press [OK]. 9. Use [Î / ï] to select "Yes" or "No" for proxy server, then press [OK]. • If you use proxy server, select "Yes" to go to the next step. • If you do not use proxy server, select "No" to go to step 13. Continued on next page. EN-57
-
 1
1 -
2
-
3
-
4
-
5
-
6
-
7
-
8
-
9
-
10
-
11
-
12
-
13
-
14
-
15
-
16
-
17
-
18
-
19
-
20
-
21
-
22
-
23
-
24
-
25
-
26
-
27
-
28
-
29
-
30
-
31
-
32
-
33
-
34
-
35
-
36
-
37
-
38
-
39
-
40
-
41
-
42
-
43
-
44
-
45
-
46
-
47
-
48
-
49
-
50
-
51
-
 52
52 -
 53
53 -
 54
54 -
 55
55 -
 56
56 -
 57
57 -
 58
58 -
 59
59 -
 60
60 -
 61
61 -
 62
62 -
63
-
64
-
65
-
66
-
67
-
68
-
69
-
70
-
71
-
72
-
73
-
74
-
75
-
76
-
77
-
78
-
79
-
80
-
81
-
82
-
83
-
84
-
85
-
86
-
87
-
88
-
89
 |
 |
