Marantz DV7600 DV7600 User Manual - Page 29
Creating your own setting
 |
View all Marantz DV7600 manuals
Add to My Manuals
Save this manual to your list of manuals |
Page 29 highlights
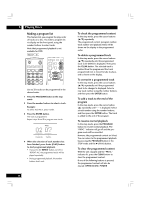
Playing Discs Creating your own setting 1 Press the VIDEO ADJ. button on the remote control. 2 Select "Setup" and then press ENTER. Video Adjustment Memory Select Standard Setup 3 Use the cursor buttons (2/3) to select a Memory (Memory 1, 2, 3) to change/store a picture quality parameter. Video Adjustment Recall Settings Memory 1 Progressive Motion Auto 1 DNR min CNR min Sharpness High soft max max sharp Sharpness Mid soft Detail soft Brightness min sharp sharp max Move : Enter 4 Use the cursor buttons (5/∞) to select a picture quality parameter, then use the cursor buttons (2/3) to adjust that parameter. Contrast Chroma Level Hue Chroma Delay Gamma Black Setup Initialize Move : Video Adjustment min min green - max max red + + 0.0 IRE Off Enter • Progressive Motion - When using progressive scan, this adjusts the motion and still picture quality. There are two modes: Auto and Video. In Auto mode, the player automatically distinguishes film-source material and video-source material. Set to the Video mode when you know the program you are watching is from videosource material (such as animations). Auto 1: Standard setting Auto 2: Setting for moving images Auto 3: Setting for still images Video 1: Standard setting Video 2: Setting for moving images Video 3: Setting for still images • DNR - Adjusts the amount of noise reduction (NR) applied to the Y (brightness) component 5 • CNR - Adjusts the amount of noise reduction (NR) applied to the C (color) component • Sharpness High - Adjusts the sharpness of the high-frequency (finely detailed) elements in the picture • Sharpness Mid - Adjusts the sharpness of the mid-frequency (less detailed) elements in the picture • Detail - Adjusts how sharp edges appear in the picture • Brightness - Adjusts the image brightness • Contrast - Adjusts the image contrast • Chroma Level - Adjusts how saturated colors appear • Hue - Adjusts the overall color balance between red and green • Chroma Delay - Compensates for misalign- ment of the Y (brightness) and the C (color) components • Gamma - Adjusts the brightness of the darker images in the picture • Black Setup - Corrects floating black color • Initialize - Returns to the default values 5 Press ENTER to save your changes. Note • Pressing DISPLAY while the VIDEO ADJUST- MENT screen is displayed shows one adjustment item, as given below, so that you can adjust the item while confirming its effect. Pressing DISPLAY again returns to the former setting. • Chroma Delay will not operate in Composite Video out, S2 Video out and COMPONENT Video out when Interlace is selected. 29 English
-
 1
1 -
2
-
3
-
4
-
5
-
6
-
7
-
8
-
9
-
10
-
11
-
12
-
13
-
14
-
15
-
16
-
17
-
18
-
19
-
20
-
21
-
22
-
23
-
 24
24 -
 25
25 -
 26
26 -
 27
27 -
 28
28 -
 29
29 -
 30
30 -
 31
31 -
 32
32 -
 33
33 -
 34
34 -
35
-
36
-
37
-
38
-
39
-
40
-
41
-
42
-
43
-
44
-
45
-
46
-
47
-
48
-
49
-
50
-
51
-
52
-
53
-
54
-
55
-
56
 |
 |
