Marantz DV7600 DV7600 User Manual - Page 39
Setting up the Audio Setup
 |
View all Marantz DV7600 manuals
Add to My Manuals
Save this manual to your list of manuals |
Page 39 highlights
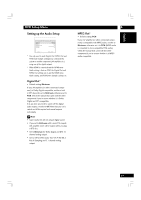
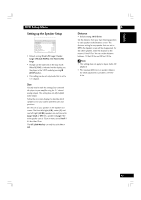
English DVD Setup Menu Setting up the Audio Setup VIDEO HDMI AUDIO SPEAKER SP LEVEL DISC SYSTEM Digital out MPEG Out PCM Down Sample Audio Out Audio DRC Bitstream PCM On 2 Channel (Stereo) Off Move : Select : Enter * You only need to make Digital Out, MPEG Out and PCM Down Sample setting if you connected this system to another component (AV amplifier, etc.) using one of the digital outputs. * When HDMI is connected and the HDMI menu Audio setting is Auto or PCM, the Digital Out and MPEG Out settings are as per the HDMI menu Audio setting, and PCM Down Sample is always on. Digital Out* • Default setting: Bitstream If your AV amplifier (or other connected component) is Dolby Digital compatible, and has a built in DTS decorder set to Bitstream, otherwise set to PCM. Check the manual that came with the other component if you're unsure whether it is Dolby Digital and DTS compatible. If at any time you need to switch off the digital audio output, set this to Off. Note that you can't switch on/off the optical and coaxial outputs individually. Note • Super Audio CD will not output digital sound. • If you set to Bitstream with a non-DTS compatible amplifier, noise will be output when you play a DTS disc. • Set to Bitstream for Dolby Digital and DTS 5.1 channel analog output. • Set to Off for DVD Audio 192/176.4/96/88.2 kHz Hi Sampling and 5.1 channel analog output. 6 MPEG Out* • Default setting: PCM If your AV amplifier (or other connected component) is compatible with MPEG audio, set this to Bitstream, otherwise set it to PCM (MPEG audio is converted to more compatible PCM audio). Check the manual that came with the other component if you're unsure whether it is MPEG audio compatible. 39
-
 1
1 -
2
-
3
-
4
-
5
-
6
-
7
-
8
-
9
-
10
-
11
-
12
-
13
-
14
-
15
-
16
-
17
-
18
-
19
-
20
-
21
-
22
-
23
-
24
-
25
-
26
-
27
-
28
-
29
-
30
-
31
-
32
-
33
-
 34
34 -
 35
35 -
 36
36 -
 37
37 -
 38
38 -
 39
39 -
 40
40 -
 41
41 -
 42
42 -
 43
43 -
 44
44 -
45
-
46
-
47
-
48
-
49
-
50
-
51
-
52
-
53
-
54
-
55
-
56
 |
 |
