Marantz DV7600 DV7600 User Manual - Page 44
Setting up the SP Level Setup, Setting up the DISC Setup
 |
View all Marantz DV7600 manuals
Add to My Manuals
Save this manual to your list of manuals |
Page 44 highlights
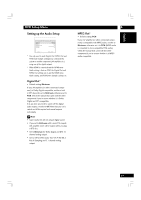
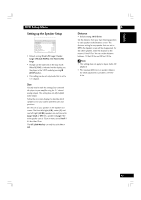
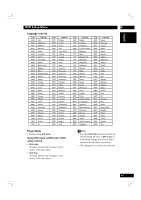
6 DVD Setup Menu Setting up the SP Level Setup VIDEO HDMI AUDIO SPEAKER SP LEVEL DISC SYSTEM Test Tone Front L Level Center Level Front R Level Rear RS Level Rear LS Level LFE (Sub Woofer) Level Off 0.0 dB 0.0 dB 0.0 dB 0.0 dB 0.0 dB 0.0 dB Move : Select : Enter You may want to make this setting if you connected this player to your amplifier using the 5.1 channel analog outputs. If you want to adjust the relative volume levels of any of the speakers, adjustment is in the range of 6dB to +6dB, in steps of 0.5dB. • When you adjust it, the overall output level may sound quieter than when Audio out is set to 2 Channel (Stereo, Lt/Rt) or TruSurround. This is not a malfunction. To help you gauge the correct gain levels, set the Test Tone to Manual (test tone from just that speaker) or Auto (test tone from each speaker in turn), then adjust the gain so that all speakers appear to be the same volume from your listening position. Follow the on-screen displays to select speakers and set the Output Levels. • Many AV amplifiers allow you to make similar settings at the amplifier stage. In this case, set the output levels at the player or the amplifier, not both. • As the test tone plays through a speaker, its name is highlighted in yellow on-screen. • For the Manual Test Tone procedure, use the cursor buttons (5/∞) to select the Speaker, then press the ENTER button to output the test tone, and once again press the ENTER button to change the level. Note • Test tone cannot be used if a disc is loaded press open/close to open the disc tray, and remove a disc. Be sure to press the open/close to close the disc tray. • Change can be made only in the stop mode. When RESUME is indicated on the display, put the player in the STOP mode by pressing 7 (STOP) button. • This setting can be set only Audio Out is set to 5.1 Channel. 44 Setting up the DISC Setup VIDEO HDMI AUDIO SPEAKER SP LEVEL DISC SYSTEM Audio Language Subtitle Language DVD Menu Language Player Mode English English English DVD Audio Move : Select : Enter LANGUAGE settings If you set the Audio Language, Subtitle Language and DVD Menu Language in advance, they will come up automatically every time you watch a movie. • Default setting: English The DVD format recognizes 136 different languages. Choose Others if you want to specify a language other than those listed, then follow the on-screen display to select a language. You may also want to refer to the Language code list on page 45. Tip You can switch between the languages and subtitle recorded on a DVD disc any time during playback using the AUDIO and SUBTITLE buttons. (This does not affect this setting.) Note • You cannot switch languages if there is only one language recorded on the disc. In this case, the mark is displayed. • For some discs, selection can be made using the DVD menu. In these cases, press MENU to display the DVD menu screen and then make your selection. • If the selected language is not recorded on the disc, the original pre-recorded language is selected.
-
 1
1 -
2
-
3
-
4
-
5
-
6
-
7
-
8
-
9
-
10
-
11
-
12
-
13
-
14
-
15
-
16
-
17
-
18
-
19
-
20
-
21
-
22
-
23
-
24
-
25
-
26
-
27
-
28
-
29
-
30
-
31
-
32
-
33
-
34
-
35
-
36
-
37
-
38
-
 39
39 -
 40
40 -
 41
41 -
 42
42 -
 43
43 -
 44
44 -
 45
45 -
 46
46 -
 47
47 -
 48
48 -
 49
49 -
50
-
51
-
52
-
53
-
54
-
55
-
56
 |
 |
