Maytag MDB6709AWQ Installation Instructions
Maytag MDB6709AWQ - Jetclean Plus 24 in. Dishwasher Manual
 |
UPC - 883049154343
View all Maytag MDB6709AWQ manuals
Add to My Manuals
Save this manual to your list of manuals |
Maytag MDB6709AWQ manual content summary:
- Maytag MDB6709AWQ | Installation Instructions - Page 1
INSTALLATION INSTRUCTIONS UNDERCOUNTER DISHWASHER PLASTIC GIANT TUB MODELS INSTRUCTIONS D'INSTALLATION p LAVE-VAISSELLE ENCASTRE MODELES A TRES GRANDE CUVE EN PLASTIQUE Table of Contents 2 Table des mati@res 21 W10240115A - Maytag MDB6709AWQ | Installation Instructions - Page 2
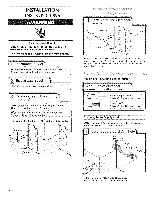
door until latched. • Observe all governing codes and ordinances. • Install this dishwasher as specified in these instructions. • Installation should be performed by a qualified service technician. The dishwasher must be installed to meet all electrical and plumbing national and local codes and - Maytag MDB6709AWQ | Installation Instructions - Page 3
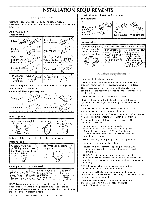
installation. Read and follow the instructions provided with any tools listed here. All Installations Tools needed: In addition, for first=time installations floor. Do not install dishwasher over carpeted flooring. Shelter dishwasher and water lines leading to dishwasher against freezing. Damage - Maytag MDB6709AWQ | Installation Instructions - Page 4
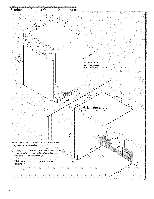
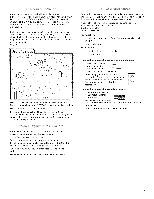
*Insulation may be compressed. _not used on all models} Check that all surfaces have no protrusions that w,ould prohibit dishwasher installation. NOTE: Shaded area of cabinet walls show where utility connections may be installed. *Measured from the lowest point on the underside O| countertop. May be - Maytag MDB6709AWQ | Installation Instructions - Page 5
If required the air gap should be installed in accordance with the air gap installation instructions, when connecting the air gap a rubber dishwasher with direct wiring: • Use flexible, armored or non-metallic sheathed, copper wire with grounding wire that meets the wiring requirements for your home - Maytag MDB6709AWQ | Installation Instructions - Page 6
Disconnec_use box orcircuit I I brea ker box befor e installing dishwasher: If the water line and the cable extend to the locations shown, proceed to the "Install Drain Hose" section. If they do not reach far enough, follow the instructions in the "Prepare Cabinet Opening-New Utilities" section - Maytag MDB6709AWQ | Installation Instructions - Page 7
cabinet opening). Tape cable to the floor in area shown. This will prohibit cable from moving when dishwasher is moved into cabinet opening. l Direct Wire - Drill Helpful Tip: Routing the water line local codes and ordinances. The water line to the dishwasher should have a manual shutoff valve. - Maytag MDB6709AWQ | Installation Instructions - Page 8
the disposer or a waste tee must be made before the drain trap and at least 20" (50.8 cm) above the floor where the dishwasher will be installed. Helpful Tip: To reduce vibration of the hose, keep the hose away from the floor. Option A, Waste disposer - no air gap t ;t ; :i 1. Using a hammer - Maytag MDB6709AWQ | Installation Instructions - Page 9
1C. onnebclat cekndofofdraihnosteowaste teeandcutifneeded. (Donoct utribbesdection.) 2.Attacbhlacekndofdraihnosteowastteee withalargseilvedrraihnoscelam(pprovided). Usepliertsosqueeczleamoppeanndmove intopositioIfnth. edraihnosweascutusea 1Wto' 2"(3.8to5cms)crew-tycplaem(pnot provided). Option C, - Maytag MDB6709AWQ | Installation Instructions - Page 10
push down on open door. Doing so can result in serious injury or cuts. Excessive Weight Hazard Use two or more people to move and install dishwasher. Failure to do so can result in back or other injury. Attac__ Using a 1/4" hex head socket, nut driver or Phillips screwdriver, remove two screws - Maytag MDB6709AWQ | Installation Instructions - Page 11
. D!recwt ire: : FollowOptionBinstructions Electrical Shock Hazard Electrically ground dishwasher. Connect ground wire to green ground connector in terminal box. Do not use an extension cord. Failure to follow these instructions death, fire, or electrical shock. can result in Power - Maytag MDB6709AWQ | Installation Instructions - Page 12
removed screw to secure cover. NOTE: Do not plug into outlet until instructed. Tighten strain relief screws to secure cord. Measure height of cabinet opening from underside of countertop to floor where dishwasher will be installed (you will need to measure the lowest point on the underside of the - Maytag MDB6709AWQ | Installation Instructions - Page 13
as needed in the area shown to bring the dishwasher up to 34" (86.4 cm) below the countertop. NOTE: Shims must be securely attached to floor to prohibit movement when the dishwasher is in use. Using two or more people, stand dishwasher upright. NOTE: Do not install kickplate until instructed. 13 - Maytag MDB6709AWQ | Installation Instructions - Page 14
or on the console-they may dent. Helpful Tip: Temporarily tape utilities to the floor in the locations shown to prohibit them from moving when dishwasher is moved into the cabinet opening. If the door closes too quickly, decrease the spring tension by moving the spring end toward the front of - Maytag MDB6709AWQ | Installation Instructions - Page 15
Alignfrontofdishwashdeoropr anewl ithfronot fcabinedtoors. Youmayneetdoadjusatlignmetnotbeevenwithyour cabinets. Placleevealgainstot pfrontopeninogftub.Chectkhat dishwashiselreveflromsidetosideL. fdishwashisenrotlevel, adjusfrtontlegsupordownuntidl ishwashiselrevel. - Maytag MDB6709AWQ | Installation Instructions - Page 16
drain hose into the black drain hose connector up to the drain hose stop. 16 Route cable so that it does not touch dishwasher motor or lower part of dishwasher tub. Pull cable through cable clamp in terminal box. Select UL Listed/CSA Approved twist-on wire connectors (not included) rated to - Maytag MDB6709AWQ | Installation Instructions - Page 17
Electrical Shock Hazard Electrically ground dishwasher. Connect ground wire to green ground connector in terminal box. Do not use an extension cord. Failure to follow these instructions can result in death, fire, or electrical shock. If needed, see website for animated representation of this step. - Maytag MDB6709AWQ | Installation Instructions - Page 18
., you must use side mounting kit (Part Number 8212560). Follow kit instructions. (Brackets are included with kit.) NOTE: Do not drop screws into bottom of dishwasher. Locate brackets on top of dishwasher and secure dishwasher to countertop with two, # 10 x 1/2" Phillips-head screws (included). The - Maytag MDB6709AWQ | Installation Instructions - Page 19
RemovtoeweflromdishwashReer.insttahllelowedr ishracl - Maytag MDB6709AWQ | Installation Instructions - Page 20
3 prong outlet. Check that power supply cord does not touch dishwasher motor or lower part of dishwasher tub. Reconnect Power [_1 Read the Dishwasher User Instructions that came with your dishwasher. [_1 Check that all parts have been installed and no steps were skipped. Check that you have all - Maytag MDB6709AWQ | Installation Instructions - Page 21
- Nouveaux moyens de raccordement 25 Raccordement a la canalisation d'eau - Pr6paration et installation 26 Installation du tuyau d'6vacuation 27 Instructions d'installation (suite) Pr6paration du lave-vaisselle 29 Raccordement 61ectrique - Cordon d'alimentation 30 Dimensions - Maytag MDB6709AWQ | Installation Instructions - Page 22
¸_i_ _ _ _;_:L"i_ Rassembler les out/Is et pi_ces n_cessaires avant de commencer I'installation. Lire et observer les instructions avec chacun des out/Is de la liste ci-dessous. fournies Pour toutes les installations Outillage n_cessaire : Pi ce n Tournevis _ _J I lame plate Tourne-_crou cl_ - Maytag MDB6709AWQ | Installation Instructions - Page 23
eta un niveau uniforme; (en cas de diff6rence de niveau entre la surface du plancher devant la cavit6 d'installation et le plancher de la cavit6 d'installation, il peut 6tre n6cessaire d'employer des cales pour rehausser le lave-vaisselle.) Dimensions - Produit et cavit6 d'encastrement Conseil - Maytag MDB6709AWQ | Installation Instructions - Page 24
, utiliser des raccords de dia. int. 1/2" ou plus. • Si un brise-vide est n6cessaire, il doit _tre install6 conform6ment aux instructions d'installation fournies avec le produit; un tuyau de caoutchouc (pas fourni) sera n6cessaire pour le raccordement au raccord T du circuit d'6vacuation ou - Maytag MDB6709AWQ | Installation Instructions - Page 25
,_yV_i:!__'_ii!ii_!Oii__iigij!i!:!;!__;_i,_::ig:¸:i!_ii!_!ii!_i:_i::i!ii!i!:_iiCO0_ii_l::ii_!!!:_ii_i_i_ii_ Preparer et installer le c&blage _lectrique Oui--Voir les instructions _ la section "Pr6paration de la cavit6 d i encastrement - Raccordement aux circuits existants i/ . Non-voir les - Maytag MDB6709AWQ | Installation Instructions - Page 26
de 1/2"(1,3 crn) dans le panneau lat6ral ou I'arriere du placard. Placard en bois : Poncer pour produire une surface lisse dans le trou. Placard m6tallique • Installer le passe-ill (Piece no 302797 - pas fourni) sur le trou. 26 Mesurer la Iongueur totale n6cessaire de tube de cuivre ou de tube de - Maytag MDB6709AWQ | Installation Instructions - Page 27
.) IIfautquelaIongueduerlasectioqnuid6passdeanIs'espace d'encastremseonitsuffisanpteoulreraccordemaeIn'et ntr6e dulave-vaissseullrelec6t6gauche/Ia'avandtulave-vaisselle. Purge de la canalisation Installer le tuyau d'6vacuation comme on le volt sur I'illustration, travers le trou perc6 dans - Maytag MDB6709AWQ | Installation Instructions - Page 28
I'enfiler sur le tuyau jusqu'a sa position finale. Si le tuyau d'evacuation a &t& coup&, utiliser une bride a vis de 1V2" _ 2" (3,8 _ 5 cm) (pas fournie). 3. Installer un tuyau de caoutchouc (pas fourni) entre le brise-vide et le raccord T d'evacuation - utiliser des brides _ vis (pas fournies). 28 - Maytag MDB6709AWQ | Installation Instructions - Page 29
des blessures graves ou des coupures. Risque du poids excessif Utiliser deux personnes ou plus pour d_placer et installer le lave=vaisselle. Le non=respect de cette instruction peut causer une blessure au dos ou d'autre blessure. Utiliser un tourne-6crou de 1¼,o, u un tournevis Phillips; 6ter - Maytag MDB6709AWQ | Installation Instructions - Page 30
; d6montleercouvercdleuboftiedreconnexiocno;nservleavr is etlecouvercpleoureutilisation. Installer le cordon d'alimentation de telle de la borne. Ne pas utilJser un cable de rallonge. Le non=respect de ces instructions peut causer un d_ces, un Jncendie ou un choc _lectrJque. 'L ,i _,'A' cte_ y - Maytag MDB6709AWQ | Installation Instructions - Page 31
d'alimentation sur une prise de courant avant d'en avoir regu I'instruction. Si n6cessaire, consulter le site Internet www.whirlpool.comonglet FAQ entre le sol et la face inf6rieure du plan de travail, a I'emplacement d'installation pr6vu (mesurer a partir du point le plus bas de la face inf6rieure - Maytag MDB6709AWQ | Installation Instructions - Page 32
-vaisselle. Faire intervenir deux personnes ou plus pour redresser le lavevaisselle. REMAROUE : Ne pas installer le panneau de plinthe avant d'en avoir re,cu I'instruction. Montant de fixation e. .......M...o..n..tant de fixation ...... Vsdebocage _ (situ6e au fond ...... _ de a po gn6e - Maytag MDB6709AWQ | Installation Instructions - Page 33
V6rifieqruelecondudit'arriv6de'eauestplacs6urlec6t6 gauchdeelacavit6etqueletuyaud'6vacuatieosntplac6pres ducentredelacavit& j Manoeuvre de la porte "_l Si la porte s'ouvre sous I'effet de son propre poids, augmenter la tension des ressorts : d6placer le point d'ancrage de chaque ressort vers I' - Maytag MDB6709AWQ | Installation Instructions - Page 34
lJ Enfiler un _c[ou et une virole _.. --" iur le tube_ V6rifieqruelespieddser6glagdeeI'aplomsobnftermemeennt contaactvelcesolF. ermetrverrouilllaeprortep;laceurn niveaeuncontaactvelcepannedaeufacadVe6. rifieqruele lave-vaisseesltcleentrd6anlsacavit(6avant/arrieSrei ). n6cessamireo, - Maytag MDB6709AWQ | Installation Instructions - Page 35
d'encastrement. Utiliser une pince pour ouvrir compl_tement la bride verte; faire glisser la bride sur le connecteur pour la placer entre les but6es. Installer le cSble d'alimentation de telle mani_re qu'il ne soit pas en contact avec le moteur du lave-vaisselle, jusqu'a la partie inf_rieure de - Maytag MDB6709AWQ | Installation Instructions - Page 36
vert relie Ne pas utiliser un c_ble de rallonge. Le non-respect de ces instructions peut causer un d_ces, un incendie ou un choc _lectrique. liais0n & la sous la rondelle. Bien serrer la vis de connexion. REMARQUE : Installer chaque connecteur de fils sur les conducteurs (mouvement de vissage). - Maytag MDB6709AWQ | Installation Instructions - Page 37
fait d'un mat_riau comme le Corrian, le granit, etc., on dolt utiliser I'ensemble de montage lateral (piece no 8212560). Fx_cuter les instructions pour installer les brides fournies avec I'ensemble. REMARQUE : Veiller a ne pas laisser tomber une vis au fond de la cuve du lave-vaisselle. Identifier - Maytag MDB6709AWQ | Installation Instructions - Page 38
Retirelarserviettdeeprotectioqnuiavai6t t6plac6aeufonddu lave-vaisseRl6lein. stallepranieinr f6rieur. Sin6cessaciroen, sultleersiteInternet www.whirlpool.com/anch(orninggleFtAQq)uipr6senutene descriptivoind6odecette6tape. i¸/¸)((:/ ):(_ii_:))):):) Maintenir les deux panneaux ensemble; placer les - Maytag MDB6709AWQ | Installation Instructions - Page 39
cable de rallonge. Le non-respect de ces instructions peut causer un d_c_s, un incendie ou un V_rifier que tousles composants ont _t_ installes et qu'aucune _tape n'a _t_ d'une intervention de service, essayer d'abord les un nettoyage exceptionnel. Certains modeles sont dot_s d'un dispositif de - Maytag MDB6709AWQ | Installation Instructions - Page 40
W10240115A © 2009 All rights reserved. Tous droits reserves. @Registered trademarkf TM Trademark of Maytag Corporation or its related companies @Marque deposeef TM Marque de commerce de Maytag Corporation ou de ses compagnies affiliees 7/09 Printed in U.S.A. Imprime aux E.-U.
-
 1
1 -
 2
2 -
 3
3 -
 4
4 -
 5
5 -
 6
6 -
 7
7 -
8
-
9
-
10
-
11
-
12
-
13
-
14
-
15
-
16
-
17
-
18
-
19
-
20
-
21
-
22
-
23
-
24
-
25
-
26
-
27
-
28
-
29
-
30
-
31
-
32
-
33
-
34
-
35
-
36
-
37
-
38
-
39
-
40
 |
 |
INSTALLATION
INSTRUCTIONS
UNDERCOUNTER
DISHWASHER
PLASTIC
GIANT
TUB
MODELS
INSTRUCTIONS
D'INSTALLATION
p
LAVE-VAISSELLE ENCASTRE
MODELES
A TRES GRANDE
CUVE
EN PLASTIQUE
Table
of Contents
................................................
2
Table
des mati@res
..............................................
21
W10240115A