Motorola MOTOSLVR L7c Verizon User Guide - Page 14
turn it on & off - driver
 |
View all Motorola MOTOSLVR L7c manuals
Add to My Manuals
Save this manual to your list of manuals |
Page 14 highlights
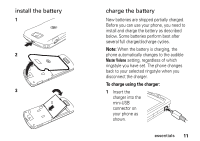
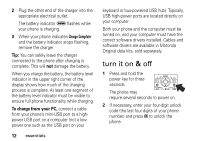
2 Plug the other end of the charger into the appropriate electrical outlet. The battery indicator N flashes while your phone is charging. 3 When your phone indicates Charge Complete and the battery indicator stops flashing, remove the charger. Tip: You can safely leave the charger connected to the phone after charging is complete. This will not damage the battery. When you charge the battery, the battery level indicator in the upper right corner of the display shows how much of the charging process is complete. At least one segment of the battery level indicator must be visible to ensure full phone functionality while charging. To charge from your PC, connect a cable from your phone's mini-USB port to a highpower USB port on a computer (not a lowpower one such as the USB port on your 12 essentials keyboard or bus-powered USB hub). Typically, USB high-power ports are located directly on your computer. Both your phone and the computer must be turned on, and your computer must have the correct software drivers installed. Cables and software drivers are available in Motorola Original data kits, sold separately. turn it on & off 1 Press and hold the power key for three seconds. The phone may require several seconds to power on. 2 If necessary, enter your four-digit unlock code (the last four digits of your phone number) and press OK to unlock the phone.
-
 1
1 -
2
-
3
-
4
-
5
-
6
-
7
-
8
-
 9
9 -
 10
10 -
 11
11 -
 12
12 -
 13
13 -
 14
14 -
 15
15 -
 16
16 -
 17
17 -
 18
18 -
 19
19 -
20
-
21
-
22
-
23
-
24
-
25
-
26
-
27
-
28
-
29
-
30
-
31
-
32
-
33
-
34
-
35
-
36
-
37
-
38
-
39
-
40
-
41
-
42
-
43
-
44
-
45
-
46
-
47
-
48
-
49
-
50
-
51
-
52
-
53
-
54
-
55
-
56
-
57
-
58
-
59
-
60
-
61
-
62
-
63
-
64
-
65
-
66
-
67
-
68
-
69
-
70
-
71
-
72
-
73
-
74
-
75
-
76
-
77
-
78
-
79
-
80
-
81
-
82
-
83
-
84
-
85
-
86
-
87
-
88
-
89
-
90
-
91
-
92
-
93
-
94
-
95
-
96
-
97
-
98
-
99
-
100
-
101
-
102
-
103
-
104
-
105
-
106
-
107
-
108
-
109
-
110
-
111
-
112
-
113
-
114
-
115
-
116
-
117
-
118
-
119
-
120
-
121
-
122
-
123
-
124
-
125
-
126
-
127
-
128
-
129
-
130
-
131
-
132
-
133
-
134
-
135
-
136
-
137
-
138
-
139
-
140
-
141
-
142
-
143
-
144
-
145
-
146
-
147
-
148
-
149
-
150
-
151
-
152
-
153
-
154
-
155
-
156
-
157
-
158
-
159
-
160
-
161
-
162
-
163
-
164
-
165
-
166
-
167
-
168
-
169
-
170
-
171
-
172
-
173
-
174
-
175
-
176
-
177
-
178
-
179
-
180
-
181
-
182
-
183
-
184
-
185
-
186
-
187
-
188
-
189
-
190
-
191
-
192
-
193
-
194
-
195
-
196
-
197
-
198
-
199
-
200
-
201
-
202
-
203
-
204
-
205
-
206
-
207
-
208
-
209
-
210
-
211
-
212
-
213
-
214
-
215
-
216
-
217
-
218
-
219
-
220
-
221
-
222
-
223
-
224
-
225
-
226
-
227
-
228
-
229
-
230
-
231
-
232
-
233
-
234
-
235
-
236
-
237
-
238
-
239
-
240
-
241
-
242
-
243
-
244
-
245
-
246
-
247
-
248
-
249
-
250
 |
 |
