Nikon COOLPIX S9300 Reference Manual - Page 106
Recording Movies, Recording and Playing Back Movies
 |
View all Nikon COOLPIX S9300 manuals
Add to My Manuals
Save this manual to your list of manuals |
Page 106 highlights
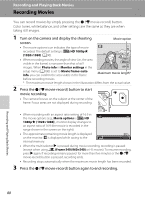
Recording and Playing Back Movies Recording Movies You can record movies by simply pressing the b (e movie-record) button. Color tones, white balance, and other settings are the same as they are when taking still images. 1 Turn on the camera and display the shooting screen. Movie option • The movie options icon indicates the type of movie recorded. The default setting is d HD 1080pP (1920×1080) (A90). • When recording movies, the angle of view (i.e., the area visible in the frame) is narrower than that of still 29m 0s images. When Photo info in Monitor settings in the 1140 setup menu (A100) is set to Movie frame+auto info, you can confirm the area visible in the frame Maximum movie length* before recording movies. * The maximum movie length shown in the illustration differs from the actual value. 2 Press the b (e movie-record) button to start movie recording. • The camera focuses on the subject at the center of the frame. Focus areas are not displayed during recording. • When recording with an aspect ratio setting of 16:9 in the movie options (e.g., Movie options is d HD 1080pP (1920×1080)), monitor display changes to an aspect ratio of 16:9 (the movie is recorded in the range shown in the screen on the right). • The approximate remaining movie length is displayed on the monitor. C is displayed while saving to the 7m23s internal memory. • When the multi selector K is pressed during movie recording, recording is paused (except when using p iFrame 540 (960×540) or HS movies). To resume recording, press K again. If recording remains paused for more than five minutes or the b (e movie-record) button is pressed, recording ends. • Recording stops automatically when the maximum movie length has been recorded. 3 Press the b (e movie-record) button again to end recording. Recording and Playing Back Movies 88
-
 1
1 -
2
-
3
-
4
-
5
-
6
-
7
-
8
-
9
-
10
-
11
-
12
-
13
-
14
-
15
-
16
-
17
-
18
-
19
-
20
-
21
-
22
-
23
-
24
-
25
-
26
-
27
-
28
-
29
-
30
-
31
-
32
-
33
-
34
-
35
-
36
-
37
-
38
-
39
-
40
-
41
-
42
-
43
-
44
-
45
-
46
-
47
-
48
-
49
-
50
-
51
-
52
-
53
-
54
-
55
-
56
-
57
-
58
-
59
-
60
-
61
-
62
-
63
-
64
-
65
-
66
-
67
-
68
-
69
-
70
-
71
-
72
-
73
-
74
-
75
-
76
-
77
-
78
-
79
-
80
-
81
-
82
-
83
-
84
-
85
-
86
-
87
-
88
-
89
-
90
-
91
-
92
-
93
-
94
-
95
-
96
-
97
-
98
-
99
-
100
-
 101
101 -
 102
102 -
 103
103 -
 104
104 -
 105
105 -
 106
106 -
 107
107 -
 108
108 -
 109
109 -
 110
110 -
 111
111 -
112
-
113
-
114
-
115
-
116
-
117
-
118
-
119
-
120
-
121
-
122
-
123
-
124
-
125
-
126
-
127
-
128
-
129
-
130
-
131
-
132
-
133
-
134
-
135
-
136
-
137
-
138
-
139
-
140
-
141
-
142
-
143
-
144
-
145
-
146
-
147
-
148
-
149
-
150
-
151
-
152
-
153
-
154
-
155
-
156
-
157
-
158
-
159
-
160
-
161
-
162
-
163
-
164
-
165
-
166
-
167
-
168
-
169
-
170
-
171
-
172
-
173
-
174
-
175
-
176
-
177
-
178
-
179
-
180
-
181
-
182
-
183
-
184
-
185
-
186
-
187
-
188
-
189
-
190
-
191
-
192
-
193
-
194
-
195
-
196
-
197
-
198
-
199
-
200
-
201
-
202
-
203
-
204
-
205
-
206
-
207
-
208
-
209
-
210
-
211
-
212
-
213
-
214
-
215
-
216
-
217
-
218
-
219
-
220
-
221
-
222
-
223
-
224
-
225
-
226
-
227
-
228
-
229
-
230
-
231
-
232
-
233
-
234
-
235
-
236
-
237
-
238
-
239
-
240
-
241
-
242
-
243
-
244
 |
 |
