Nikon D50 D50 User's Manual - Page 109
AE Lock, Flash Mode, AE-L Button, Release Bttn, Manual - user guide
 |
View all Nikon D50 manuals
Add to My Manuals
Save this manual to your list of manuals |
Page 109 highlights
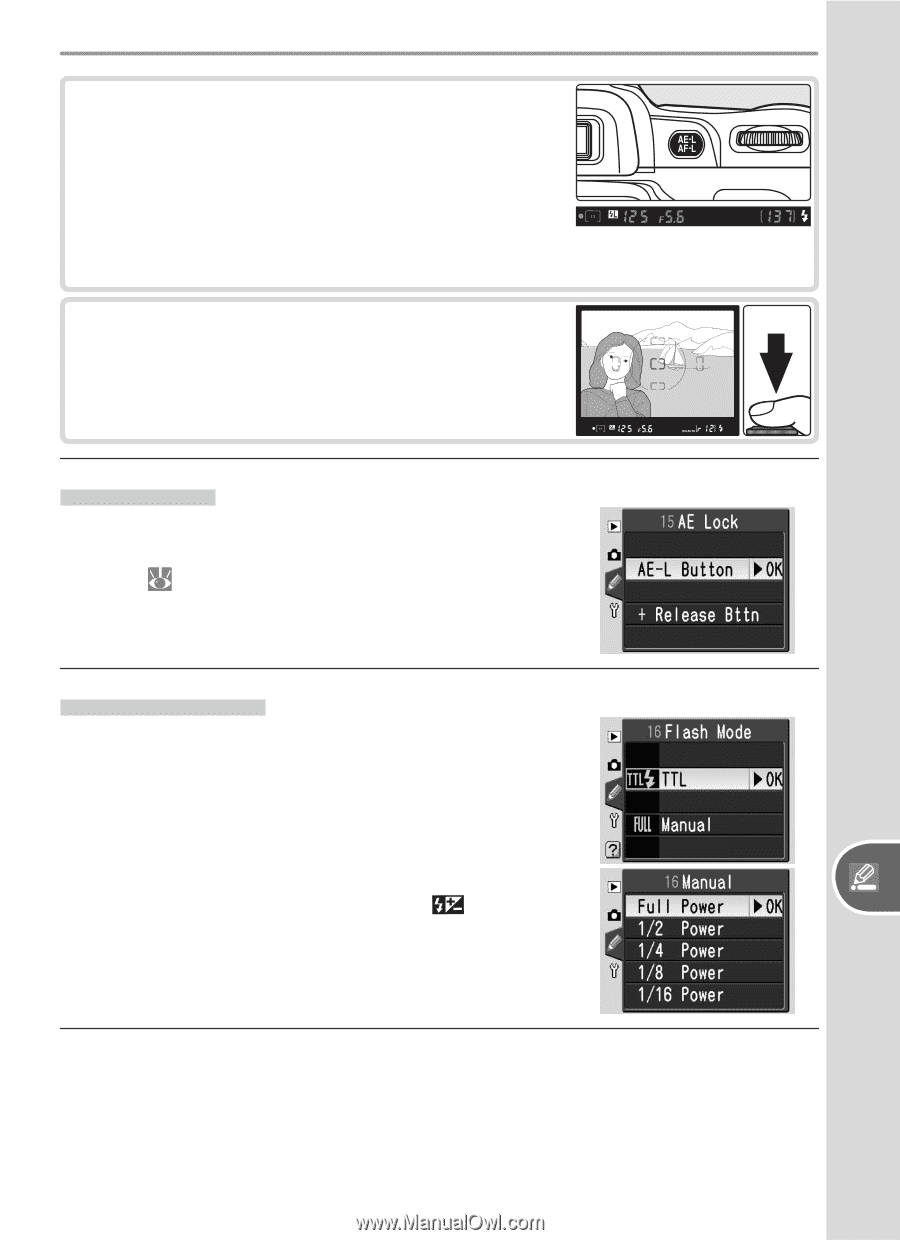
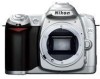
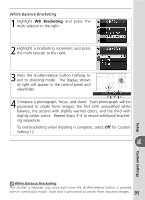
4 Confirm that the flash-ready indicator is displayed in the viewfinder and press the AE-L/AF-L button. The built-in flash will emit a low-intensity pulse to determine the appropriate flash level. Flash output will be locked at this level and an EL icon will be displayed in the viewfinder. 5 Recompose the photograph and shoot. If desired, additional pictures can be taken without releasing FV lock. When shooting is complete, press the AE-L/AF-L button to release FV lock. 15: AE Lock At the default setting of AE-L Button, exposure can only be locked by pressing the AE-L/AF-L button ( 97). If +Release Bttn is selected, exposure will also lock when the shutter-release button is pressed halfway. 16: Flash Mode At the default setting of TLL, the camera adjusts flash level automatically in response to shooting conditions. Selecting Manual allows the user to select the flash level for P, S, A, and M modes from the menu shown below at right (at full power, built-in flash has a Guide Number [m/ft] of 17/56 [ISO 200] or 12/39 [ISO 100]). icons will blink in the control panel and viewfinder when Manual is selected. 99 Setup Custom Settings
-
 1
1 -
2
-
3
-
4
-
5
-
6
-
7
-
8
-
9
-
10
-
11
-
12
-
13
-
14
-
15
-
16
-
17
-
18
-
19
-
20
-
21
-
22
-
23
-
24
-
25
-
26
-
27
-
28
-
29
-
30
-
31
-
32
-
33
-
34
-
35
-
36
-
37
-
38
-
39
-
40
-
41
-
42
-
43
-
44
-
45
-
46
-
47
-
48
-
49
-
50
-
51
-
52
-
53
-
54
-
55
-
56
-
57
-
58
-
59
-
60
-
61
-
62
-
63
-
64
-
65
-
66
-
67
-
68
-
69
-
70
-
71
-
72
-
73
-
74
-
75
-
76
-
77
-
78
-
79
-
80
-
81
-
82
-
83
-
84
-
85
-
86
-
87
-
88
-
89
-
90
-
91
-
92
-
93
-
94
-
95
-
96
-
97
-
98
-
99
-
100
-
101
-
102
-
103
-
 104
104 -
 105
105 -
 106
106 -
 107
107 -
 108
108 -
 109
109 -
 110
110 -
 111
111 -
 112
112 -
 113
113 -
 114
114 -
115
-
116
-
117
-
118
-
119
-
120
-
121
-
122
-
123
-
124
-
125
-
126
-
127
-
128
-
129
-
130
-
131
-
132
-
133
-
134
-
135
-
136
-
137
-
138
-
139
-
140
-
141
-
142
-
143
-
144
-
145
-
146
-
147
-
148
 |
 |