Nokia 5190 User Guide
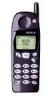
Nokia 5190 - Cell Phone - GSM Manual
 |
View all Nokia 5190 manuals
Add to My Manuals
Save this manual to your list of manuals |
Nokia 5190 manual content summary:
- Nokia 5190 | User Guide - Page 1
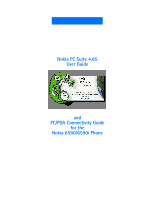
Nokia PC Suite 4.85 User Guide and PC/PDA Connectivity Guide for the Nokia 6590/6590i Phone - Nokia 5190 | User Guide - Page 2
Nokia. All rights reserved. Nokia, Nokia 6590, 6590i, 3360, 5190, 6190, 6340, 6360, 7160, 7190, 8290, 8890, 8390, the Nokia Connecting People, and the Nokia original accessories logos are trademarks or registered trademarks of Nokia Notice Your phone may contact your local service facility. This - Nokia 5190 | User Guide - Page 3
1 Printing this guide 1 Abbreviations 2 Safety notes 2 Infrared communications 2 2 Install Nokia PC Suite 4.85 3 Important note: IR for Windows Me and XP operating system users 3 PC Suite installation instructions 3 Remove PC Suite 4 3 Nokia Content Copier 5 Compatible phones 5 Content - Nokia 5190 | User Guide - Page 4
Launch other PC suite applications 28 8 Wireless modem setup for Nokia 6590/6590i phone 29 Download modem driver 29 Getting connected for the first system) devices 40 General Packet Radio Service (GPRS) and circuit switched data (CSD 40 Learn about your phone as a wireless modem 40 Connections - Nokia 5190 | User Guide - Page 5
and must be configured to recognize your Nokia phone as the active modem (instructions to follow later in this document) Note: This feature is available only if your service provider's network supports digital data calls. Please check with your service provider prior to sending or receiving digital - Nokia 5190 | User Guide - Page 6
guide for detailed safety instructions. Do not connect incompatible products. • To avoid any potential loss of data, you should not make or receive calls while synchronizing data between the phone devices have to be pointing at each other. Your Nokia phone is a Class 1 Laser Product. Enable infrared - Nokia 5190 | User Guide - Page 7
Nokia 6590/6590i phone" on page 29 and perform this task prior to installing Nokia PC Suite. Once you have performed the modem installation, you may continue with the installation instructions below. • PC SUITE INSTALLATION INSTRUCTIONS its terms. 4 Review the safety notes, then click Next. [ 3 ] - Nokia 5190 | User Guide - Page 8
Programs. 3 Scroll through the list of installed applications, then click Nokia PC Suite 4.85. 4 Click the Add/Remove button. 5 Click Remove from the Nokia PC Suite Setup window, then click Next. 6 Follow the on-screen instructions until the setup wizard has completed removing the program. 7 Restart - Nokia 5190 | User Guide - Page 9
can only be read from these phones, then copied to your Nokia 8390, 6340, 6360, or 6590 phone. Note: Nokia Content Copier does not support certain Nokia 5100 and 6100 series phones. For more information on specific models of incompatible phones, please see "Other phones" on page 7. • CONTENT COPIER - Nokia 5190 | User Guide - Page 10
must first be saved to your PC. Once you have connected your Nokia 6590/6590i phone ("target" phone) via IR, follow the instructions found below: "Copy information to the target phone". Save the source phone data Once the source phone's data has been read, you must save the information to your PC - Nokia 5190 | User Guide - Page 11
Copier wizard. • Click Finish to exit Nokia Content Copier. • OTHER PHONES Due to software and hardware differences between generations of phone technology, the following phones are not compatible with Content Copier: Protocol TDMA CDMA GSM1900 Nokia model number 3320 5120, 5125, 5160, 5165 6120 - Nokia 5190 | User Guide - Page 12
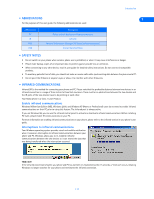
select your PC sound card's MIDI playback device. 1 Click Start, point to Programs, point to Nokia PC Suite, then click Nokia PC Composer. 2 Click COMPOSER The illustration below introduces you to PC Composer's tools and commands: File management Transfer tone to phone Editing tools Send tone - Nokia 5190 | User Guide - Page 13
of up to approximately 70 notes and rests. The phone discards any notes or rests beyond 70. Use the note counter to the right of the Status Bar to monitor the length of your new ringing tone. Create a new ringing tone 1 Launch Nokia PC Composer (click Start, point to Programs, point to - Nokia 5190 | User Guide - Page 14
Nokia PC Composer • OTHER PC COMPOSER VIEWS In Phone from the Tools • SEND RINGING TONE TO ANOTHER PHONE You can also send the ringing tone from your PC to another phone supporting downloadable ringing tones. PC Composer converts the ringing tone to SMS text message format, then instructs your phone - Nokia 5190 | User Guide - Page 15
number for the phone receiving the ringing tone (or select it from the list of phone book entries), then press Send. The ringing tone is transferred to your phone, then sent as an SMS to the recipient. 4 • CREATE RINGING TONES FROM MIDI FILES Nokia Important: PC Suite supports Type 1 MIDI files - Nokia 5190 | User Guide - Page 16
Nokia PC Composer Edit and save You may need to edit the converted MIDI the ringing tone, you can save your work in ringing tone (.ott) format, then send the new tone to your phone. For more information on saving, please refer to "Save your new ringing tone" on page 10. For more information - Nokia 5190 | User Guide - Page 17
and your Nokia mobile phone. You can use Nokia PC Sync to keep information up-to-date in both locations. PC Sync supports a variety about the capacity of your phone's phone book and reminder list, please refer to the technical specifications section of your phone's user guide. 1 Click the Calendar/ - Nokia 5190 | User Guide - Page 18
phone, you can restore it by synchronizing again. Deselecting the Ignore contact deletions option instructs PC Suite Troubleshooting document in numbers in your PIM application and phone book memory only. Numbers stored on your phone's SIM card are not synchronized with your PIM application. Nokia - Nokia 5190 | User Guide - Page 19
application. Select New Synchronization from the Nokia PC Suite program group, then follow the instructions on page 13. Important: New phone and PC. • CREATING A CUSTOM CONTACT LIST Users who have up to 500 contacts in their PIM should create a custom contact list or subset of their master - Nokia 5190 | User Guide - Page 20
the new folder. UPDATE PC SYNC'S OUTLOOK SETTINGS To update PC Sync's settings to synchronize with your custom list: 1 Establish a connection between your phone and PC. 2 Launch Nokia PC Sync from your PC's Start menu. If you have PC Sync enabled on startup, right-click the PC Sync tray icon, then - Nokia 5190 | User Guide - Page 21
press CTRL + V) to paste copies of the selected contacts into the new list. UPDATE PC SYNC'S LOTUS ORGANIZER SETTINGS 1 Establish a connection between your phone and PC. 2 Launch Nokia PC Sync from your PC's Start menu. If you have PC Sync enabled on startup, right-click the PC Sync tray icon, then - Nokia 5190 | User Guide - Page 22
caller group logos via SMS to other compatible Nokia phones that support these features. • TOUR OF PC EDITOR The illustration below introduces you to PC Composer's tools and commands picture size reduces the number of characters that accompanies the picture message (maximum of 121 characters). [ 18 - Nokia 5190 | User Guide - Page 23
Nokia your phone. Tip: PC Graphics automatically selects the correct file type based on the picture type you selected. File types supported: Picture information on saving pictures in your phone, please refer to your phone's user guide. • SEND GRAPHIC TO ANOTHER PHONE AS A TEXT MESSAGE Once you create - Nokia 5190 | User Guide - Page 24
phone number (or select it from the list of phone book entries), then click Send. The Send dialog box also keeps track of the last ten numbers you entered manually. You can also select one of these numbers Nokia PC Graphics. 4 Click the Read from phone button (or select the Read from phone - Nokia 5190 | User Guide - Page 25
-coded bitmap images for use with picture messaging and caller group logos. Capture area Nokia PC Editor provides tools to select or "capture" the portion of the image you want to use, as well as for adjusting the image and converting it to black and white for use in your phone. NON-SUPPORTED - Nokia 5190 | User Guide - Page 26
locations for your data and settings: phone memory, SIM card memory, and your PC (RAM memory and hard drive storage). Each time you launch Phone Editor, phone numbers, text messages and various phone settings (in both phone and SIM card) are read into Phone Editor's memory. When you terminate the - Nokia 5190 | User Guide - Page 27
TO AN EXISTING CARD You can add additional numbers or other information to an existing contact card. Note: The contact card must be in phone memory before adding information. 1 Select the contact to edit from the list. 2 Click the Add entry button, then follow the instructions above to add - Nokia 5190 | User Guide - Page 28
Nokia Phone Editor Note: Your SIM card does not support multiple numbers per name (or other information such as e-mail addresses). For more information on how your phone processes the copying of phone book entries with multiple numbers per name to your SIM card, please see your phone's user guide. - Nokia 5190 | User Guide - Page 29
where messages are stored) List of text messages for the selected folder 7 (read and unread) Memory status (SIM card and phone message memory) • SEND AND MANAGE SMS MESSAGES You can use Nokia Phone Editor's Messages application to send and manage SMS messages from your PC. When you launch the - Nokia 5190 | User Guide - Page 30
Nokia Phone name (as stored in your phone book), then click the Check Names button . -OREnter the recipient's phone number in the Recipient field. 4 Click you can act on the message in a variety of ways: Action Instructions Read Double-click the message header in the Inbox to view the message - Nokia 5190 | User Guide - Page 31
to enable/disable saving a copy of your sent messages • Accessories - used to modify how the various accessories work in conjunction with your phone's profiles Tip: Attach the accessory to the phone first so that your settings are stored in the phone's memory. • User - used to edit and store your - Nokia 5190 | User Guide - Page 32
Nokia Phone Editor • LAUNCH OTHER PC SUITE APPLICATIONS The PC Editor navigation bar contains buttons that can be used to launch the other PC Suite applications. Use these buttons while in Phone Editor to launch PC Composer, PC Graphics, PC Sync, or Content Copier. 7 [ 28 ] - Nokia 5190 | User Guide - Page 33
MODEM DRIVER During the modem installation process, Windows looks for software specific to the new device being installed. The modem driver for your phone can be found in the Nokia 6590/6590i (US products) section of: http://www.nokia.com/us Since the Add New Hardware Wizard for all Windows - Nokia 5190 | User Guide - Page 34
the software to your PC's hard drive. • WINDOWS 2000 MODEM SETUP INSTRUCTIONS 1 Install the security update from Microsoft's web site, then reboot your PC. 2 Enable IR communications on your phone (for more information on enabling IR on your phone, please refer to your phone's user guide). [ 30 ] - Nokia 5190 | User Guide - Page 35
a successful infrared connection has been made, the infrared monitor indicates your phone has been found. Windows 2000 installs your Nokia phone as Standard Modem over IR link. Confirm successful installation of your phone via the Phone and Modem Options Control Panel. Use this new device with your - Nokia 5190 | User Guide - Page 36
Wireless modem setup for Nokia 6590/6590i phone 5 Double-click the Standard Modem over IR Link entry 7 Click Next when the Wizard indicates it will search for the best drivers. 8 Insert the Nokia floppy disk into your floppy drive. Verify that ONLY the Floppy disk drives option is checked (clear - Nokia 5190 | User Guide - Page 37
OPERATING SYSTEM) 8 Wireless modem support using IR with Windows XP is similar to that of the Windows 2000 operating system with the security update applied. To install your phone as a wireless modem using infrared, please see "Windows 2000 Modem Setup instructions" on page 30, but begin - Nokia 5190 | User Guide - Page 38
Packet Radio Service (GPRS) Your Nokia phone is the first in a new generation of phones to take advantage traveling and want to surf the Web or check e-mail wirelessly. Because your service provider is your Internet access point, you don't have to search for your regular ISP's local dial-up number - Nokia 5190 | User Guide - Page 39
a GPRS access point to allow secure access to their network from your wireless service provider Observe the following before making or to the Internet through your wireless service provider's access point. However, instead of dialing a traditional phone number, the dialing string to access - Nokia 5190 | User Guide - Page 40
Nokia phone as the modem to use, then click Next. 5 Enter the GPRS network access code: *99#, then click Finish. You may need to remove area code information so only the access code AOL) account. However, instead of using the AOL dial-up number, you connect 9 using AOL's TCP/IP connection. To - Nokia 5190 | User Guide - Page 41
with your Nokia phone (as detailed below). GATHER CONFIGURATION INFORMATION You need the phone number for your Internet service provider or : Your wireless service provider must support digital data for this feature to work. Contact your service provider to verify that this service is available in - Nokia 5190 | User Guide - Page 42
own proprietary software. Important: These examples are provided for your information only. Nokia does not endorse or provide support for any of the above applications or services. REMINDERS! Before you can use your Nokia phone with ANY data program, you must first do the following: • Establish an - Nokia 5190 | User Guide - Page 43
Nokia phone are possible only if your service provider supports digital data and fax service. You may be required to subscribe to these services. Check with your service your Nokia phone as number assigned to your phone call by pressing your phone's and could cause using your phone's keypad. All - Nokia 5190 | User Guide - Page 44
instructions SERVICE (GPRS) AND CIRCUIT SWITCHED DATA (CSD) Before you can use your phone manual or the 3com web site for more information on third-party software. http://www.palm.com/ Important: To access the Internet using CSD, you must have an existing dial-up account with a full-service Nokia phone - Nokia 5190 | User Guide - Page 45
then tap New. 4 Enter a name for this service (example: GPRS). Leave user name and password blank. 5 Tap the Connection drop-down arrow, then tap the name of the connection device (example: Nokia). 6 Enter the GPRS network access code ( *99# ) in the Phone field. The setup is now complete. CONNECT - Nokia 5190 | User Guide - Page 46
digital data services before trying to configure your PalmOS device. • LEARN ABOUT YOUR PHONE AS A WIRELESS MODEM You can use your Nokia phone as a your device's user guide. Create a modem connection 11 To create a new modem connection for use with your wireless service provider's GPRS network: - Nokia 5190 | User Guide - Page 47
the GPRS network access code: *99# in the Phone number field, then click Next new GPRS modem connection To connect to your Internet service provider or corporate network: 1 Tap the Start a new modem connection for use with your Nokia phone is similar to that found in the various guide. [ 43 ] - Nokia 5190 | User Guide - Page 48
service provider or corporate network: 1 Tap the Start icon , then tap Settings. 2 Tap the Connections tab, then tap Modem. 3 Tap New Connection, then enter a name for the connection (example: Internet-Nokia phone tap Next. 7 Enter the area code (if necessary) and phone number, then click Next. 8 Tap - Nokia 5190 | User Guide - Page 49
way Pocket PC dials local, long distance, and international numbers. For more information on dialing patterns, consult your handheld service provider or corporate network: 1 Tap the Start icon , then tap Programs. 2 Tap Connections, then tap your new modem connection (example: Internet-Nokia phone - Nokia 5190 | User Guide - Page 50
PC Graphics 20 existing graphic in phone 20 Edit Profiles 27 Edit ringing tone change duration 9 change note duration 9 change pitch 9 Edit settings 27 F Fax configuring software 39 modem selection 39 File formats not supported 21 supported 21 G General Packet Radio Service (GPRS) 34 GPRS dial-up - Nokia 5190 | User Guide - Page 51
3 uninstall PC Suite 4 Internet access wireless service provider 34 Introduction 1 IR 2 enable IR as SMS 19 transfer to phone 19 New modem connection 35, 37 New Synchronization 15 Nokia Modem Setup (Windows 2000) 15 options 15 starting application 15 supported PIMs 13 synchronize for the first time - Nokia 5190 | User Guide - Page 52
text file 26 storing on PC 26 Sound card setup 8 Source phone 6 Standard MIDI File edit 12 Standard MIDI file open 11 save 12 Standard MIDI files (about) 11 subset of phone book 15 Synchronization conflicts 13 System requirements 1 T Target phone 6 Time-out 2 Types of data applications 37 U Update
-
 1
1 -
 2
2 -
 3
3 -
 4
4 -
 5
5 -
 6
6 -
 7
7 -
8
-
9
-
10
-
11
-
12
-
13
-
14
-
15
-
16
-
17
-
18
-
19
-
20
-
21
-
22
-
23
-
24
-
25
-
26
-
27
-
28
-
29
-
30
-
31
-
32
-
33
-
34
-
35
-
36
-
37
-
38
-
39
-
40
-
41
-
42
-
43
-
44
-
45
-
46
-
47
-
48
-
49
-
50
-
51
-
52
 |
 |

Nokia PC Suite 4.85
User Guide
and
PC/PDA Connectivity Guide
for the
Nokia 6590/6590i Phone