Oki C3600n Color Access Policy Manager (CAPM) User's Guide - Page 23
Edit a Policy, Application, Document Name/URLs or Host Name
 |
View all Oki C3600n manuals
Add to My Manuals
Save this manual to your list of manuals |
Page 23 highlights
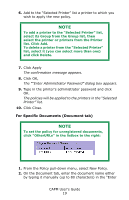
The confirmation message appears. 7. Click OK, The "Enter Administrator Password" dialog box appears. 8. Type in the printer's administrator password and click OK. The policies will be applied to the printers in the "Selected Printer" list. 9. Click Close. Edit a Policy NOTE For the meaning of the information in the Status column, see the "Policy Status Messages" table on page 27. 1. Select from the Group list the group to which the printer belongs, then select from the Printer list the printer which contains the policy you want to edit. 2. In the Policy drop-down menu, select Edit Policy. The Policy dialog box displays the policy acquired from the printer. 3. Click the tab for which you wish to make changes. 4. In Policy listbox on the right, select the Login Name, Application, Document Name/URLs or Host Name for which you wish to make changes. 5. Click the radio button for the revised type of access you want, then click Change. 6. CLick Apply. 7. Select the appropriate Group from the Group drop-down list, then click the appropriate printer(s) from the listbox. 8. Click Add. The printer(s) appear in the Selected Printer listbox on the right. 9. Click Apply. then click OK CAPM User's Guide 23
-
 1
1 -
2
-
3
-
4
-
5
-
6
-
7
-
8
-
9
-
10
-
11
-
12
-
13
-
14
-
15
-
16
-
17
-
 18
18 -
 19
19 -
 20
20 -
 21
21 -
 22
22 -
 23
23 -
 24
24 -
 25
25 -
 26
26 -
 27
27 -
 28
28 -
29
-
30
-
31
 |
 |
