Oki C710n Network User's Guide, English - Page 39
Yes, I want to launch Oki LPR Utility
 |
View all Oki C710n manuals
Add to My Manuals
Save this manual to your list of manuals |
Page 39 highlights
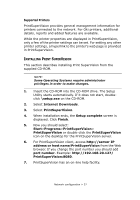
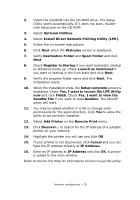
2. Insert the CD-ROM into the CD-ROM drive. The Setup Utility starts automatically. If it does not start, doubleclick setup.exe on the CD-ROM. 3. Select Optional Utilities. 4. Select Install Direct Network Printing Utility (LPR). 5. Follow the on-screen instructions. 6. Click Next when the Welcome screen is displayed. 7. Verify Destination Folder and Spool Folder and click Next. 8. Check Register in Startup if you want automatic startup as Windows boots up. Check Launch as minimized if you want to startup in the Icon state and click Next. 9. Verify the program folder name and click Next. The installation starts. 10. When the installation ends, the Setup complete screen is displayed. Check Yes, I want to launch Oki LPR Utility now and click Finish. Check Yes, I want to view the ReadMe File if you want to read Readme. The OkiLPR utility will start. 11. You may be asked whether it is OK to change write permissions for the spool directory. Click Yes to allow the utility to be correctly installed. 12. Select Add Printer on the Remote Print menu. 13. Click Discover... to search for the IP address of a suitable printer on your network. 14. Highlight the printer you will use and click OK. 15. If your printer is not discovered, click Cancel and you can type the IP address directly at IP Address:. 16. Enter an IP address at IP Address and click OK. A printer is added to the main window. Refer to the On-line Help for information on how to use the utility. Network configuration > 39
-
 1
1 -
2
-
3
-
4
-
5
-
6
-
7
-
8
-
9
-
10
-
11
-
12
-
13
-
14
-
15
-
16
-
17
-
18
-
19
-
20
-
21
-
22
-
23
-
24
-
25
-
26
-
27
-
28
-
29
-
30
-
31
-
32
-
33
-
 34
34 -
 35
35 -
 36
36 -
 37
37 -
 38
38 -
 39
39 -
 40
40 -
 41
41 -
 42
42 -
 43
43 -
 44
44 -
45
-
46
-
47
-
48
-
49
-
50
-
51
-
52
-
53
-
54
-
55
-
56
-
57
-
58
-
59
-
60
-
61
-
62
-
63
-
64
-
65
-
66
-
67
-
68
-
69
-
70
-
71
-
72
-
73
-
74
-
75
-
76
-
77
-
78
-
79
-
80
-
81
 |
 |