Olympus E10 E-10 Instructions (English) - Page 5
How to Use This Manual
 |
View all Olympus E10 manuals
Add to My Manuals
Save this manual to your list of manuals |
Page 5 highlights
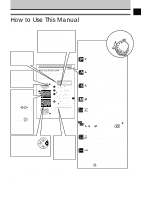
How to Use This Manual The sample page below shows you how the use this manual. Setting Tables Initial settings (defaults) are indicated in bold. Procedures Follow the numbered procedures. The numbers in the illustrations on the left correspond to the step numbers on the right. Indicates the corresponding step number of the procedure on the right. Using the Menus To open the next page of a menu in the direction indicated by the arrows , press the appropriate pointer on the arrow pad to move the highlighted green frame in order to perform settings. Selecting Sharpness Three settings are available for adjusting sharpness: HARD, NORMAL, and SOFT. SHARP sharpens the contrast at color borders to maximize the clarity of the image. NORMAL Enabled when you purchase the camera. Defines borders to achieve best focus fo printing the image. HARD Greatly enhances and sharpens borders. SOFT Softens borders slightly and is ideal for images that you intend to process with a computer graphics software application. 2 3 OFF Previous shot is not displayed. Previous shot is displayed for as long AUTO as it takes for the image to be stored on the memory card. 1 5sec Previous shot is displayed for 5 seconds. 1 Press the menu button . The menu opens in the monitor. 2 On the arrow pad, press or to move the green highlight to the sharp option mark . 3 On the arrow pad, press to move the green highlight to HARD, NORMAL, or SOFT. The mark is displayed in the control panel when a setting other than NORMAL is 7 selected. 4 Press the button to select the setting. The green highlight returns to the sharp option mark . Press button again to close the menu. Note • Selecting HARD could cause the image to appear rough. 4 137 Arrow pad Press the black pointer. If more than one pointer is marked in black, press either pointer. Cautions and Notes provided at bottom of the page describe precautions and tips about using the camera. Move the mode dial to align the mark with . Mode Dial Setting Tells you the possible mode dial settings required to follow the procedure. OFF ON P (Program mode) Camera automatically selects the best aperture value and shutter speed for the shot. A (Aperture priority mode) Allows you to set the aperture value (camera selects the shutter speed). S (Shutter priority mode) Allows you to set the shutter speed (camera selects the aperture value). M (Manual mode) Allows you to set both the shutter speed and aperture value. (Playback mode) Allows you to display on the monitor images of pictures you have taken. When shooting mode is set for P, A, S, or M, rapidly press (Monitor button) twice to enter the playback mode. (Print reserve mode) Allows you to select images for printing on a DPOF printer or by a DPOF printing service. (Setup/connection mode) Select this setting before you connect the camera to a computer. Also displays the camera setup features after you press the menu button . This is only a sample, not a real page. Please do not attempt to execute the procedure described on this page. 3
-
 1
1 -
 2
2 -
 3
3 -
 4
4 -
 5
5 -
 6
6 -
 7
7 -
 8
8 -
 9
9 -
 10
10 -
 11
11 -
12
-
13
-
14
-
15
-
16
-
17
-
18
-
19
-
20
-
21
-
22
-
23
-
24
-
25
-
26
-
27
-
28
-
29
-
30
-
31
-
32
-
33
-
34
-
35
-
36
-
37
-
38
-
39
-
40
-
41
-
42
-
43
-
44
-
45
-
46
-
47
-
48
-
49
-
50
-
51
-
52
-
53
-
54
-
55
-
56
-
57
-
58
-
59
-
60
-
61
-
62
-
63
-
64
-
65
-
66
-
67
-
68
-
69
-
70
-
71
-
72
-
73
-
74
-
75
-
76
-
77
-
78
-
79
-
80
-
81
-
82
-
83
-
84
-
85
-
86
-
87
-
88
-
89
-
90
-
91
-
92
-
93
-
94
-
95
-
96
-
97
-
98
-
99
-
100
-
101
-
102
-
103
-
104
-
105
-
106
-
107
-
108
-
109
-
110
-
111
-
112
-
113
-
114
-
115
-
116
-
117
-
118
-
119
-
120
-
121
-
122
-
123
-
124
-
125
-
126
-
127
-
128
-
129
-
130
-
131
-
132
-
133
-
134
-
135
-
136
-
137
-
138
-
139
-
140
-
141
-
142
-
143
-
144
-
145
-
146
-
147
-
148
-
149
-
150
-
151
-
152
-
153
-
154
-
155
-
156
-
157
-
158
-
159
-
160
-
161
-
162
-
163
-
164
-
165
-
166
-
167
-
168
-
169
-
170
-
171
-
172
-
173
-
174
-
175
-
176
-
177
-
178
-
179
-
180
-
181
-
182
-
183
-
184
-
185
-
186
-
187
-
188
-
189
-
190
-
191
-
192
-
193
-
194
-
195
-
196
-
197
-
198
-
199
-
200
-
201
-
202
-
203
 |
 |
