Olympus SP 500 SP-500 UZ Advanced Manual (English) - Page 58
Changing ISO sensitivity (ISO), Changing picture brightness
 |
UPC - 050332156173
View all Olympus SP 500 manuals
Add to My Manuals
Save this manual to your list of manuals |
Page 58 highlights
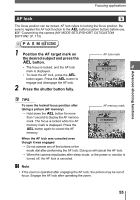
Changing ISO sensitivity (ISO) The higher the ISO, the better the camera's light sensitivity and ability to shoot in low light conditions. However, high sensitivity introduces noise into the resulting picture, which may give it a grainy appearance. AUTO 80/100/200/ 400 Sensitivity is automatically adjusted according to the conditions of the subject. With a low ISO setting, you can shoot clear, sharp images in daylight. With a high ISO setting, you can shoot in dark places. Top menu [MODE MENU] [CAMERA] [ISO] [AUTO] / [80] / [100] / [200] / [400] g"Using the menus" (P. 17) 4 Note • ISO is based on the sensitivity of normal camera film. Changing picture brightness In some situations, you may get better results when the exposure that the camera sets is compensated (adjusted) manually. You can adjust the exposure in the range of ±2.0 EV in 1/3 EV steps. When the exposure is changed, you can check the result on the monitor. Advanced shooting functions 1 Press pq. • Adjust toward [+] to brighten the image or [-] to darken the image. 2 Take the picture. 1/200 F4.0 +2.0 SQ1 1600×1200 4 58
-
 1
1 -
2
-
3
-
4
-
5
-
6
-
7
-
8
-
9
-
10
-
11
-
12
-
13
-
14
-
15
-
16
-
17
-
18
-
19
-
20
-
21
-
22
-
23
-
24
-
25
-
26
-
27
-
28
-
29
-
30
-
31
-
32
-
33
-
34
-
35
-
36
-
37
-
38
-
39
-
40
-
41
-
42
-
43
-
44
-
45
-
46
-
47
-
48
-
49
-
50
-
51
-
52
-
 53
53 -
 54
54 -
 55
55 -
 56
56 -
 57
57 -
 58
58 -
 59
59 -
 60
60 -
 61
61 -
 62
62 -
 63
63 -
64
-
65
-
66
-
67
-
68
-
69
-
70
-
71
-
72
-
73
-
74
-
75
-
76
-
77
-
78
-
79
-
80
-
81
-
82
-
83
-
84
-
85
-
86
-
87
-
88
-
89
-
90
-
91
-
92
-
93
-
94
-
95
-
96
-
97
-
98
-
99
-
100
-
101
-
102
-
103
-
104
-
105
-
106
-
107
-
108
-
109
-
110
-
111
-
112
-
113
-
114
-
115
-
116
-
117
-
118
-
119
-
120
-
121
-
122
-
123
-
124
-
125
-
126
-
127
-
128
-
129
-
130
-
131
-
132
-
133
-
134
-
135
-
136
-
137
-
138
-
139
-
140
-
141
-
142
-
143
-
144
-
145
-
146
-
147
-
148
-
149
-
150
-
151
-
152
-
153
-
154
-
155
-
156
-
157
-
158
-
159
-
160
-
161
-
162
-
163
-
164
-
165
-
166
-
167
-
168
-
169
-
170
-
171
-
172
-
173
-
174
-
175
-
176
-
177
-
178
-
179
-
180
-
181
-
182
-
183
-
184
-
185
-
186
-
187
-
188
-
189
 |
 |
