Onkyo TX-NR3009 Owner Manual - Page 44
Setting the Display Brightness, Displaying Source Information, Changing the Input Display
 |
View all Onkyo TX-NR3009 manuals
Add to My Manuals
Save this manual to your list of manuals |
Page 44 highlights
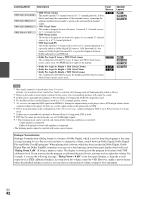
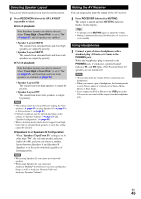
Setting the Display Brightness You can adjust the brightness of the AV receiver's display. 1 Press RECEIVER followed by DIMMER repeatedly to select: • Normal + MASTER VOLUME and input selector indicators light. • Normal + MASTER VOLUME and input selector indicators go off. • Dim + MASTER VOLUME and input selector indicators go off. • Dimmer + MASTER VOLUME and input selector indicators go off. Tip • (North American models) Alternatively, you can use the AV receiver's DIMMER. Changing the Input Display When you connect an V-capable Onkyo component, you must configure the input display so that V can work properly. This setting can be done only from the front panel. 1 Press TV/CD, GAME or VCR/DVR. "TV/CD", "GAME" or "VCR/DVR" appears on the display. 2 Press and hold down TV/CD, GAME or VCR/DVR (about 3 seconds) to change the input display. Repeat this step to select the desired input display. ■ TV/CD: → TV/CD → DOCK TAPE → ■ GAME: GAME ↔ DOCK Displaying Source Information You can display various information about the current input source as follows. (Components connected to the UNIVERSAL PORT jack are excluded.) 1 Press RECEIVER followed by DISPLAY repeatedly to cycle through the available information. Tip • Alternatively, you can use the AV receiver's DISPLAY. The following information can typically be displayed. Input source Listening mode Signal format*1 Sampling frequency Input signal resolution Output resolution *1 If the input signal is PCM, the sampling frequency is displayed. If the input signal is digital but not PCM, the signal format is displayed. Information is displayed for about three seconds, then the previously displayed information reappears. En 44 ■ VCR/DVR: VCR/DVR ↔ DOCK Note • DOCK can be selected for the TV/CD, GAME or VCR/DVR input selector, but not at the same time. • Enter the appropriate remote control code before using the remote controller for the first time (➔ page 79). Using the Whole House Mode The Whole House Mode is useful when you want to add extra background music to your home party; this allows you to enjoy the same stereo music as the main room in separate rooms (Multi Zone: Powered Zone 2/3). The Whole House Mode selects the same input source for Multi Zone as the main room's. See also: • "Speaker Setup" (➔ page 51) • "Multi Zone" (➔ page 72) 1 Press WHOLE HOUSE MODE on the front panel. To cancel the Whole House Mode, change the input source for the main room or select a listening mode (➔ page 36). Note • The Whole House Mode only supports analog audio. • To use the Whole House Mode, Powered Zone 2/3 must be set to enabled (➔ page 51). • Cancelling the Whole House Mode will switch Multi Zone off. • The sound from Powered Zone 2/3 may interrupt when turning the Whole House Mode on or off. • If you change the setting of Multi Zone while using the Whole House Mode, this setting prevails over the Whole House Mode's. • To adjust the volume of Multi Zone, switch the AV receiver to Multi Zone control. See "Adjusting the Volume for Zones" (➔ page 74) for the volume adjustment of Multi Zone. • The Whole House Mode cannot be used while the "Audio TV Out" setting is on.
-
 1
1 -
2
-
3
-
4
-
5
-
6
-
7
-
8
-
9
-
10
-
11
-
12
-
13
-
14
-
15
-
16
-
17
-
18
-
19
-
20
-
21
-
22
-
23
-
24
-
25
-
26
-
27
-
28
-
29
-
30
-
31
-
32
-
33
-
34
-
35
-
36
-
37
-
38
-
 39
39 -
 40
40 -
 41
41 -
 42
42 -
 43
43 -
 44
44 -
 45
45 -
 46
46 -
 47
47 -
 48
48 -
 49
49 -
50
-
51
-
52
-
53
-
54
-
55
-
56
-
57
-
58
-
59
-
60
-
61
-
62
-
63
-
64
-
65
-
66
-
67
-
68
-
69
-
70
-
71
-
72
-
73
-
74
-
75
-
76
-
77
-
78
-
79
-
80
-
81
-
82
-
83
-
84
-
85
-
86
-
87
-
88
-
89
-
90
-
91
-
92
-
93
-
94
-
95
-
96
-
97
-
98
-
99
-
100
-
101
-
102
-
103
-
104
-
105
-
106
-
107
-
108
 |
 |