Onkyo TX-NR3009 Owner Manual - Page 48
Input/Output Assign, Monitor Out, Analog, HDMI Main, HDMI Sub, BothMain, BothSub, Through, 480p/576p - 4k
 |
View all Onkyo TX-NR3009 manuals
Add to My Manuals
Save this manual to your list of manuals |
Page 48 highlights
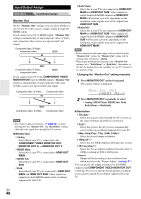
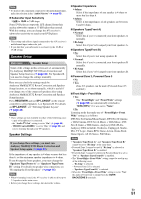
Input/Output Assign Main Menu Input/Output Assign Monitor Out On the "Monitor Out" settings, you can select whether or not to have the video sources' images output through the HDMI output. If you connect your TV to HDMI output, "Monitor Out" setting is automatically set and composite video, S-Video, and component video sources are upconverted* and output. Composite video, S-Video, component video IN HDMI OUT Composite video, S-Video, component video HDMI If you connect your TV to the COMPONENT VIDEO MONITOR OUT (not the HDMI output), "Monitor Out" setting is automatically set and composite video and S-Video sources are upconverted* and output. ` Both(Main): Select this if your TVs are connected to HDMI OUT MAIN and HDMI OUT SUB. Video signals are output from both HDMI outputs but HDMI OUT MAIN will become a priority; depending on the resolution, video signals may not be output from HDMI OUT SUB. ` Both(Sub): Select this if your TVs are connected to HDMI OUT MAIN and HDMI OUT SUB. Video signals are output from both HDMI outputs but HDMI OUT SUB will become a priority; depending on the resolution, video signals may not be output from HDMI OUT MAIN. Note • If not connected to the same output you have selected in the "Monitor Out" setting, the "Monitor Out" setting will be automatically switched to "Analog". • When using the DeepColor function, if the "Monitor Out" setting is set to "Both(Main)" or "Both(Sub)", the number of bits may be limited due to the capability of your TV connected to a priority output. Changing the "Monitor Out" setting manually 1 Press MONITOR OUT on the front panel. The current setting is displayed. Composite video, S-Video Component video IN OUT Composite video, S-Video Component video Note • See "Video Connection Formats" (➔ page 94) for charts showing how the "Monitor Out" and "Resolution" settings affect the video signal flow through the AV receiver. ■ Monitor Out ` Analog: Select this if your TV is connected to the COMPONENT VIDEO MONITOR OUT, MONITOR OUT S, or MONITOR OUT V. `HDMI Main: Select this if your TV is connected to HDMI OUT MAIN. `HDMI Sub: Select this if your TV is connected to HDMI OUT SUB. ` Both: Select this if your TVs are connected to HDMI OUT MAIN and HDMI OUT SUB. Video signals are output from both HDMI outputs at the resolution supported by both TVs. 2 Press MONITOR OUT repeatedly to select: `Analog, HDMI Main, HDMI Sub, Both, Both(Main) or Both(Sub) ■ Resolution ` Through*1: Select this to pass video through the AV receiver at the same resolution and with no conversion. ` Auto*2: Select this to have the AV receiver automatically convert video at resolutions supported by your TV. `480p (480p/576p), 720p, 1080i, 1080p*2: Select the desired output resolution. ` 1080p/24*2*3: Select this for 1080p output at 24 frames per second. ` 4K Upscaling*2*3: Select this for an output resolution four times that of 1080p, resulting in 3840 × 2160 pixels. ` Source: Output will be according to the resolution level which was set in the "Picture Adjust" (➔ page 61). You can specify the output resolution for the HDMI output(s) and COMPONENT VIDEO MONITOR OUT so that the AV receiver upconverts the picture resolution as necessary to match the resolution supported by your TV. En 48
-
 1
1 -
2
-
3
-
4
-
5
-
6
-
7
-
8
-
9
-
10
-
11
-
12
-
13
-
14
-
15
-
16
-
17
-
18
-
19
-
20
-
21
-
22
-
23
-
24
-
25
-
26
-
27
-
28
-
29
-
30
-
31
-
32
-
33
-
34
-
35
-
36
-
37
-
38
-
39
-
40
-
41
-
42
-
 43
43 -
 44
44 -
 45
45 -
 46
46 -
 47
47 -
 48
48 -
 49
49 -
 50
50 -
 51
51 -
 52
52 -
 53
53 -
54
-
55
-
56
-
57
-
58
-
59
-
60
-
61
-
62
-
63
-
64
-
65
-
66
-
67
-
68
-
69
-
70
-
71
-
72
-
73
-
74
-
75
-
76
-
77
-
78
-
79
-
80
-
81
-
82
-
83
-
84
-
85
-
86
-
87
-
88
-
89
-
90
-
91
-
92
-
93
-
94
-
95
-
96
-
97
-
98
-
99
-
100
-
101
-
102
-
103
-
104
-
105
-
106
-
107
-
108
 |
 |
