Panasonic AG-HMC40 User Manual - Page 50
Adjusting the shutter speed, Set the AUTO/MANUAL switch to MANUAL
 |
UPC - 791871304891
View all Panasonic AG-HMC40 manuals
Add to My Manuals
Save this manual to your list of manuals |
Page 50 highlights
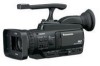
Adjusting the shutter speed 1 Set the AUTO/MANUAL switch to MANUAL to select manual mode. (Page 40) 2 Touch the LCD monitor and display the Function Navi. 3 Touch to display the operation menu. 4 Touch SHTR. • The shutter speed appears at the left of the screen. 5 Touch or to adjust the shutter speed. • As the shutter speed increases, camera sensitivity decreases. • With auto iris control, as the shutter speed increases, the aperture widens and the focal length decreases. • Because the focal time increases at slower shutter speeds, we recommend using a tripod. 6 Touch SHTR to close the operation menu. 7 Touch to close the Function Navi. • With artificial lighting and especially fluorescent lights and mercury-vapor lamps, the luminance changes in synchronization with the power line frequency. When this frequency is 50 Hz, mutual interference will occur between the camera-recorder's vertical sync frequency (approx. 60 Hz) and the lighting frequency (50 Hz). This means that the white balance may change periodically. Before shooting in areas with artificial lighting or adjusting the white balance, set the shutter speed as follows. Progressive mode Shutter speed 50 Hz 60 Hz OFF (60i) 1/100 1/60 30P 1/50 1/60 24P 1/50 1/60 50
-
 1
1 -
2
-
3
-
4
-
5
-
6
-
7
-
8
-
9
-
10
-
11
-
12
-
13
-
14
-
15
-
16
-
17
-
18
-
19
-
20
-
21
-
22
-
23
-
24
-
25
-
26
-
27
-
28
-
29
-
30
-
31
-
32
-
33
-
34
-
35
-
36
-
37
-
38
-
39
-
40
-
41
-
42
-
43
-
44
-
 45
45 -
 46
46 -
 47
47 -
 48
48 -
 49
49 -
 50
50 -
 51
51 -
 52
52 -
 53
53 -
 54
54 -
 55
55 -
56
-
57
-
58
-
59
-
60
-
61
-
62
-
63
-
64
-
65
-
66
-
67
-
68
-
69
-
70
-
71
-
72
-
73
-
74
-
75
-
76
-
77
-
78
-
79
-
80
-
81
-
82
-
83
-
84
-
85
-
86
-
87
-
88
-
89
-
90
-
91
-
92
-
93
-
94
-
95
-
96
-
97
-
98
-
99
-
100
-
101
-
102
-
103
-
104
-
105
-
106
-
107
-
108
-
109
-
110
-
111
-
112
-
113
-
114
-
115
-
116
-
117
-
118
-
119
-
120
-
121
-
122
 |
 |