Panasonic CF-29CRKGZKM Service Manual - Page 19
Disassembly/Reassembly, 7.1. Disassembly Instructions
 |
UPC - 092281833422
View all Panasonic CF-29CRKGZKM manuals
Add to My Manuals
Save this manual to your list of manuals |
Page 19 highlights
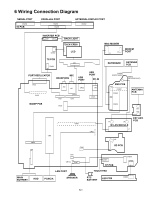
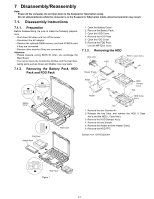
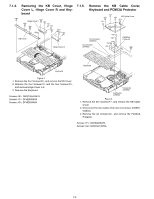
7 Disassembly/Reassembly Note: Power off the computer. Do not shut down to the Suspend or hibernation mode. Do not add peripherals while the computer is in the Suspend or hibernation mode; abnormal operation may result. 7.1. Disassembly Instructions 7.1.1. Preparation Before disassembling, be sure to make the following preparations. • Shut down Windows and turn off the power. • Disconnect the AC adaptor. • Remove the optional DIMM memory card and PCMCIA card if they are connected. • Remove other devices if they are connected. Attention: • Please execute writing BIOS ID when you exchange the Main Board. • You cannot reuse the Conductive Clothes and the heat dissi- pating parts such as Sheet and Rubber. Use new parts. 7.1.2. Removing the Battery Pack, HDD Pack and FDD Pack 1. Open the Battery Cover. 2. Remove the Battery Pack. 3. Open the HDD Cover. 4. Remove the HDD Pack. 5. Open the FDD Cover. 6. Remove the FDD Pack. Use the MP Eject Lever. 7.1.3. Removing the HDD HDD FPC HDD Heater Sheet HDD U Case Ass'y Battery Cover MP Cover FDD Pack Battery Pack HDD Cover Sheet Sheet Heater HDD Damper Ass'y Tab HDD Case Ass'y Tab 1. Remove the four Screws. 2. Release the two Tabs, and remove the HDD U Case Ass'y and the HDD L Case Ass'y. 3. Remove the HDD Damper Ass'y. 4. Remove the two Sheets. 5. Remove the Heater and the Heater Sheet. 6. Remove the HDD FPC. Screws : DFHE5025XA MP RELEASE HDD Pack Figure 1 7-1
-
 1
1 -
2
-
3
-
4
-
5
-
6
-
7
-
8
-
9
-
10
-
11
-
12
-
13
-
 14
14 -
 15
15 -
 16
16 -
 17
17 -
 18
18 -
 19
19 -
 20
20 -
 21
21 -
 22
22 -
 23
23 -
 24
24 -
25
-
26
-
27
-
28
-
29
-
30
-
31
-
32
-
33
-
34
-
35
-
36
-
37
-
38
-
39
-
40
-
41
-
42
-
43
-
44
-
45
-
46
-
47
-
48
-
49
-
50
-
51
-
52
-
53
-
54
-
55
-
56
-
57
-
58
-
59
-
60
-
61
-
62
-
63
-
64
-
65
-
66
-
67
-
68
-
69
-
70
-
71
-
72
-
73
-
74
-
75
-
76
-
77
-
78
-
79
-
80
-
81
-
82
-
83
-
84
-
85
-
86
-
87
-
88
-
89
-
90
-
91
-
92
-
93
-
94
-
95
-
96
-
97
-
98
-
99
-
100
-
101
-
102
-
103
-
104
 |
 |
